React
Redux
[Redux #2] React + Redux
2022/10/12 16:12:17
0
1366
我們進到 Redux 的官網 首頁最下方,會看到官方提供的兩個 Plugin
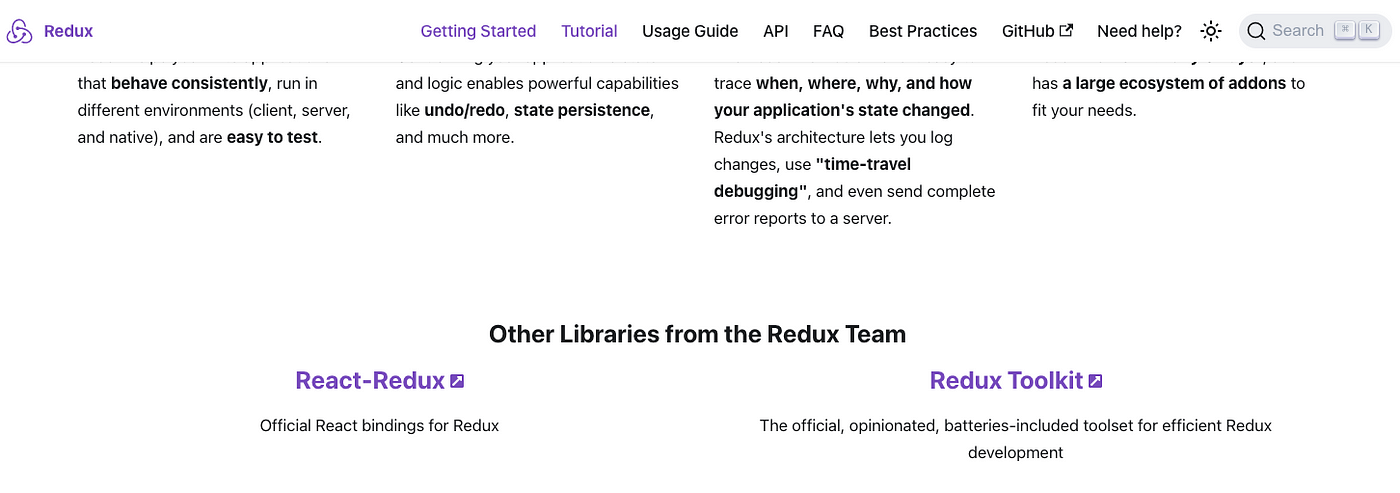
React Redux、Redux Toolkit
兩者都是使用於 React 的套件,底層都是 Redux,差異在於提供的 function 不同
- React Redux:提供 React 跟 Redux 串接的 Function。
- Redux Toolkit:提供建立 Redux 相關架構的 Function。
兩個套件會搭配著使用。
Redux 官網其實有提供一個創建 React 時直接加入 Redux 作為模板的指令。
npx create-react-app redux-essentials-example --template redux
但是!
我們先不使用它,先從手動建立開始,再使用模板會更了解 Redux 的運作。
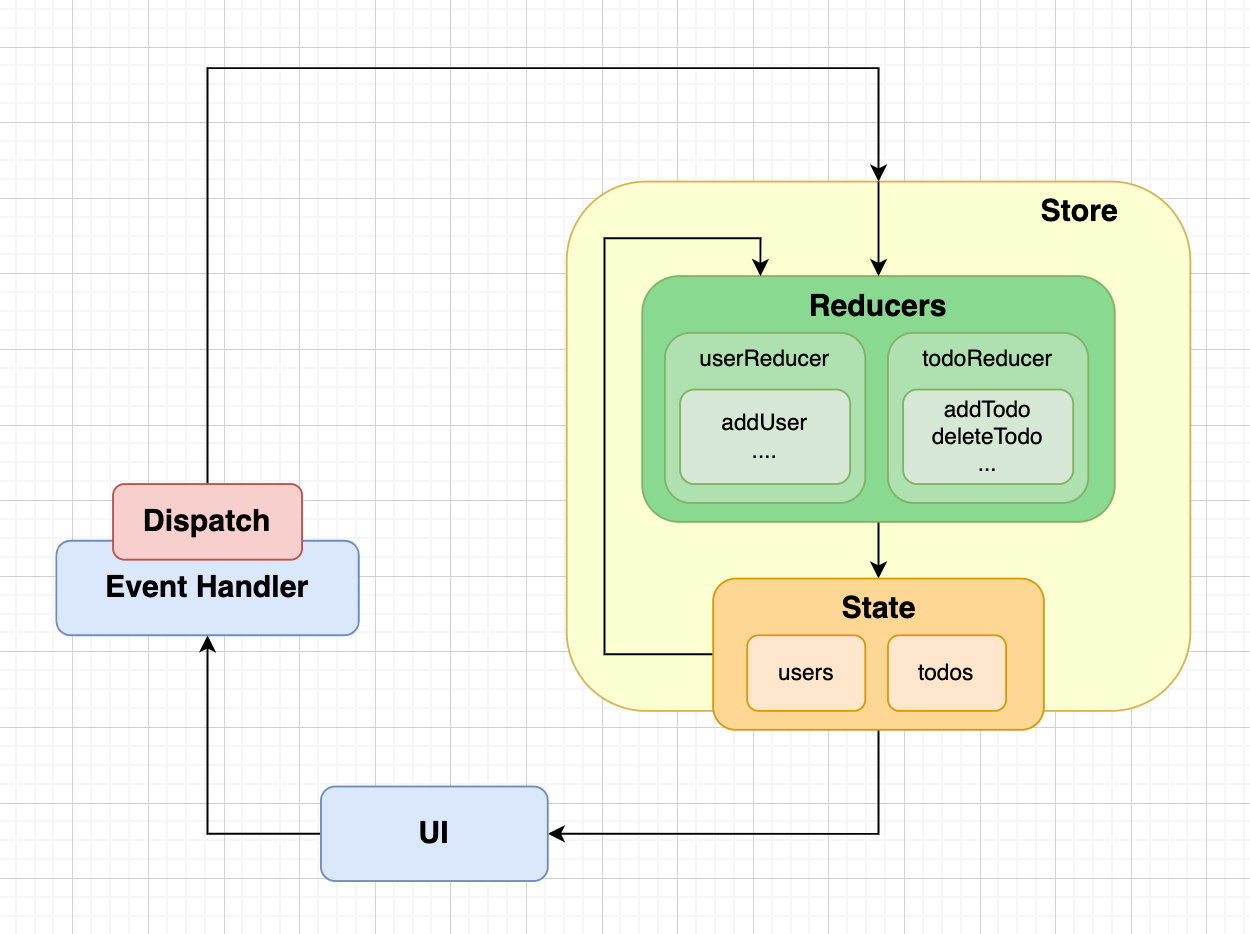
複習 Redux 資料流
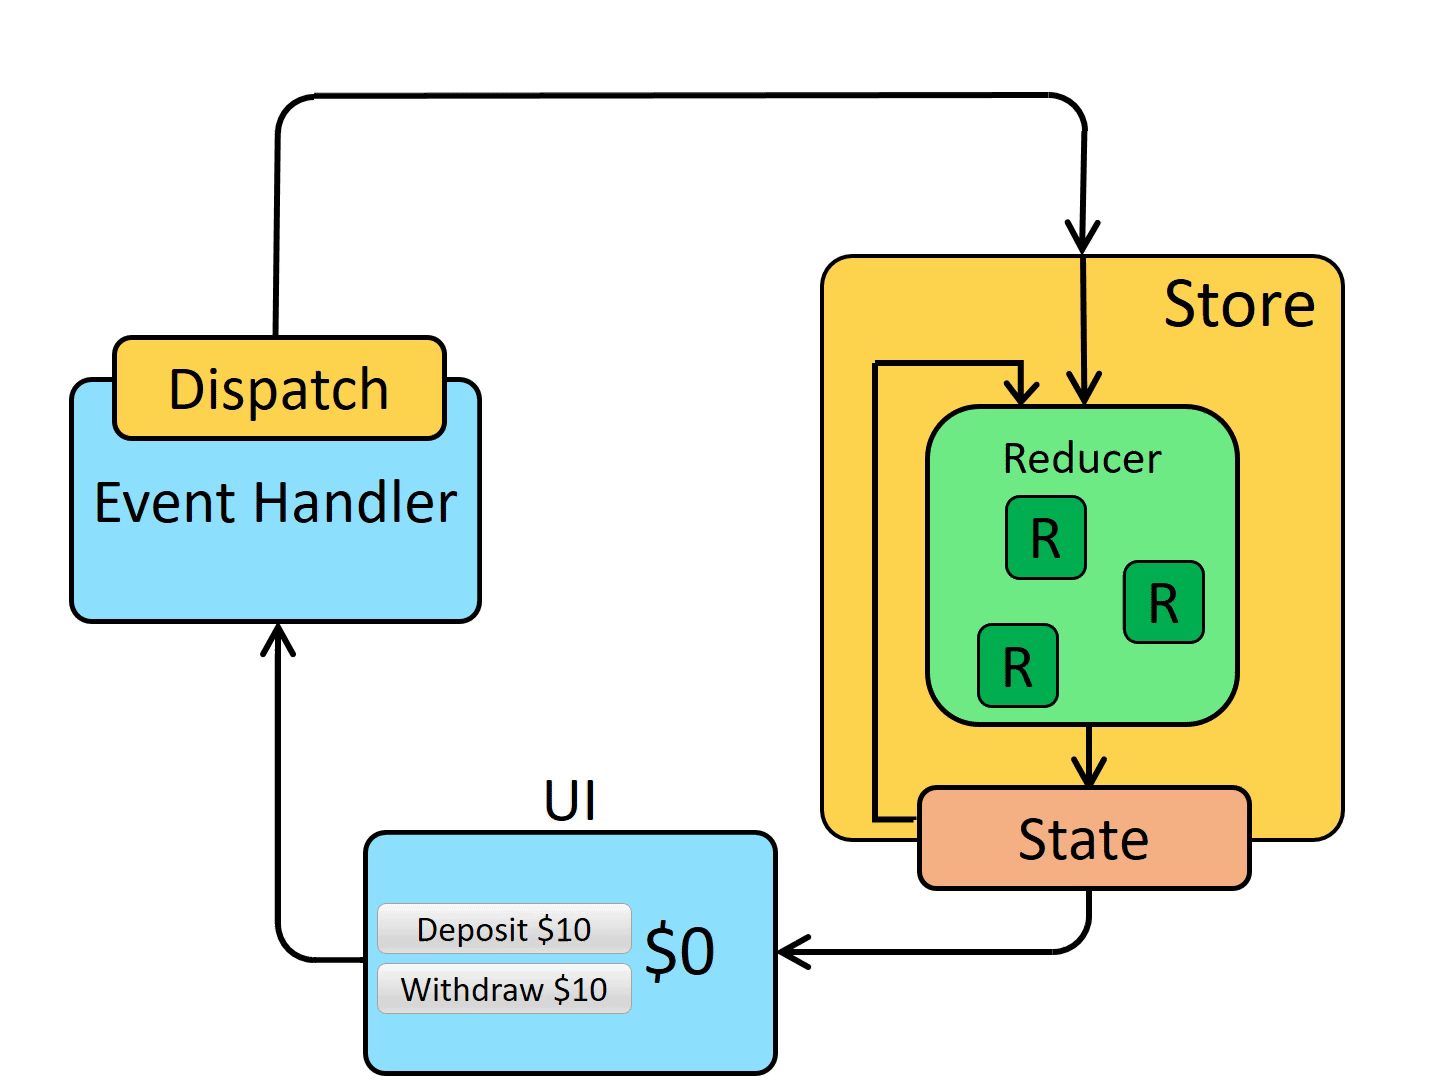
在開始之前,我們先再複習一次這張圖
當使用者點擊按鈕產生了事件,事件會到 Event Handler ,Dispatch 一個 Action 傳送到 Store,經過 Reducer,針對進來的 Action 跟原本的 State 進行處理,處理完後回傳新的 State 再更新到 UI 中。
此次實作會分別建立 user、todo 兩個 State 儲存在 Store 中,以下為實際建立的 Flow
建立流程
- 建立應用程式中唯一的 Store。
- 建立 Store 裡面的多個 State (並給予初始值)和 Reducer。
- State 有了初始值後,就可以先將 State 傳遞至 UI(View),並確認有顯示出資料。
- 針對不同 State 建立 Action。
- Reducer 內建立針對每個 Action 的處理行為。
- 在 UI 中將事件透過 Dispatch,發動對應的 Action 進行處理。
前置作業
- 建立 React 專案
- 安裝 React Redux、Redux Toolkit
# If you use npm:
npm install @reduxjs/toolkit react-redux  # Or if you use Yarn:
yarn add @reduxjs/toolkit react-redux
操作開始
Step1. 建立應用程式中唯一的 Store
- 先建立一個 redux 資料夾 redux 的相關檔案都會放在這裡。
--- 路徑:src/redux
- 建立 Store
--- 路徑:src/redux/store.jsimport { configureStore } from '@reduxjs/toolkit'

export default configureStore({
    reducer: {
        // reducers 會放在這裡
    }
})
Step2. 建立 Store 裡面的多個 State (並給予初始值)和 Reducer。
- State 會放在個別的 Reducer 檔案中結果
路徑:src/redux/reducers/todos.js
let todoId = 2

// state 初始值
const initialState = {
    email: 'test@test.com',
    todos: [{
        id: 1,
        content: '練習做黃金開口笑包',
        isDone: false
    }]
}


/**
 * @description 處理 todos 相關的 reducer
 * @param {object} state 狀態值,會給予一個初始值 initialState
 * @param {object} action 動作
 */
export default function todosReducer(state = initialState, action) {

    // 先不做任何處理,將 state 輸出
    reture state
}
路徑:src/redux/reducers/users.js
// state 初始值
const initialState = {
    users: ['testUser01']
}


/**
 * @description 處理 user 相關的 reducer
 * @param {object} state 狀態值,會給予一個初始值 initialState
 * @param {object} action 動作
 */
export default function usersReducer(state = initialState, action) {

    // 先不做任何處理,將 state 輸出
    reture state
}
- 接著將上方兩個 Reducers 放入 Store 中。
路徑:src/redux/store.js
import { configureStore } from '@reduxjs/toolkit'
import usersReducer from './reducers/users'
import todosReducer from './reducers/todos'

export default configureStore({
    // 可以直接使用 function name 作為屬性名稱 or 給予另外的屬性名稱
    reducer: {
        userState: usersReducer,
        todosReducer
    }
})
Step3. State 有了初始值後,就可以先將 State 傳遞至 UI(View),並確認有顯示出資料。
- 使用 Provider 將 store 傳遞至底下子元件中
路徑:src/index.js
import React from 'react';
import ReactDOM from 'react-dom/client';
import './index.css';
import App from './App';
import reportWebVitals from './reportWebVitals';
import { Provider } from 'react-redux';
import store from './redux/store';

const root = ReactDOM.createRoot(document.getElementById('root'));
root.render(
  // 將 store 傳遞至底下元件中
  <Provider store={store}>
    <App />
  </Provider>
);

// If you want to start measuring performance in your app, pass a function
// to log results (for example: reportWebVitals(console.log))
// or send to an analytics endpoint. Learn more: https://bit.ly/CRA-vitals
reportWebVitals();- 使用 useSelector 取出 state
路徑:src/app.js
import { useSelector } from "react-redux";

export default function App() {

  // 使用 useSelector 取得 state
  const users = useSelector(state => state.userState.users)
  const todos = useSelector(state => state.todosReducer.todos)

  // 使用 map 將資料印出
  return (
    <div>
      <div>
        {
          users.map(item => (<div key={item}>
            {item}
          </div>))
        }
      </div>
      <div>
        {
          todos.map(item => (<div key={item.id}>
            {item.id}. {item.content}
          </div>))
        }
      </div>
    </div>
  );
}
Step4. 針對不同 State 建立 Action。
路徑:src/redux/actions.js
/**
 * @description 新增 todo
 * @param {string} content todo 內容
 * @return {{type: string, payload: {content: string}}} action 物件
 */
export function addTodo(content) {
    return {
        type: 'todos/todoAdded',
        payload: {
            content
        }
    }
}

/**
 * @description 刪除 todo
 * @param {string} id todo id
 * @return {{type: string, payload: {id: string}}} action 物件
 */
export function deleteTodo(id) {
    return {
        type: 'todos/todoDeleted',
        payload: {
            id
        }
    }
}

/**
 * @description 新增使用者
 * @param {string} username 使用者名稱
 * @return {{type: string, payload: {username: string}}} action 物件
 */
export function addUser(username) {
    return {
        type: 'users/userAdded',
        payload: {
            username
        }
    }
}
Step5. Reducer 內建立針對每個 Action 的處理行為。
- 更新 todos.js、users.js
路徑:src/redux/reducers/todos.js
let todoId = 2
// state 初始值
const initialState = {
email: 'test@test.com',
todos: [{
id: 1,
content: '練習做黃金開口笑包',
isDone: false
}]
}
/**
* @description 處理 todos 相關的 reducer
* @param {object} state 狀態值,會給予一個初始值 initialState
* @param {object} action 動作
*/
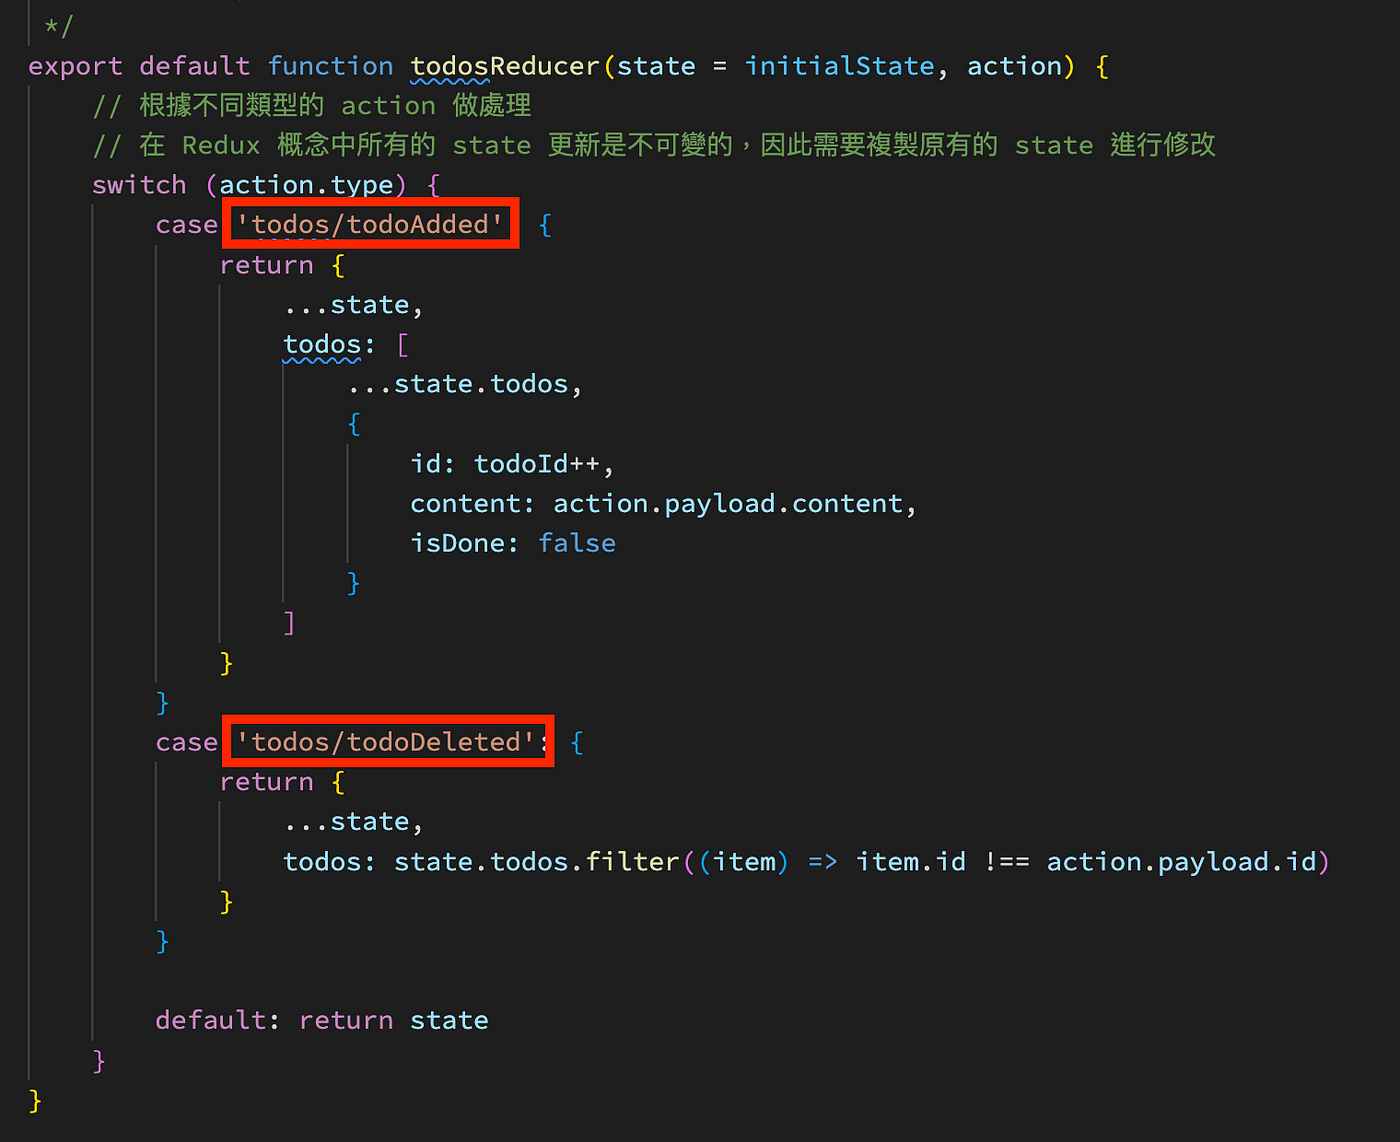
export default function todosReducer(state = initialState, action) {
// 根據不同類型的 action 做處理
// 在 Redux 概念中所有的 state 更新是不可變的,因此需要複製原有的 state 進行修改
switch (action.type) {
case 'todos/todoAdded': {
return {
...state,
todos: [
...state.todos,
{
id: todoId++,
content: action.payload.content,
isDone: false
}
]
}
}
case 'todos/todoDeleted': {
return {
...state,
todos: state.todos.filter((item) => item.id !== action.payload.id)
}
}
default: return state
}
}
路徑:src/redux/reducers/users.js
// state 初始值
const initialState = {
    users: ['testUser01']
}


/**
 * @description 處理 user 相關的 reducer
 * @param {object} state 狀態值,會給予一個初始值 initialState
 * @param {object} action 動作
 */
export default function usersReducer(state = initialState, action) {

    // 根據不同類型的 action 做處理
    switch (action.type) {
        case 'users/userAdded': {
            return {
                users: [
                    ...state.users, // 在 Redux 概念中所有的 state 更新是不可變的,因此需要複製原有的 state 進行修改
                    action.payload.username
                ]
            }
        }
        default: return state
    }
}
Step6. 在 UI(view) 中將事件透過 Dispatch,發動對應的 Action 進行處理。
路徑:src/app.js
import { useDispatch, useSelector } from "react-redux";
import { addTodo, deleteTodo } from "./redux/actions";

export default function App() {
  // 使用 useSelector 取得 state
  const users = useSelector(state => state.userState.users)
  const todos = useSelector(state => state.todosReducer.todos)

  const dispatch = useDispatch()
  const handleDeleteTodo = (id) => {
    // dispatch action
    dispatch(deleteTodo(id))
  }
  const handleAddTodo = () => {
    // dispatch action
    dispatch(addTodo('今天要和謝師傅一較高下!!'))
  }

  return (
    <div>
      <h2>Users</h2>
      <div>
        {
          users.map(item => (<div key={item}>
            {item}
          </div>))
        }
      </div>
      <div>
        <h2>Todos</h2>
        <button onClick={handleAddTodo}>新增</button>
        {
          todos.map(item => (<div key={item.id}>
            {item.id}. {item.content} <button onClick={() => { handleDeleteTodo(item.id) }}>刪除</button>
          </div>))
        }
      </div>
    </div>
  );
}
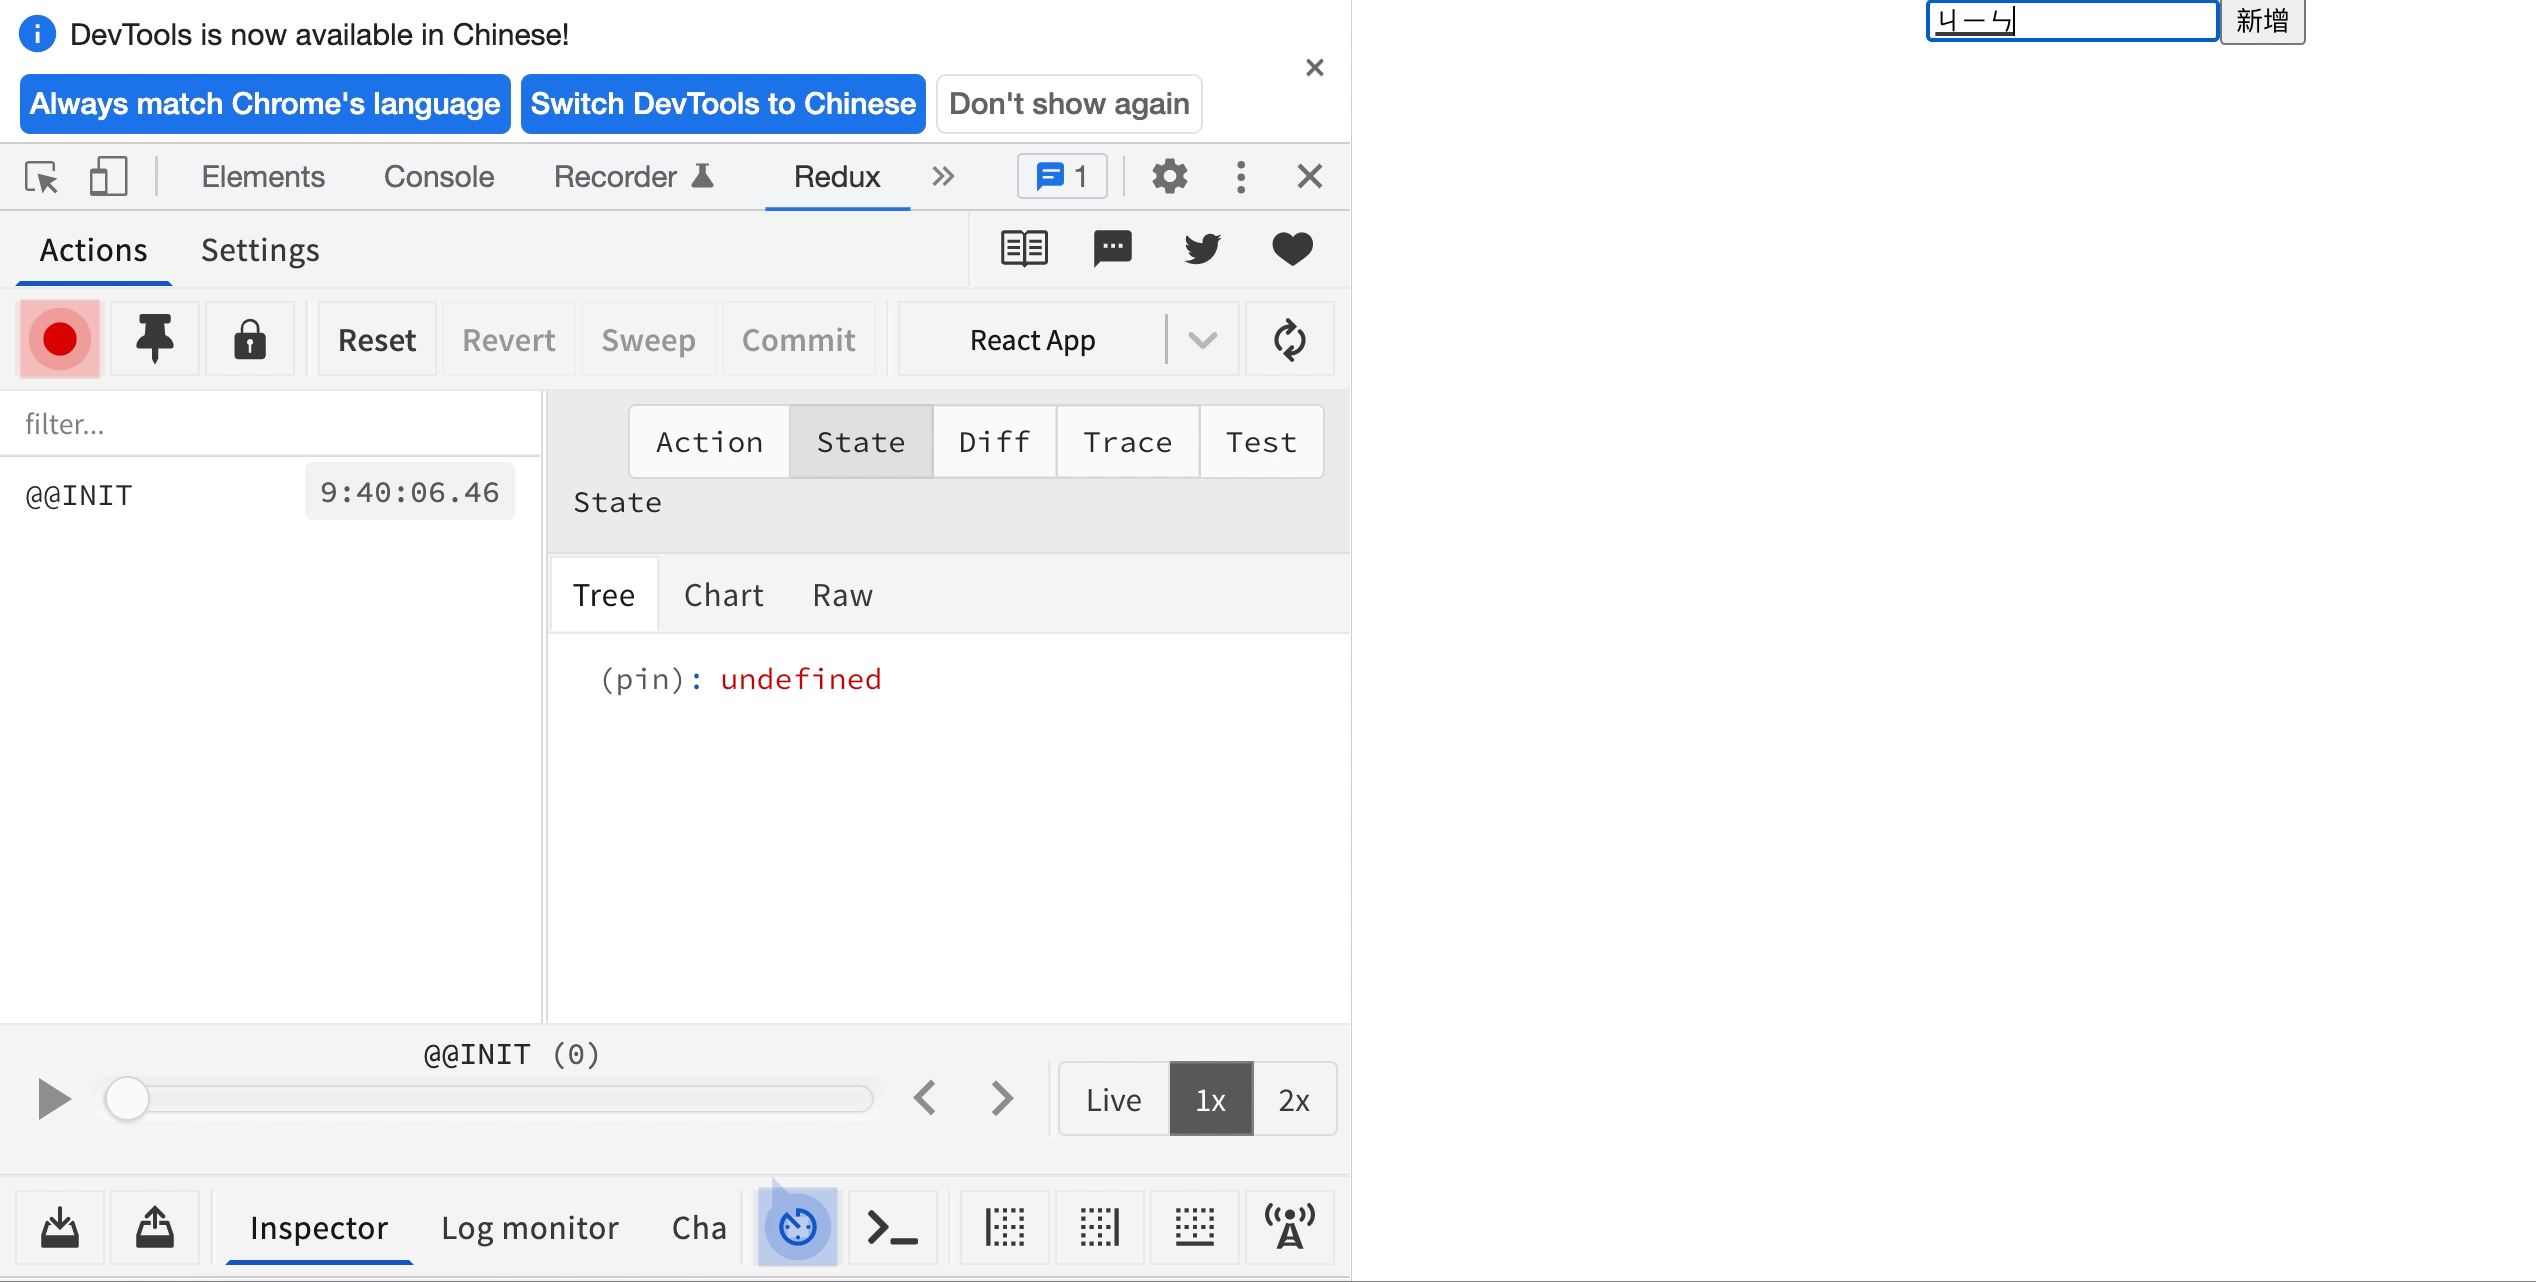
結果
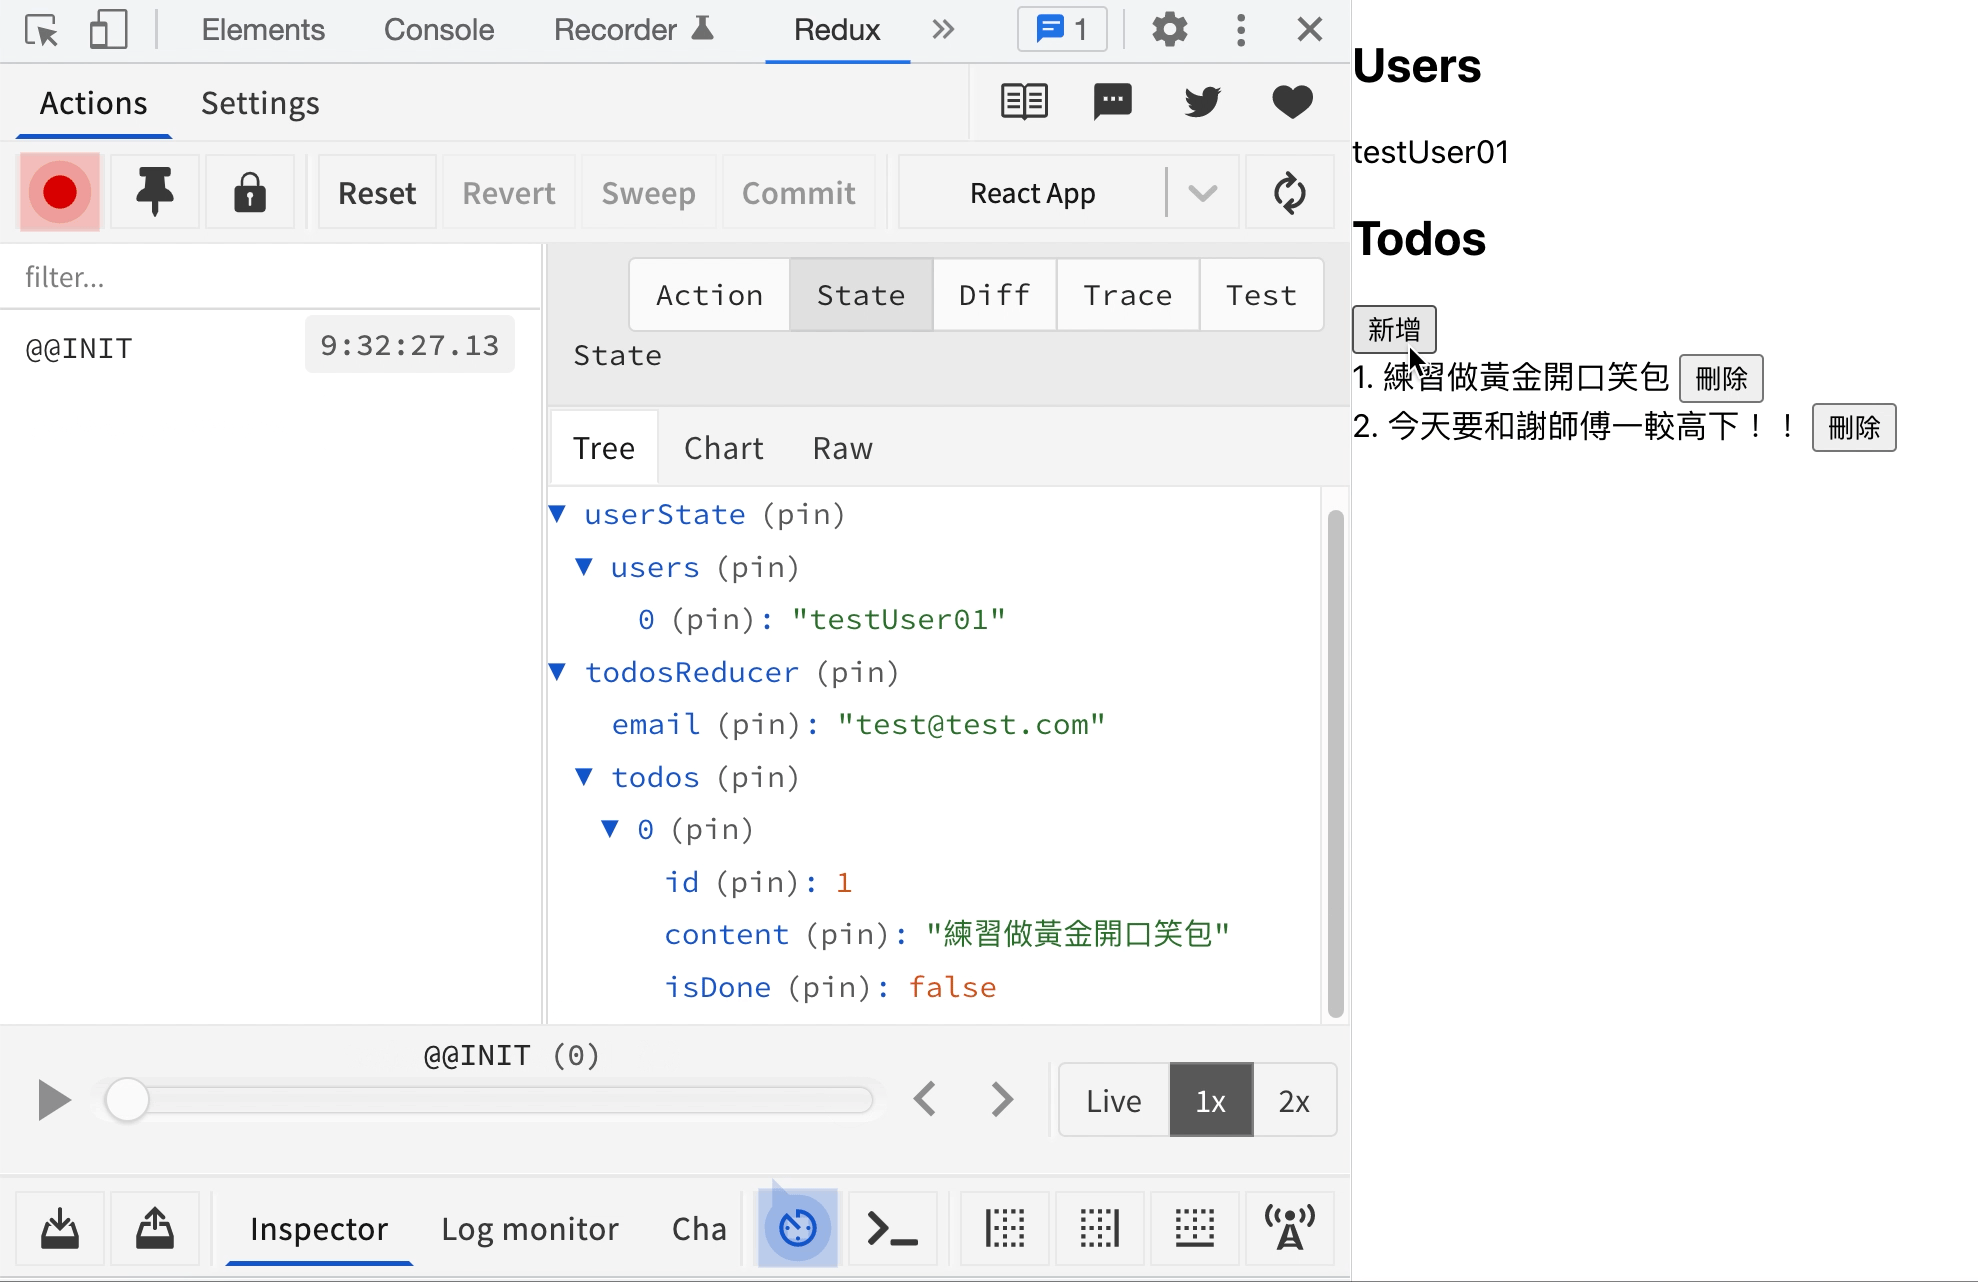
關於 devtools 的工具可以來這裡下載:Redux DevTools
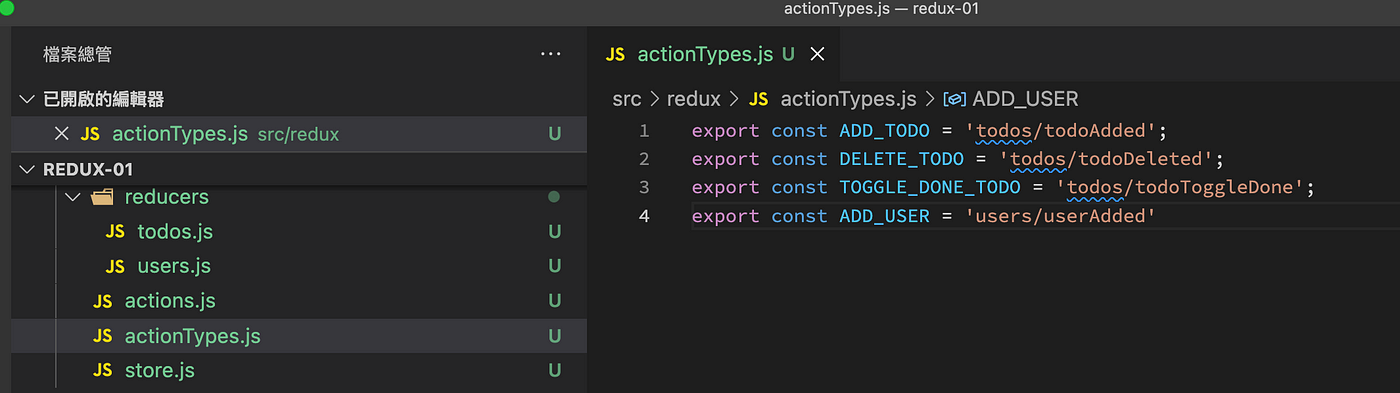
程式碼優化:使用 actionTypes 統一管理 type
我們在 action 以及 reducers 的檔案內都會使用到 action.type 那執行相對應的處理,因此我們可以建立 actionType.js 進行管理,有以下幾點好處:
- 打錯字會報錯
- 可以一目瞭然目前有哪些 action
這樣就完成了 redux 整個流程,程式碼中都有詳細的註解說明,此部分只是簡單的實作,可以再練習練習將 Todo 改成使用 Inut 欄位輸入的方式、新增 toggleIsDone 的 action
下一篇我們可以來使用看看 redux 提供的 template ~
重點筆記
- 「React Redux」提供 React 跟 Redux 串接的 Function;「Redux Toolkit」提供建立 Redux 相關架構的 Function。
- 在 Redux 概念中所有的 state 更新是不可變的,因此需要複製原有的 state 進行修改
- 須設定 state 初始值。
- 使用 「useSelect」取得 State。
- 使用「useDispatch」發出 action 至 reducer 進行處理。
- 使用「actionTypes」統一管理 type。
參考資料

相關文章