以Vue前端語法搭配ASP.NET Core Web API 實作讀取Execl檔案
一、前言
本次實作是透過 Vue.js 為前端語法,透過後端程式 ASP.NET Core 2.1 Web API 來讀取Excel 檔案資料後,將檔案內多個Sheet 內的資料返回顯示到前端頁面上。透過此實作可以學習到Vue 頁面與組件的互動邏輯,及如何與 Web API 連結。
二、環境準備
1.安裝 Node.js ,Node.js 版本建議需為 8.12.0 以上。
2.安裝 Visual Studio Code。
3.Visual Studio Code 安裝擴充功能:ESLint、Vetur、Path Autocomplete。
4.Firefox 或 Chrome 安裝 vue-devtools ,用來 debug。
5.安裝 Visual Studio 2017
6.安裝 ASP.NET Core 2.1
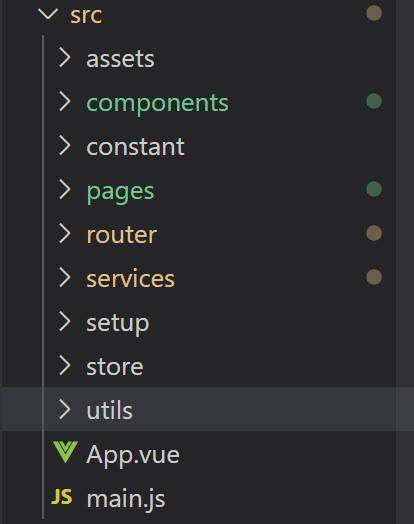
三、本實作 Vue 專案結構
1.src/assets/ – 程式使用到的 全域css、字型、圖片檔案
2.src/components/ – 共用組件
3.src/constant/ – 常數設定
4.src/router/ – 路由設定
5.src/pages – 功能頁面組件
6.src/services/ – 共用邏輯服務,例如:呼叫 API 的服務、共用(商業)邏輯
7.src/setup/ – 全域 plugin、filter、mixin… 設定
8.src/store/ – 全域狀態存放位置
9.src/utils/ – 共用工具,例如:helpr、vee validators、filter…
10.src/App.vue – Vue 主組件
11.main.js - 程式進入點
四、Vue 前端專案實作步驟
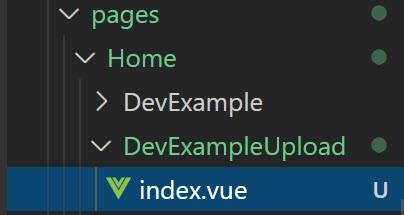
1.新增頁面組件 (Page Component),命名為DevExampleUpload
2.新增路由設定
於 src/router/index.js 載入剛建立的頁面組件。
const DevExampleUpload = () => import(/* webpackChunkName: "dev" */ '../pages/Home/DevExampleUpload/index.vue')
定義路由 URL 及名稱,並設定訪問此頁面組件。將URL名稱設定為devExampleUpload
/* 上傳範例 */
{
  path: 'devExampleUpload',
  name: 'devExampleUpload',
  component: DevExampleUpload
}
3.新增資料表格組件SlTable,用於動態顯示多個Sheet的資料。
範例程式如下:
<template>
<div>
<el-table :data="tableData" border height="300">
<el-table-column v-for="(item,key) in tableData[0]"
:key="key"
:prop="key"
:label="key"></el-table-column>
</el-table>
<br>
</div>
</template>
<script>
export default{
  name: 'SlTable',
  data () {
    return {
    }
  },
  props: ['tableData']
}
</script>
4.新增DevExampleUpload頁面互動設計
於 DevExampleUpload/index.vue 頁面組件的 <template> 區塊中插入 HTML,加入上傳物件及匯入按鈕的組件以及要顯示的資料表格組件。
<template>
  <el-main>
    <el-form>
      <!-- 上傳檔案 -->
      <table cellspacing="0" cellpadding="0" border="0" class="el-table__body table-condition" style="width: 100%;border-color: grey;border :1px solid #AAAAAA;">
        <tbody>
        <tr class="el-table__row">
          <td class="col-title" style="text-align:right;padding: 12px;" >
            <div class="cell">檔案</div>
          </td>
          <td  colspan="6" >
             <div class="cell"  style="  margin-left: 20px" >
               <tp-upload  uploadBtnName="匯入" @upload="uploadTestResult" />
              </div>
          </td>
          </tr>
        </tbody>
      </table>
    </el-form>
   <!-- 顯示資料 -->
    <template v-for="(item,index) in result"  >
       <template>
        <sl-table :tableData="item"  :key="index"  :isExpand="true" :isExpandOnly="true"></sl-table>
      </template>
    </template>
  </el-main>
</template>
於頁面組件的 <script> 區塊中插入組件互動邏輯,以及加入檢查上傳檔案格式邏輯。
<script>
import TpUpload from 'components/TpUpload/index.vue'
import SlTable from '@/components/SlTable'

export default {
  name: 'DevExampleUpload',
  components: {
    TpUpload,
    SlTable
  },
  data () {
    return {
      isShowData: false,
      pageIndex: 1,
      pageSize: 20,
      total: 0,
      tableData: [],
      result: []
    }
  },
  methods: {
    async uploadTestResult (files) {
      var file = files[0].raw
      var isXLS = this.checkFileType(file.name)
      if (isXLS) {
        // 呼叫 Web API
        const res = await this.$api.Example.UploadExcelExample({file})
        const { header: { isSuccess, code, message }, body } = res
        if (isSuccess) {
          // 成功顯示資料
          this.result = body.uploadData
        } else {
          // 失敗顯示訊息
          this.$errorService.handle(code, message)
        }
      } else {
        this.$message.warning('上傳檔案格式需為 Excel xls')
      }
    },
    checkFileType (fileName) {
      // 檢查上傳的檔案類型
      var filename2 = fileName.toLowerCase()
      var extIndex = filename2.lastIndexOf('.')
      if (extIndex !== -1) {
        var fileType = filename2.substr(extIndex + 1, filename2.length)
        if (fileType === 'xls') {
          return true
        } else {
          return false
        }
      }
      return false
    }
  }
}
</script>

<style scoped>
.el-col {
  text-align: center;
  margin-top: 15px;
}
</style>
五、Web API 專案實作步驟
1.建立呼叫API時,所需要的要求Request 與回傳 Response 的資料結構模組
Request Body Model 程式範例如下:
namespace WebAPI.Models.Example
{
    /// <summary>
    /// [REQ] for Upload
    /// </summary>
    public class UpREQ
    {
        /// <summary>
        /// 檔案
        /// </summary>
        [Required]
        public IFormFile File { get; set; }
    }
}
Response Body Modl 程式範例如下:
namespace WebAPI.Models.Example
{
    /// <summary>
    /// [RES] for GetUploadRES
    /// </summary>
    public class GetUploadRES
    {
        /// <summary>
        /// 訊息代碼清單
        /// </summary>
        public List<DataTable> UploadData { get; set; }
    }
}
2.新增將EXCEL文件內的資料轉換為List<DataTable>資料格式方法
程式範例如下:
    /// <summary>
    /// 提供 Excel 相關功能之工具類別
    /// </summary>
    public static class ExcelHelper
    {
        /// <summary>
        /// 將 Excel 文件內的資料轉為 DataTable
        /// </summary>
        /// <param name="ms">Excel Steam</param>
        /// <returns>DataTable資料</returns>
        public static List<DataTable> ReadToList(Stream ms)
        {
            var listdt = new List<DataTable>();
            IWorkbook workbook = new HSSFWorkbook(ms);
            IWorkbook newworkbook = new HSSFWorkbook();
            // sheet
            var getsheetcount = workbook.NumberOfSheets;
            for (var i = 0; i < getsheetcount; i++)
            {
                var dt = new DataTable();
                var sheet = workbook.GetSheetAt(i);
                var sheetRow1 = sheet.GetRow(0);
                var cols = 0;
                if (sheetRow1 != null)
                {
                    for (var col = 0; col < sheetRow1.Cells.Count; col++)
                    {
                        var colnumber = col + 1;
                        dt.Columns.Add("Col" + colnumber.ToString());
                    }

                    cols = sheetRow1.Cells.Count;
                }

                for (var row = 0; row <= sheet.LastRowNum; row++)
                {
                    var sheetRow = sheet.GetRow(row);
                    if (sheetRow != null)
                    {
                        if (sheetRow.Cells.Count > cols)
                        {
                            var addcols = sheetRow.Cells.Count - cols;
                            for (var col = 0; col < addcols; col++)
                            {
                                var colnumber = cols + col + 1;
                                dt.Columns.Add("Col" + colnumber.ToString());
                            }

                            cols = sheetRow.Cells.Count;
                        }

                        // record
                        var dataRow = dt.NewRow();
                        for (var col = 0; col < sheetRow.Cells.Count; col++)
                        {
                            var cell = sheetRow.GetCell(col);
                            if (cell != null)
                            {
                                if (cell.CellType == CellType.Numeric)
                                {
                                    dataRow[col] = sheetRow.GetCell(col).NumericCellValue;
                                }
                                else
                                {
                                    dataRow[col] = sheetRow.GetCell(col).StringCellValue;

                                }
                            }
                            else
                            {
                                dataRow[col] = "";
                            }

                        }

                        dt.Rows.Add(dataRow);

                    }
                }

                listdt.Add(dt);
            }

            return listdt;

        }
    }
3.新增Controller,命名為ExampleController
Controller執行處理API請求資料的取得與回覆資料model建立的作業,範例程式如下:
namespace WebAPI.Controllers
{
    /// <summary>
    /// 測試使用相關模組
    /// </summary>
    [Route("api/[controller]")]
    [ApiController]
    [SwaggerTag("測試模組")]

    public class ExampleController : BaseController
    {
        /// <summary>
        /// 上傳 Excel 檔案範例
        /// </summary>
        /// <param name="req">檔案與相依資訊</param>
        /// <returns> Empty response body </returns>
        [HttpPost("UploadExcelExample")]
        public ActionResult<ResponseBox<GetUploadRES>> UploadExcelExample([FromForm]RequestFileBox<UpREQ> req)
        {
            var res = new GetUploadRES();
            var files = Request.Form.Files;
            var file = req.Body.File;
            if (file.Length > 0)
            {
                using (var stream = file.OpenReadStream())
                {
                    res.UploadData = ExcelHelper.ReadToList(stream);
                }
            }

            return Done(res);
        }
    }
}
六、執行結果
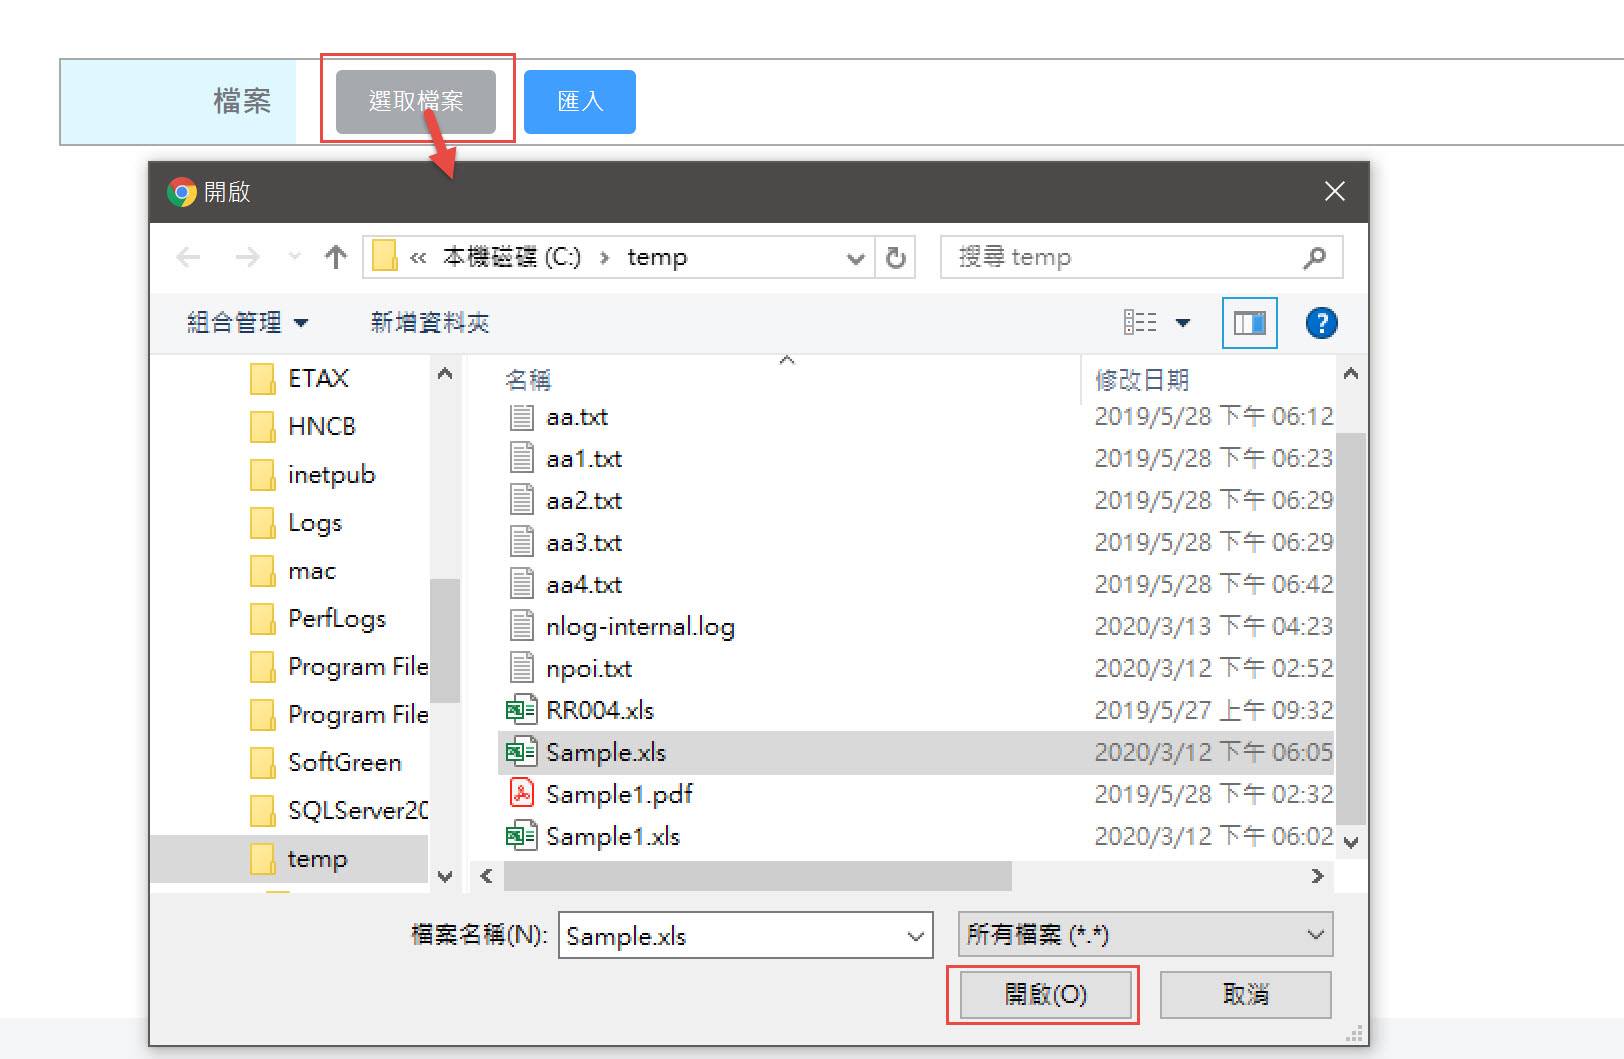
1.瀏覽DevExampleUpload 頁面,顯示選取檔案及匯入兩個按鈕

2.按選取檔案按鈕且選擇EXCEL檔案,瀏覽上傳。
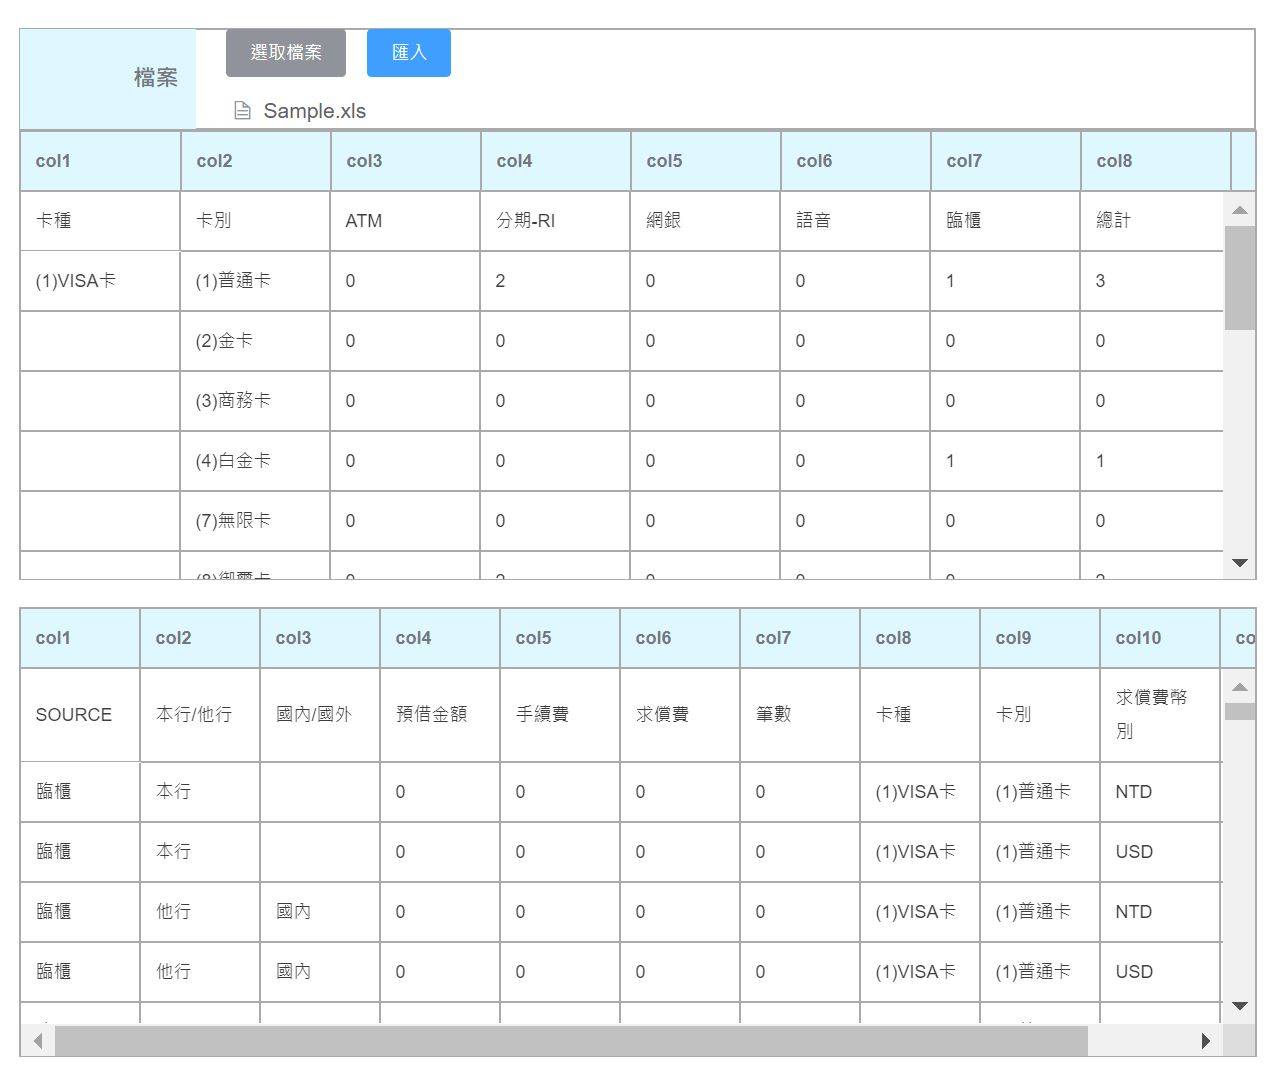
3.上傳成功後,會將EXCEL檔名顯示在畫面上

4.按匯入按鈕,會將EXCEL檔案內的資料,顯示在畫面上。
可以看到下圖顯示兩個資料表,上面顯示的是Shee1的資料,下面顯示的是Sheet2的資料。
七、結語
透過本實作,可以簡單將EXCEL內多個Sheet的資料顯示在畫面上。可學習到 Vue 主組件與子組件互動邏輯,以及了解到 Vue 如何與 Web API 連結。但此實作只針對讀取xls格式的檔案,若是要讀取xlsx格式,則必須修改資料轉換為List<DataTable>的方法。希望對有同樣需求的人能夠有點幫助。
八、參考資料
vue - https://cn.vuejs.org/v2/guide/
vue cheat sheet - https://vuejs-tips.github.io/cheatsheet/
vue-router - https://router.vuejs.org/zh-cn/
.Net Core - https://docs.microsoft.com/zh-tw/dotnet/core/