Activiti整合應用 - 以Spring Boot為例
前言
Activiti是ㄧ套用java開發出來的工作流程引擎(workflow engine),支援JDK 6以上,目前最新的版本為Activiti 7,其每個版本都包含了以下內容:
1.核心API,基本上不會因為版本而大幅改變,僅有優化上的差異。
2.利用核心引擎開發好的功能模組,例如寫好的Web,Restful API,或是ㄧ些功能元件,這部分各版本提供的內容不見得ㄧ樣。
而上述的內容都是open-source (專案連結),因此開發人員在利用Activiti搭建服務時,可以根據自己的需要來修改、取用原始碼並建置自己的服務。本文會就整合Activiti的角度來做介紹,首先會簡介Activiti引擎的主要架構,包括Table Schema與7大核心服務;接著,會建置ㄧ個Spring Boot專案,並用Maven來做管理,逐步整合Activiti到此專案中。
Activiti核心簡介
Activiti引擎與核心API架構如下圖(取自官方使用者說明):
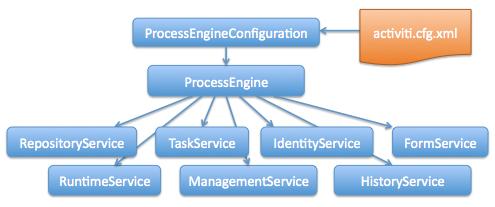
如上圖所示,ProcessEngine為Activiti的核心,要取得各個服務之前,必須先產生ProcessEngine的實例,實作上使用者可以像圖中使用activiti.cfg.xml來產生ProcessEngineConfiguration,再用它來建置ProcessEngine。
activiti.cfg.xml其實就是ㄧ個Spring的配置檔,可以藉由它來透過Spring容器管理Activiti相關的Bean,如果不想用XML檔,使用者亦可以用Java物件的方式來實作配置(這會在後面介紹)。在這邊先請讀者看一個activiti.cfg.xml的簡單範例,藉此了解一下Activiti的基本配置:
<beans xmlns="http://www.springframework.org/schema/beans"
    xmlns:xsi="http://www.w3.org/2001/XMLSchema-instance"
    xsi:schemaLocation="http://www.springframework.org/schema/beans   http://www.springframework.org/schema/beans/spring-beans.xsd">

    <!-- 資料來源bean -->
    <bean id="dataSource" class="org.springframework.jdbc.datasource.SimpleDriverDataSource">
        <property name="url"
            value="jdbc:sqlserver://192.168.99.100:1433;DatabaseName=Activiti_TEST" />
        <property name="driverClass" value="com.microsoft.sqlserver.jdbc.SQLServerDriver" />
        <property name="username" value="sa" />
        <property name="password" value="1qaz2wsx" />
    </bean>

    <!-- 事務管理器bean -->
    <bean id="transactionManager"
        class="org.springframework.jdbc.datasource.DataSourceTransactionManager">
        <property name="dataSource" ref="dataSource" />
    </bean>

    <!-- 流程引擎配置bean -->
    <bean id="processEngineConfiguration"
        class="org.activiti.spring.SpringProcessEngineConfiguration">

        <property name="dataSource" ref="dataSource" />
        <property name="transactionManager" ref="transactionManager"/>
        <property name="databaseSchemaUpdate" value="true" />

        <property name="jobExecutorActivate" value="false" />
        <property name="asyncExecutorEnabled" value="true" />
        <property name="asyncExecutorActivate" value="false" />
    </bean>
</beans> 上述的XML內容,我們可以看到配置了3個Bean:
1. 帶有資料庫連線資訊的Data Source;
2. 利用Data Source產生的Transaction Manager;
3. 由前2者,加上其它需要的屬性配置,組裝產生的ProcessEngineConfiguration。
至此我們可以得知,資料庫是Activiti重要的部分,我們只要有Activiti的Library +資料庫就能搭建出Activiti核心服務,那這邊可能會有一個疑問:
有了資料庫,那Table Schema怎麼辦?
這部分,在官方的提供下載檔案裡是有SQL Script讓我們手動執行的,不過不用這麼麻煩,使用者只要在ProcessEngineConfiguration的設置上,加入databaseSchemaUpdate = true,Activiti就會於啟動時檢查資料庫,並視乎狀況自動在資料庫建立需要的Table了。
註:Activiti有預設了一個In-Memory Database的資料庫H2,如果測試時沒有可用的資料庫,可以改用它,配置方式如下:
	<!-- 資料來源bean -->
	<bean id="dataSource" class="org.springframework.jdbc.datasource.SimpleDriverDataSource">
		<property name="url" value="jdbc:h2:mem:activiti;DB_CLOSE_DELAY=1000" />
		<property name="driverClass" value="org.h2.Driver" />
		<property name="username" value="sa" />
		<property name="password" value="" />
	</bean>
下圖為Activiti自動於資料庫中建立的資料表:
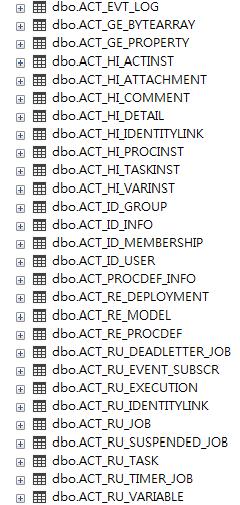
根據Activiti的官方文件,所有Activiti的Table前面都會加上”ACT”的字首,後續都會用底線來分隔單字,根據第2個單字(通常為2個字母組成),可以將這個Table做功能上的分類,以下用表格說明:
| 表格名稱 |
解釋 |
| ACT_RE_* |
RE代表repository,儲存靜態資料,例如:流程圖、流程定義…等等。 |
| ACT_RU_* |
RU代表runtime,儲存起案後,流程的執行時期所產生之資訊,例如:流程實體、關卡實體、流程變數….等等。 這些資訊在流程結束後消失,而必須至歷史檔(ACT_HI_*)查詢。 |
| ACT_HI_* |
HI代表history,儲存過去執行時期的各歷史資訊,例如:流程實體、關卡實體、流程變數…等等。 |
| ACT_ID_* |
ID代表identity,儲存身份認證資訊,例如:使用者、群組…等等。 然而,大部分系統都有自己針對使用者、群組與權限的控管方式,通常不會使用到這些Activiti預設的Table。 |
| ACT_GE_* |
GE代表general,僅有兩個Table: ACT_GE_PROPERTY存放Activiti引擎參數值(例如版本) ACT_GE_BYTEARRAY負責以二進位制形式儲存流程定義檔內容。 |
| ACT_EVT_LOG |
EVT代表event,此分類目前只有一個ACT_EVT_LOG,如果有開啟以下設定,Activiti用此Table來記錄Log: processEngineConfiguration.setEnableDatabaseEventLogging(true) |
| ACT_PROCDEF_INFO |
此分類也是只有一個表,就字面上來看,應該也是跟流程定義檔案有關。 |
在取得ProcessEngine以後,就可以取得Activiti的7個核心服務物件,如下程式碼範例(取自官方文件):
ProcessEngine processEngine = ProcessEngines.getDefaultProcessEngine();

RuntimeService runtimeService = processEngine.getRuntimeService();
RepositoryService repositoryService = processEngine.getRepositoryService();
TaskService taskService = processEngine.getTaskService();
ManagementService managementService = processEngine.getManagementService();
IdentityService identityService = processEngine.getIdentityService();
HistoryService historyService = processEngine.getHistoryService();
FormService formService = processEngine.getFormService();
各服務簡介如下表:
| 服務名稱 |
解釋 |
| RepositoryService |
想要對流程圖的定義檔進行存取,或是流程定義的佈署進行操作時,可使用此服務,就定位上是處理流程引擎中較為靜態的資料。 |
| RuntimeService |
想要利用佈署中的流程定義來產生案件的時候,可以使用此服務執行起案以產生流程實體,同時也能對進行中流程的流程實體、變數與狀態進行查詢與操作。 |
| TaskService |
想要對流程實體中的關卡進行操作時,就會使用到此服務,基本上從待辦關卡的查詢、關卡的指派、關卡的認領以及完成關卡等等的系統動作,都可以藉由此服務來達成。 |
| IdentityService |
如果有使用Activiti預設之身份認證功能,可以用此服務來針對使用者與群組進行管理操作。 |
| FormService |
流程中不同階段可能會與特定的表單內容有關聯,例如起案時有起案用的表單,關卡簽核時也有個自的表單,這些表單的變數內容都可以定義在流程圖檔(bpmn)內,並且利用此服務來傳入表單內容值進行起案與送審。 |
| HistoryService |
所有流程引擎過去蒐集到的資訊都可以透過此服務來查詢,包括已結案與尚未結案的資料。 |
| ManagementService |
可以對流程引擎本身進行管理與查詢的服務,包括取得資料庫metadata的資訊,或是對一些Activiti的棑程功能(像是Timers)進行管理。 |
Activiti整合Spring Boot
接下來將用實際範例,介紹如何整合Activiti到自己專案中,以讓各位有更具體的了解,當然在實作前我們也先訂下一些目標:
1. 範例將會移植官方的Activiti Modeler到專案中,這讓使用者可以透過Web畫面來進行流程圖(bpmn)的繪製;
2. 使用者可以針對已存檔的流程圖進行編輯、刪除與匯出成流程圖檔(bpmn,即xml檔)。
此範例預計使用Spring Boot來建置,開發環境為Eclipse + JDK 1.8,Spring Boot的版本採用2.2.2,Activiti的版本採用5.23.0,展示層模板框架使用Spring Boot推薦的thymeleaf,架構上則是ㄧ般的MVC Web。
一、 創建新Maven專案
開啟Eclipse -> New -> Project -> 選擇Maven Project,按照步驟完成新增。
專案建立好了之後可以先調整一下專案的路徑結構,並先新增一個Spring Boot默認的屬性設定檔,可參考下圖:
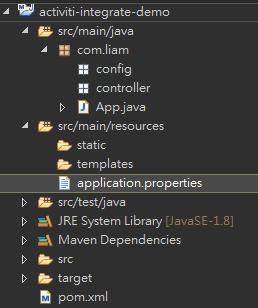
請注意:
1. 確保有src/main/resources路徑
2. application.properties (或application.yml)為Spring Boot標準的屬性配置檔案,默許位置需放在src/main/resources之下。
3. src/main/resources/static為Spring Boot默許任可之靜態資源放置路徑,之後會使用到它。
4. src/main/resources/templates會用來放置thymeleaf的html檔,一樣是Spring Boot默許認可的位置。
二、pom.xml設定
關於pom.xml,我們可以先加入Parent標籤使其繼承spring-boot-starter-parent,這樣後續加入其它依賴(depency)的時候可以減少一些 版本上的對應。根據預想的需求,請先在pom.xml加入以下內容(還未包括Activiti的部分):
<!-- 專案基於Spring Boot 2.2.2建置,繼承此POM,方便整合其他依賴 -->
<parent>
    <groupId>org.springframework.boot</groupId>
    <artifactId>spring-boot-starter-parent</artifactId>
    <version>2.2.2.RELEASE</version>
    <relativePath /> <!-- lookup parent from repository -->
</parent>

<dependencies>
    <!-- Spring Boot Web應用開發相關依賴 -->
    <dependency>
        <groupId>org.springframework.boot</groupId>
        <artifactId>spring-boot-starter-web</artifactId>
    </dependency>
    <!-- 使用 thymeleaf 作為Web MVC 展示層框架 -->
    <dependency>
        <groupId>org.springframework.boot</groupId>
        <artifactId>spring-boot-starter-thymeleaf</artifactId>
    </dependency>
    <!-- Spring Boot應用測試相關依賴 -->
    <dependency>
        <groupId>org.springframework.boot</groupId>
        <artifactId>spring-boot-starter-test</artifactId>
        <scope>test</scope>
    </dependency>
    <!-- 資料庫連線使用之JDBC(可自行調整) -->
    <dependency>
        <groupId>com.microsoft.sqlserver</groupId>
        <artifactId>mssql-jdbc</artifactId>
        <scope>provided</scope>
    </dependency>
    <!-- 前端library -->
    <dependency>
        <groupId>org.webjars</groupId>
        <artifactId>bootstrap</artifactId>
        <version>3.3.7</version>
    </dependency>
    <!-- Maven專案預設引用的junit依賴 -->
    <dependency>
        <groupId>junit</groupId>
        <artifactId>junit</artifactId>
        <!-- <version>3.8.1</version> -->
        <scope>test</scope>
    </dependency>
</dependencies>
三、Activiti整合
在此範例我們預計使用Activiti 5版,因此我們先在pom.xml的Properties標籤中加入Activiti的版本號,如下:
<properties>
    <project.build.sourceEncoding>UTF-8</project.build.sourceEncoding>
    <!-- Java Compile Version -->
    <java.version>1.8</java.version>
    <!-- Activiti Version -->
    <activiti-version>5.23.0</activiti-version>
</properties>
接著加入Activiti核心引擎的相關依賴,如下:
<!-- Activiti核心引擎 -->
<dependency>
    <groupId>org.activiti</groupId>
    <artifactId>activiti-engine</artifactId>
    <version>${activiti-version}</version>
</dependency>
<!-- Activiti整合Spring -->
<dependency>
    <groupId>org.activiti</groupId>
    <artifactId>activiti-spring</artifactId>
    <version>${activiti-version}</version>
</dependency>
接下來,將進行Activiti的配置,我們將利用Spring透過Java物件的方式來完成,以下逐步說明:
1. application.properties加入資料庫連線相關屬性(視乎資料庫環境調整):
activiti.datasource.driver-class-name=com.microsoft.sqlserver.jdbc.SQLServerDriver
activiti.datasource.url=jdbc:sqlserver://192.168.99.100:1433;DatabaseName=Activiti_TEST
activiti.datasource.username=sa
activiti.datasource.password=如果想要用Activiti自帶的H2 資料庫,也可以設定如下:
activiti.datasource.driver-class-name=org.h2.Driver
activiti.datasource.url=jdbc:h2:mem:activiti;DB_CLOSE_DELAY=1000
activiti.datasource.username=sa
activiti.datasource.password=
2. 有別於使用activiti.cfg.xml,本範例將使用java + annotation的方式來配置Actitviti,請於source folder的/config/底下新增一支 java類別,本範例命名為ActivitiConfig.java,內容如下:
package com.liam.config;

import java.sql.Driver;

import javax.sql.DataSource;

import org.activiti.engine.FormService;
import org.activiti.engine.HistoryService;
import org.activiti.engine.IdentityService;
import org.activiti.engine.ManagementService;
import org.activiti.engine.ProcessEngine;
import org.activiti.engine.RepositoryService;
import org.activiti.engine.RuntimeService;
import org.activiti.engine.TaskService;
import org.activiti.engine.impl.cfg.ProcessEngineConfigurationImpl;
import org.activiti.spring.ProcessEngineFactoryBean;
import org.activiti.spring.SpringProcessEngineConfiguration;
import org.springframework.beans.factory.annotation.Value;
import org.springframework.context.annotation.Bean;
import org.springframework.context.annotation.Configuration;
import org.springframework.jdbc.datasource.DataSourceTransactionManager;
import org.springframework.jdbc.datasource.SimpleDriverDataSource;
import org.springframework.transaction.PlatformTransactionManager;

@Configuration
public class ActivitiConfig {

    @Value ("${activiti.datasource.url}")
    private String url;

    @Value("${activiti.datasource.username}")
    private String username;

    @Value("${activiti.datasource.password}")
    private String password;

    @Value("${activiti.datasource.driver-class-name}")
    private String driverClassName;

    /**
     * 配置Activiti Data Source
     * @throws ClassNotFoundException
     */
    @SuppressWarnings("unchecked")
    @Bean
    public DataSource activitiDataSource() throws ClassNotFoundException {
        SimpleDriverDataSource dataSource = new SimpleDriverDataSource();
        dataSource.setUrl(url);
        dataSource.setDriverClass((Class<? extends Driver>) Class.forName(driverClassName));
        dataSource.setUsername(username);
        dataSource.setPassword(password);
        return dataSource;
    }

    /**
     * 配置Transaction Manager
     * @throws ClassNotFoundException
     */
    @Bean
    public PlatformTransactionManager transactionManager() throws ClassNotFoundException {
        return new DataSourceTransactionManager(activitiDataSource());
    }

    /**
     * 配置並產生流程引擎設置實例
     * @throws ClassNotFoundException
     */
    @Bean
    public ProcessEngineConfigurationImpl processEngineConfiguration() throws ClassNotFoundException {
        SpringProcessEngineConfiguration processEngineConfiguration = new SpringProcessEngineConfiguration();
        processEngineConfiguration.setDataSource(activitiDataSource());
        processEngineConfiguration.setDatabaseSchemaUpdate("true");
        processEngineConfiguration.setTransactionManager(transactionManager());
        processEngineConfiguration.setJobExecutorActivate(false); // Activiti 5
        // processEngineConfiguration.setAsyncExecutorActivate(true); //Activiti 6
        processEngineConfiguration.setAsyncExecutorEnabled(true); // Activiti 5
        processEngineConfiguration.setAsyncExecutorActivate(true);
        processEngineConfiguration.setHistory("full");

        return processEngineConfiguration;
    }

    /**
     * 利用流程引擎設置實例產生流程引擎FactoryBean
     * @throws ClassNotFoundException
     */
    @Bean
    public ProcessEngineFactoryBean processEngineFactoryBean() throws ClassNotFoundException {
        ProcessEngineFactoryBean processEngineFactoryBean = new ProcessEngineFactoryBean();
        processEngineFactoryBean.setProcessEngineConfiguration(processEngineConfiguration());
        return processEngineFactoryBean;
    }

    /**
     * 取得ProcessEngine
     */
    @Bean
    public ProcessEngine processEngine() {

        try {
            return processEngineFactoryBean().getObject();
        } catch (Exception e) {
            throw new RuntimeException(e);
        }
    }

    @Bean
    public RepositoryService repositoryService() {
        return processEngine().getRepositoryService();
    }

    @Bean
    public RuntimeService runtimeService() {
        return processEngine().getRuntimeService();
    }

    @Bean
    public TaskService taskService() {
        return processEngine().getTaskService();
    }

    @Bean
    public HistoryService historyService() {
        return processEngine().getHistoryService();
    }

    @Bean
    public FormService formService() {
        return processEngine().getFormService();
    }

    @Bean
    public IdentityService identityService() {
        return processEngine().getIdentityService();
    }

    @Bean
    public ManagementService managementService() {
        return processEngine().getManagementService();
    }
} 上述程式碼中透過@Value取得application.properties內的資訊,並依序設置了相關的物件直到取得ProcessEngine,最後由ProcessEngine取得Activiti的7大服務且全部都交由Spring控管,未來只要透過注入就能使用它們。
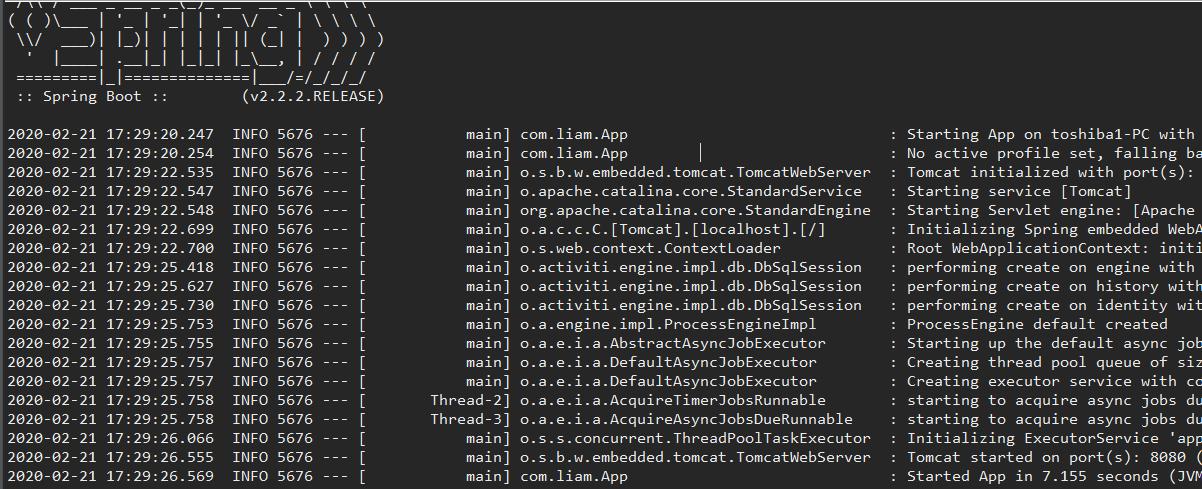
到目前為止我們已經達成基本的整合了,雖然尚無任何功能,但還是來啟動看看吧~
請找到含有程式進入點(main方法)的java類別,在新增專案時應該就有預設一支App.java了,找到它之後請幫它加上@SpringBootApplication並調整main方法(如不想執行Spring Security相關的配置就把它exclude掉),參考如下:
package com.liam;

import org.springframework.boot.SpringApplication;
import org.springframework.boot.autoconfigure.SpringBootApplication;
import org.springframework.boot.autoconfigure.security.servlet.SecurityAutoConfiguration;

@SpringBootApplication(exclude = {
        SecurityAutoConfiguration.class
        })
public class App
{
    public static void main( String[] args )
    {
        SpringApplication.run(App.class, args);
    }
} 執行main方法,如果能順利啟動沒有出錯,就代表配置就OK了,如果一開始設定給它的資料庫是尚未建立Activiti資料表的話,於啟動完成後可以去看看是不是都自動建立起來了。
Activiti整合應用實例
此部份要來介紹幾個可以做的應用,以供各位參考:
1. 將官方做好的Activiti Modeler移植進來,讓使用者可以於Web畫面繪製流程圖。
2. 編輯、刪除與下載流程圖。
一、Activiti Modeler
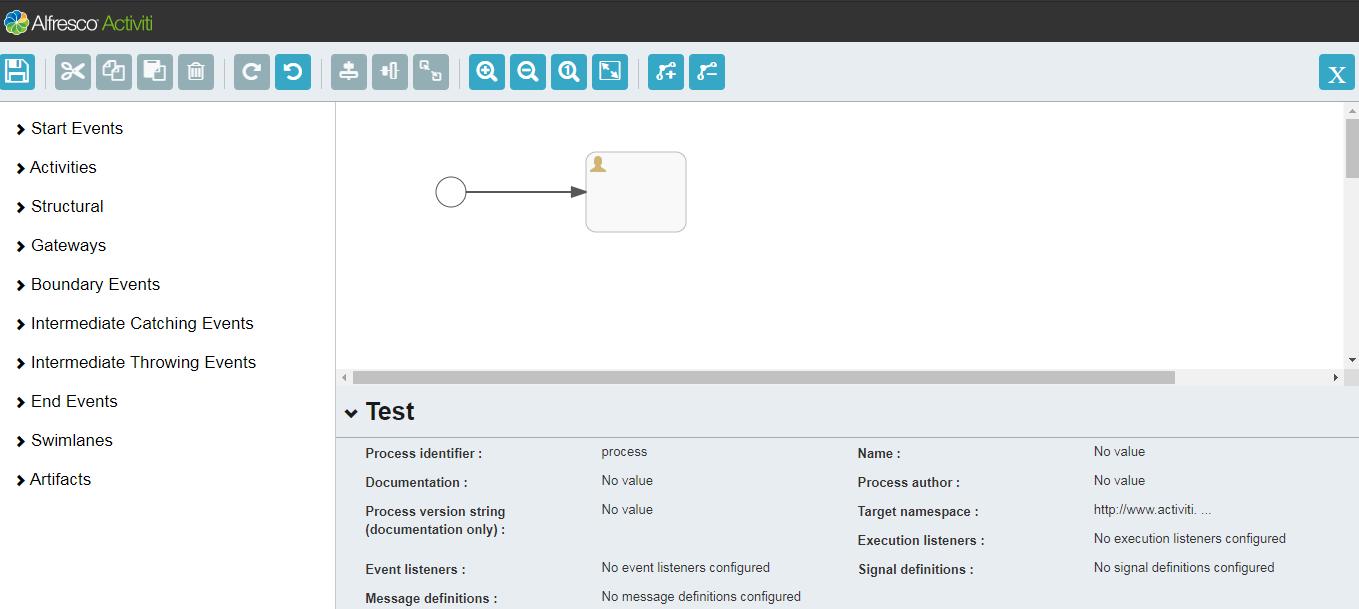
Activiti Modeler是官方寫好的功能,讓使用者可以透過Web介面來繪製Activiti的流程圖檔(bpmn,內容xml),自Activiti 5版就已經使用在官方提供的Web應用內,Activiti 5的時候叫做Activiti-Explorer,Activiti 6則改版為Activiti-App,下面為Activiti Modeler的功能畫面:
如果想要移植此畫面功能到自己的專案,我們需要先取得Activiti 5的原始碼,請至Activiti 5的GitHub (https://github.com/Activiti/Activiti/tree/5.x)將原始碼clone下來。接下來針對需要的幾個步驟一一說明:
A.靜態資源與前端程式碼
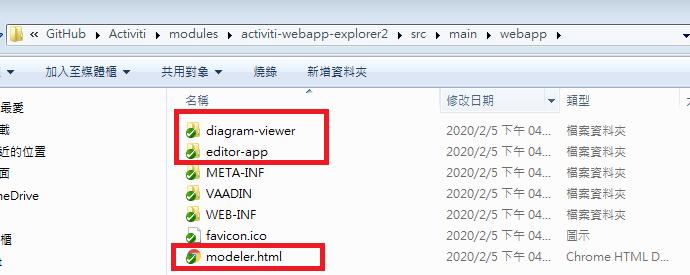
程式碼clone下來後,請先找到路徑Activiti\modules\activiti-webapp-explorer2\src\main\webapp,並在該路徑找到以下3個資源:
1. diagram-viewer資料夾
2. editor-app資料夾
3. modeler.html
如下圖:
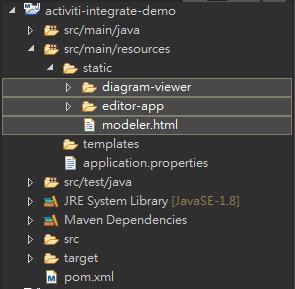
請將上述資源,複製到專案resources目錄的/static/底下,如下圖:
回到Activiti原始碼,至Activiti\modules\activiti-webapp-explorer2\src\main\resources找stencilset.json檔,如下顯示:
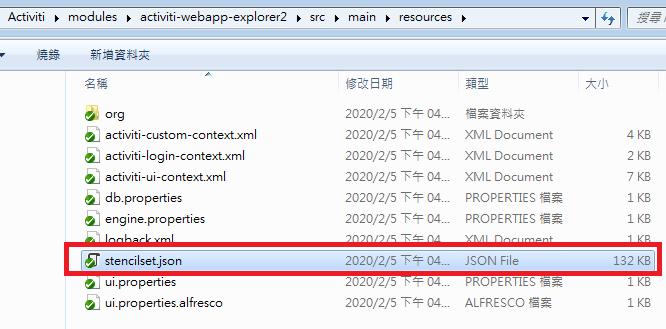
此檔案是Activiti Modeler的文字資源,基本上可以定義不同語系的內容來套用至UI上,目前官方是只有提供英文版本的,請將它放置到resources目錄底下,如下圖:

B.畫面功能後端程式
以上Activiti Modeler前端與靜態資源處理好之後,接著要處理對應後端程式的整合,首先打開Activiti原始碼至以下路徑
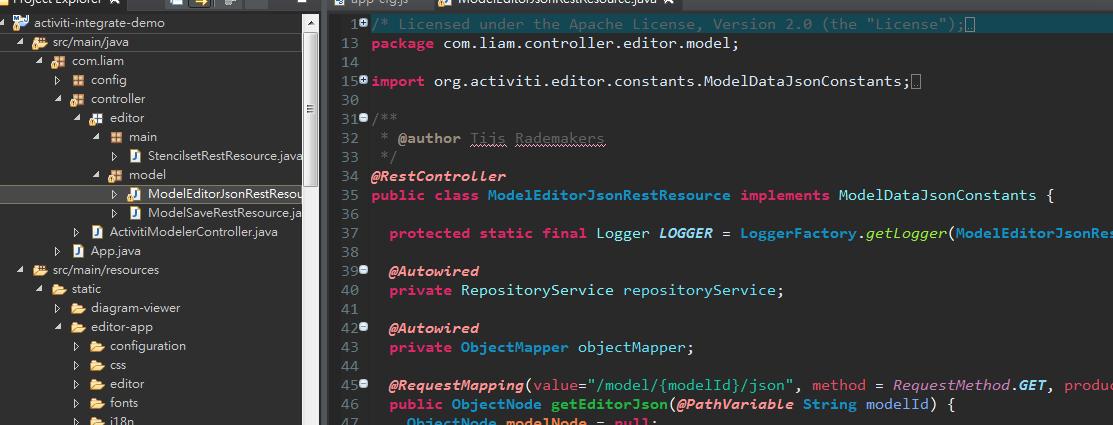
Activiti\modules\activiti-modeler\src\main\java\org\activiti\rest\editor,以此目錄為根可以往下找到三支java類別:
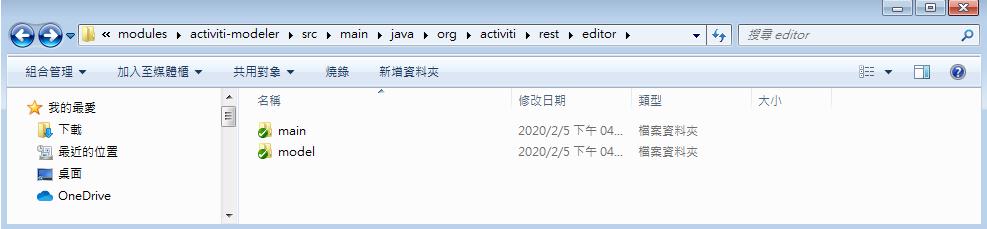
..\main\StencilsetRestResource.java,此類別處理讀取stencilset.json的事務,
..\model\ModelEditorJsonRestResource.java、
..\model\ModelSaveRestResource.java,
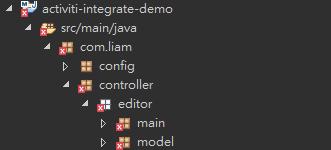
上2類別為Activiti Modeler畫面功能的後端API接口,如果開啟程式碼來看,此2支類別都有用@Autowired來注入Activiti的RepositoryService,有鑑於我們在上節的設置(ActivitiConfig)已經將Activiti的7大服務都交由Spring來控管了,因此這邊不需做調整程式碼,請直接把這3支程式放到我們的專案底下吧,個人做法是把整個editor目錄移植到controller底下,如下圖:
想當然爾,剛放進來時一定會有一些error,先調整package吧~
調整完後會發現還是少了一些函數庫,此時請到pom.xml加入以下依賴即可:
<!-- Activiti modeler -->
<dependency>
    <groupId>org.activiti</groupId>
    <artifactId>activiti-modeler</artifactId>
    <version>${activiti-version}</version>
</dependency>

<dependency>
    <groupId>org.apache.commons</groupId>
    <artifactId>commons-io</artifactId>
    <version>1.3.2</version>
</dependency>
加入之後重整專案, error應該都不見了囉~
C.前後端路徑Mapping
放置到自己專案的Activiti Modeler之前端資源裡,自以下路徑可以找到app-cfg.js:
/static/editor-app/app-cfg.js,如下圖:
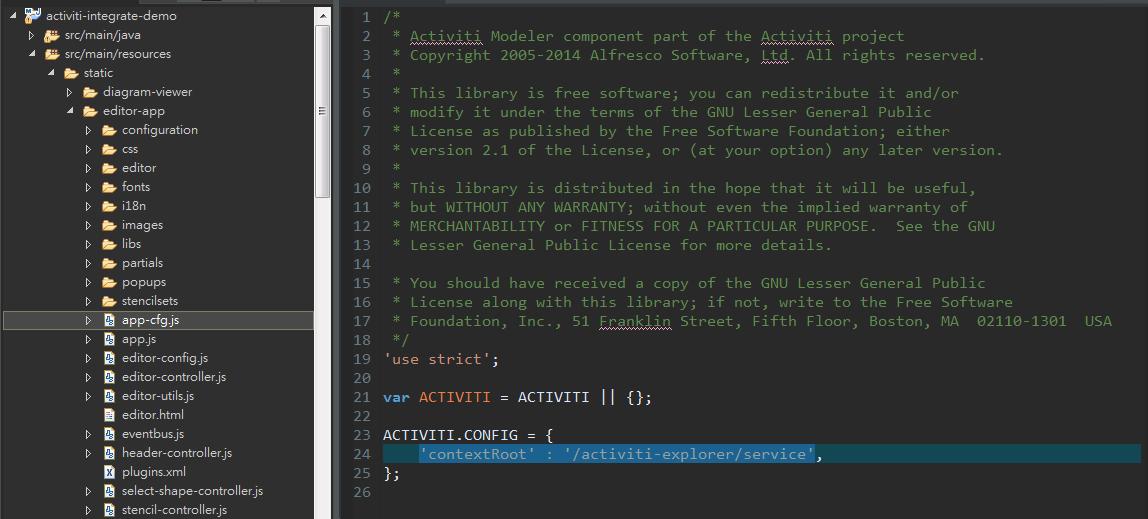
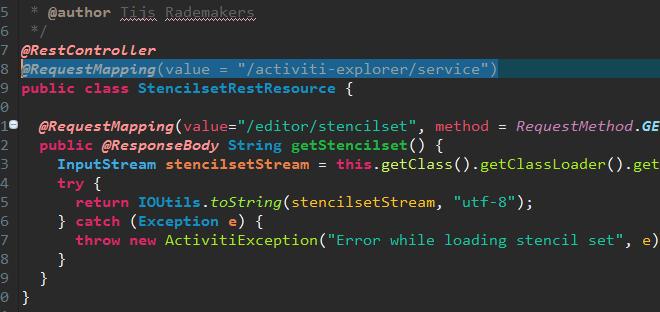
如圖反白處所示,這邊定義了一個根路徑,即前端畫面向後端發出的request的時候,會帶有/activiti-explorer/service/這樣的前綴,這邊我們必須讓前後端可以對應,如果不想要修改app-cfg.js,那我們只要在StencilsetRestResource.java、ModelEditorJsonRestResource.java與ModelSaveRestResource.java的類別名稱上加入以下annotation就可以了:
@RequestMapping(value = "/activiti-explorer/service")
如下圖:
D.調整Model儲存方法
ModelSaveRestResource.java的saveModel方法為Activiti Modeler中儲存按鈕的對應後端處理功能,然而直接使用會有問題,必須調整方法的傳入參數與內容,原方法宣告如下:
public void saveModel(@PathVariable String modelId, @RequestBody MultiValueMap<String, String> values) { 必須把移除Map型態的參數,將內容拆開來寫,調整如下:
@RequestMapping(value="/model/{modelId}/save", method = RequestMethod.PUT)
@ResponseStatus(value = HttpStatus.OK)
public void saveModel(@PathVariable String modelId, String name, String description, String json_xml, String svg_xml) {
  try {

    Model model = repositoryService.getModel(modelId);

    ObjectNode modelJson = (ObjectNode) objectMapper.readTree(model.getMetaInfo());

    modelJson.put(MODEL_NAME, name);
    modelJson.put(MODEL_DESCRIPTION, description);
    model.setMetaInfo(modelJson.toString());
    model.setName(name);

    repositoryService.saveModel(model);

    repositoryService.addModelEditorSource(model.getId(), json_xml.getBytes("utf-8"));

    InputStream svgStream = new ByteArrayInputStream(svg_xml.getBytes("utf-8"));
    TranscoderInput input = new TranscoderInput(svgStream);

    PNGTranscoder transcoder = new PNGTranscoder();
    // Setup output
    ByteArrayOutputStream outStream = new ByteArrayOutputStream();
    TranscoderOutput output = new TranscoderOutput(outStream);

    // Do the transformation
    transcoder.transcode(input, output);
    final byte[] result = outStream.toByteArray();
    repositoryService.addModelEditorSourceExtra(model.getId(), result);
    outStream.close();

  } catch (Exception e) {
    LOGGER.error("Error saving model", e);
    throw new ActivitiException("Error saving model", e);
  }
}
E.功能畫面進入點
最後我們需要為Activiti Modeler準備一個URL做為功能的進入點,請在/controller/底下自行增加一支java類別,本範例命名為ActivitiModelController,如下圖:

程式碼如下參考內容,主要功能是新增ㄧ個預設的Model資料與對應的空白流程圖檔,並轉頁至Activiti Modeler頁面:
package com.liam.controller;

import java.io.IOException;
import java.io.UnsupportedEncodingException;

import javax.servlet.http.HttpServletRequest;
import javax.servlet.http.HttpServletResponse;

import org.activiti.editor.constants.ModelDataJsonConstants;
import org.activiti.engine.RepositoryService;
import org.activiti.engine.repository.Model;
import org.springframework.beans.factory.annotation.Autowired;
import org.springframework.web.bind.annotation.RequestMapping;
import org.springframework.web.bind.annotation.RestController;

import com.fasterxml.jackson.databind.ObjectMapper;
import com.fasterxml.jackson.databind.node.ObjectNode;

@RestController
@RequestMapping("/model/")
public class ActivitiModelController {
    @Autowired
    private RepositoryService repositoryService;

    /**
     * Activiti Modeler功能畫面進入點,進入時同時新增空白Model
     * @param request
     * @param response
     */
    @RequestMapping("/new")
    public void createModel(HttpServletRequest request, HttpServletResponse response) {
        String defaultModelName = "ModelName"; //Model初始化預設名稱
        ObjectMapper objectMapper = new ObjectMapper();

        try {
            // 初始化Model
            Model modelData = repositoryService.newModel();
            ObjectNode modelObjectNode = objectMapper.createObjectNode();
            modelObjectNode.put(ModelDataJsonConstants.MODEL_NAME, defaultModelName);
            modelObjectNode.put(ModelDataJsonConstants.MODEL_REVISION, 1);
            modelObjectNode.put(ModelDataJsonConstants.MODEL_DESCRIPTION, "description");
            modelData.setMetaInfo(modelObjectNode.toString());
            modelData.setName(defaultModelName);

            // 將Model資訊到ACT_RE_MODEL,取得Model ID
            repositoryService.saveModel(modelData);

            // 初始化Model對應之流程圖資訊(空白)
            ObjectNode editorNode = objectMapper.createObjectNode();
            ObjectNode stencilSetNode = objectMapper.createObjectNode();
            stencilSetNode.put("namespace", "http://b3mn.org/stencilset/bpmn2.0#");
            editorNode.put("id", "canvas");
            editorNode.put("resourceId", "canvas");
            editorNode.set("stencilset", stencilSetNode);

            // 將流程圖資訊存入ACT_GE_BYTEARRAY
            repositoryService.addModelEditorSource(modelData.getId(), editorNode.toString().getBytes("utf-8"));

            // 進入Activiti Modeler功能畫面
            response.sendRedirect(request.getContextPath() + "/modeler.html?modelId=" + modelData.getId());
        } catch (UnsupportedEncodingException e) {
            // TODO Auto-generated catch block
            e.printStackTrace();
        } catch (IOException e) {
            // TODO Auto-generated catch block
            e.printStackTrace();
        }
    }
} 新增完之後就可以透過URL開啟Activiti Modeler畫面囉!
請啟動專案,並在瀏覽器輸入以下URL: localhost:8080/model/new
便會開啟畫面,顯示如下圖:
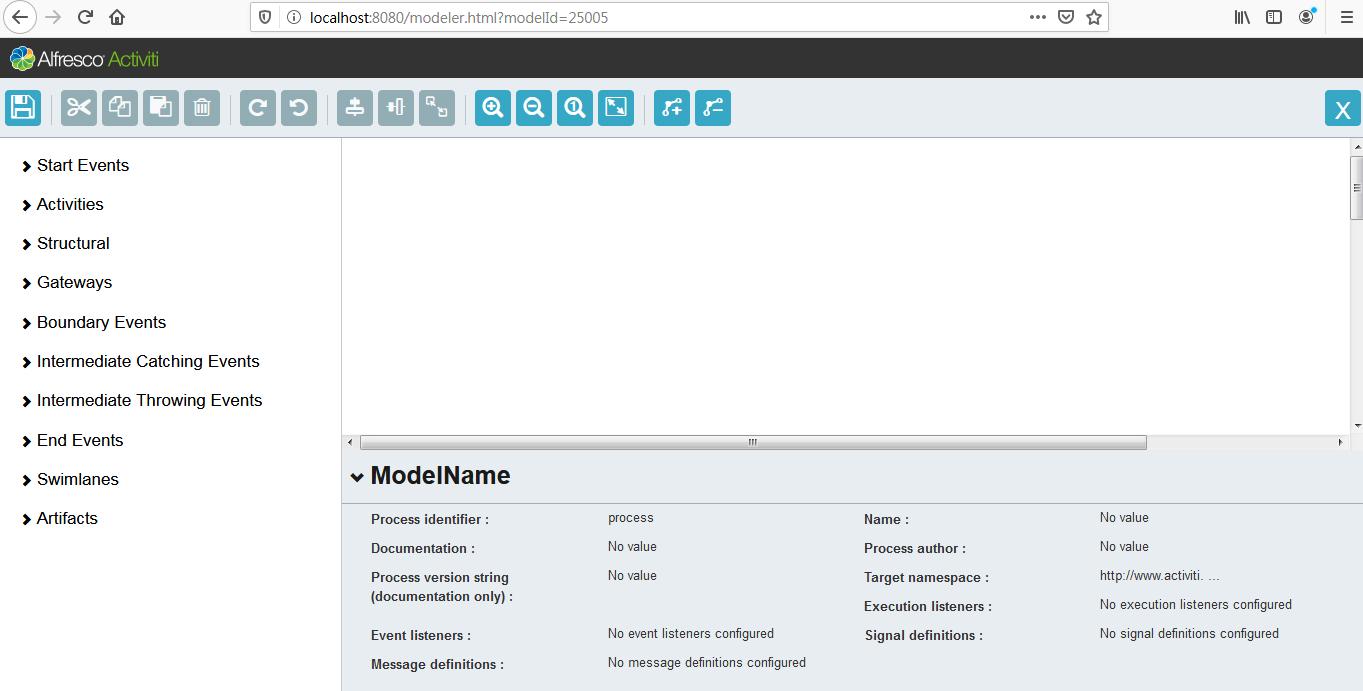
或許有人會注意到,上述程式碼是用{ContextPath}/modeler.html?modelId={modelId} 來進入Activiti Modeler畫面的,所以在功能上,其實controller是先新增ㄧ個空白的Model,取得modelId,再做為URL參數開啟畫面,這樣的進入方法拿來應用到編輯既有的Model也是非常方便。
二、編輯、刪除與下載
在這部份,我們將用ㄧ個簡單的畫面來將已經存入資料庫的流程圖Model資料列出來,並加上編輯、刪除與下載的功能進入點。
A.畫面模版
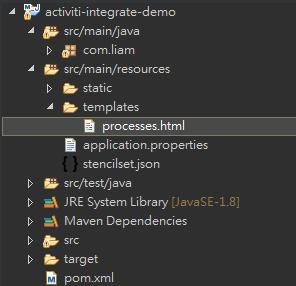
本範例使用Spring Boot建議搭配使用的thymeleaf模版框架來處理頁面(關於thymeleaf可至官方網站了解內容)。請至resources下的template資料夾 新增html檔,範例命名為processes.html,如下圖:
html檔內容請參考以下,使用thymeleaf的語法來處理動態顯示的部分:
<!DOCTYPE html>
<html xmlns:th="http://www.thymeleaf.org">
<head>
<title>Process Models</title>
<meta http-equiv="Content-Type" content="text/html; charset=UTF-8">

<link rel="stylesheet" type="text/css"
    href="webjars/bootstrap/3.3.7/css/bootstrap.min.css" />

</head>
<body>
    <div class="container">
        <div>
            <a th:href="@{model/new}" class="btn btn-info">Add</a>
        </div>
        <table class="table table-striped">
            <thead>
                <tr>
                    <td>ID</td>
                    <td>Name</td>
                    <td>Function</td>
                </tr>
            </thead>
            <tbody>
                <tr th:each="model : ${processModels}">
                    <td th:text="${model.id}"></td>
                    <td th:text="${model.name}"></td>
                    <td>
                        <a th:href="@{/modeler.html?modelId={id}(id=${model.id})}" class="btn btn-default">Edit</a>
                        <a th:href="@{model/delete/{id}(id=${model.id})}" class="btn btn-default">Delete</a>

                        <a th:if="${model.hasEditorSourceExtra() == true}"
                        th:href="@{model/export/{id}(id=${model.id})}" class="btn btn-default">Export</a>
                    </td>
                </tr>
            </tbody>
        </table>
    </div>
</body>
</html>
B.畫面Controller
我們替前面的頁面增加ㄧ個進入點,並做為此專案的首頁,請新增ㄧ支Controller,此範例命名為HomeController,如下圖:
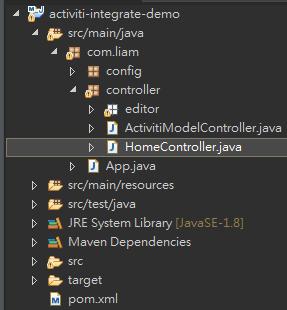
這支類別需要的功能很簡單,我們只需要透過RepositoryService取得已經存在的Activiti Model資料,並把資訊提供給頁面來宣染就好了,程式碼如下:
package com.liam.controller;

import java.util.List;

import org.activiti.engine.RepositoryService;
import org.springframework.beans.factory.annotation.Autowired;
import org.springframework.stereotype.Controller;
import org.springframework.web.bind.annotation.RequestMapping;
import org.springframework.web.servlet.ModelAndView;

@Controller
public class HomeController {

    @Autowired
    private RepositoryService repositoryService; //注入Activiti的RepositoryService

    @RequestMapping({"/", "/processes"})
    public ModelAndView home() {

        // 取出已存入DB的Model清單
        List<org.activiti.engine.repository.Model> processModels = repositoryService.createModelQuery().list();

        ModelAndView modelAndView = new ModelAndView("/processes");
        modelAndView.addObject("processModels", processModels);
        return modelAndView;
    }
}
由於home方法所對應的路徑包含”/”,所以可以作為整個應用的首頁,現在我們重啟服務,連進localhost:8080就可以看到類似以下的畫面囉。
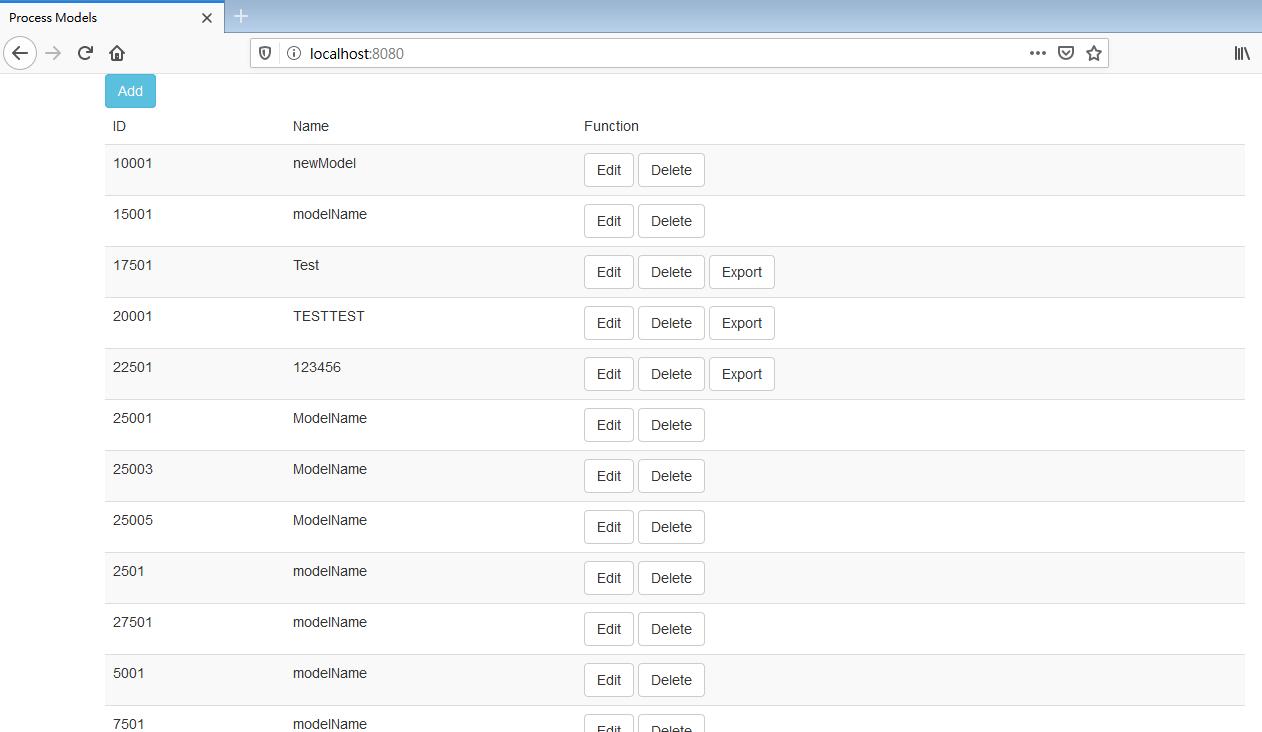
Add: 初始化ㄧ個空白流程圖Model並進入Activiti Modeler,對應路徑 model/new
Edit: 透過Activiti Modeler編輯此流程圖Model,對應路徑model/edit/{id}
Delete: 刪除此流程圖Model,對應路徑model/delete/{id}。
Export: 下載此流程圖Model為BPMN檔,如果並未在Activiti Modeler畫面存檔過便無資料可以下載,因此按鈕不顯示,對應路徑model/export/{id}。
C.Model編輯
於processes.html中,編輯按鈕對應的路徑是{model/edit/{id},請在ActivitiModelController增加ㄧ個方法對應到此路徑,並將畫面轉導至Activiti Modeler開啟編輯,方法內容如下參考:
@RequestMapping(value = "/edit/{modelId}", method = RequestMethod.GET)
public void editModel(@PathVariable String modelId, HttpServletRequest request, HttpServletResponse response) {
    try {
        // 進入Activiti Modeler功能畫面
        response.sendRedirect(request.getContextPath() + "/modeler.html?modelId=" + modelId);
    } catch (IOException e) {
        // TODO Auto-generated catch block
        e.printStackTrace();
    }
}
D.Model刪除
於processes.html中,刪除按鈕對應的路徑是{model/delete/{id},請在ActivitiModelController增加ㄧ個方法對應到此路徑,並實作刪除功能,方法內容如下參考:
@RequestMapping(value = "/delete/{modelId}", method = RequestMethod.GET)
public void deleteModel(@PathVariable String modelId, HttpServletRequest request, HttpServletResponse response) {
    try {
        //透過repositoryService刪除Activiti Model
        repositoryService.deleteModel(modelId);
        response.sendRedirect(request.getContextPath() + "/processes");
    } catch (IOException e) {
        // TODO Auto-generated catch block
        e.printStackTrace();
    }
}
E.Model匯出
於先前的processes.html中,下載按鈕對應的路徑是{model/export/{id},請在ActivitiModelController增加ㄧ個方法對應到此路徑,並實作匯出bpmn檔的功能。匯出bpmn檔,需要把先前儲存在ACT_GE_BYTEARRAY的資料轉換成bpmn檔的格式,也就是xml,因此需要進行資料格式的轉換,不過這些功能元件Activiti官方都寫好了,只要用它們提供的轉換器即可,因此請先在pom.xml加入以下依賴:
<!-- Activiti Generate BPMN -->
<dependency>
    <groupId>org.activiti</groupId>
    <artifactId>activiti-simple-workflow</artifactId>
    <version>${activiti-version}</version>
</dependency>
然後ActivitiModelController新增的方法,內容參考如下程式碼:
@RequestMapping(value = "/export/{modelId}", method = RequestMethod.GET)
public ResponseEntity<Resource> downloadFile(@PathVariable String modelId, HttpServletRequest request) {

    String fileName = null;
    byte[] bpmnBytes = null;
    // Load file as Resource
    Resource resource = null;
    // Content Type = XML
    String contentType = "application/xml";

    try {
        Model modelData = repositoryService.getModel(modelId);
        if (null != modelData) {
            if ("table-editor".equals(modelData.getCategory())) {
                byte[] modelSource = repositoryService.getModelEditorSource(modelId);

                SimpleWorkflowJsonConverter converter = new SimpleWorkflowJsonConverter();
                WorkflowDefinitionConversionFactory conversionFactory = new WorkflowDefinitionConversionFactory();
                WorkflowDefinition workflowDefinition = converter.readWorkflowDefinition(modelSource);
                fileName = workflowDefinition.getName();
                WorkflowDefinitionConversion conversion = conversionFactory
                        .createWorkflowDefinitionConversion(workflowDefinition);
                conversion.convert();
                bpmnBytes = conversion.getBpmn20Xml().getBytes("utf-8");

            } else {
                JsonNode editorNode = new ObjectMapper()
                        .readTree(repositoryService.getModelEditorSource(modelData.getId()));
                BpmnJsonConverter jsonConverter = new BpmnJsonConverter();
                BpmnModel model = jsonConverter.convertToBpmnModel(editorNode);
                fileName = model.getMainProcess().getId() + ".bpmn20.xml";
                bpmnBytes = new BpmnXMLConverter().convertToXML(model);
            }
        }

        ByteArrayInputStream in = new ByteArrayInputStream(bpmnBytes);
        resource = new InputStreamResource(in);
    } catch (IOException ex) {
        // logger.info("Could not determine file type.");
    }

    return ResponseEntity.ok().contentType(MediaType.parseMediaType(contentType))
            .header(HttpHeaders.CONTENT_DISPOSITION, "attachment; filename=\"" + fileName + "\"").body(resource);
}
到這邊所有功能都完成了,請重啟專案,在畫面上試試看這些功能吧。
本專案有上傳至Git: 連結,有需要可以Clone下來參考,目前連線資訊預設為H2 In-memory DB,所以不需要資料庫就可把服務跑起來,當然有需要調整資料庫的話也可以至application.properties調整,並於pom.xml去加入對應JDBC的依賴。
結語
本範例主要是圍繞Activiti Modeler與流程圖編輯相關的整合應用,因此只使用到Activiti 7大核心服務的RepositoryService,其他用於流程起案簽核的功能都未用到,實務上那些可能才是更重要的部分,不過那些要實作的東西就相當多了,可能無法簡單介紹完~ 無論如何,希望本篇能協助讀者對Activiti有多ㄧ點認識,畢竟它算是相當成熟的流程引擎,又是open source,應該蠻有機會在實務上使用到它的吧!
參考資料
Thymeleaf Official Documentation
springboot + activiti + modeler