使用 playwright 視覺化回歸
視覺化回歸測試使用 Playwright
大綱
1. 視覺化回歸測試簡介
什麼是視覺化回歸測試?
視覺化回歸測試是一種自動化測試方法,通過比較網頁 UI 的截圖來檢測視覺變化。它能夠確保網頁的外觀和佈局在更新後保持一致性。
為什麼需要視覺化回歸測試?
- 快速發現 UI 變化:透過圖片比對,可以快速發現頁面細微的視覺變更。
- 減少人工檢查時間:手動驗證視覺變化較為費時,而自動化測試能大幅提高效率。
- 確保視覺一致性:防止意外的樣式變更影響使用者體驗。
- 提高產品品質:在 CI/CD 流程中加入視覺化測試,確保產品品質。
與傳統測試方法的比較
| 測試方式 | 主要關注點 | 優勢 | 劣勢 |
|---|---|---|---|
| 單元測試 | 功能邏輯 | 可靠性高 | 無法捕捉 UI 變化 |
| E2E 測試 | 使用者流程 | 模擬真實用戶操作 | 執行時間較長 |
| 視覺化回歸測試 | UI 呈現 | 精確發現視覺變化 | 需管理基準圖 |
2. Playwright 框架介紹
Playwright 的特點和優勢
- 支持多種瀏覽器(Chromium、Firefox、WebKit)。
- 提供強大的選擇器系統,支援 Shadow DOM、iframe 等。
- 內建截圖功能,可用於視覺化回歸測試。
- 支援移動設備模擬,適用於響應式設計測試。
- 內建網路攔截功能,可模擬 API 回應。
安裝和環境配置
在專案目錄下執行以下命令來初始化 Playwright 設定:
npm init playwright@latest安裝測試瀏覽器:
npx playwright install3. 建立視覺回歸測試
3.1 截圖比對
Playwright 允許我們對特定元件或整個頁面進行截圖,並將其與基準圖片進行比對。
const { test, expect } = require('@playwright/test');

test('visual regression test', async ({ page }) => {
  await page.goto('https://example.com');

  // 截取整頁圖片
  expect(await page.screenshot()).toMatchSnapshot('homepage.png');

  // 截取特定元素
  const header = await page.locator('header');
  expect(await header.screenshot()).toMatchSnapshot('header.png');
});
3.2 設置比對閾值
有時候,細微的變化可能是可接受的,例如動畫或動態內容。Playwright 提供 threshold 參數來調整比對容差。
expect(await page.screenshot()).toMatchSnapshot('homepage.png', {
  threshold: 0.1
});
3.3 動態內容處理
若頁面包含變動的元素(如日期、時間或動畫),可以使用 CSS 隱藏這些元素,避免影響比對結果。
await page.addStyleTag({ content: '* { animation: none !important; }' });3.4 測試報告生成
Playwright 內建測試報告功能,可輸出包含測試結果、比對圖片、誤差分析的報告。
npx playwright test --reporter=html4. 實作範例
先決條件
- Node.js 版本必須 >= 18.3
- 熟悉終端機基本操作
- 前端開發基礎知識
- 有基礎測試語法概念
- 有 Docker 基礎概念
這邊使用 vite 建立一個純 JS 專案
專案建立步驟
- 使用 Vite 建立專案
npm create vite@latest . -- --template vanilla - 安裝專案依賴
npm install
開發指令
- 啟動開發服務器:
npm run dev - 建置專案:
npm run build - 預覽建置結果:
npm run preview
專案結構
index.html- 專案的入口 HTML 文件main.js- 主要的 JavaScript 程式碼文件style.css- 全局樣式文件public/- 靜態資源目錄vite.config.js- Vite 設定文件
E2E 測試 (Playwright)
安裝與設定
- 初始化 Playwright
npm init playwright@latest選擇設定選項:
- Choose between TypeScript or JavaScript (default is TypeScript) → JavaScript
- Name of your Tests folder → tests
- Add a GitHub Actions workflow? (y/N) → 根據需求選擇
- Install Playwright browsers (y/N) → Y
- 安裝完成後會自動建立:
playwright.config.js- Playwright 設定檔tests/- 測試檔案目錄tests-examples/- 範例測試
執行測試
# 執行所有測試
npx playwright test

# 在 UI 模式下執行測試
npx playwright test --ui

# 執行特定測試檔案
npx playwright test tests/example.spec.js

# 在瀏覽器中以除錯模式執行
npx playwright test --debug
產生測試報告
npx playwright show-report自動產生測試程式碼
npx playwright codegen http://localhost:5173支援的瀏覽器
- Chromium
- Firefox
- WebKit
4.1 建立基本測試
4.1.1 測試 vite 預設建立的 counter.js
// src/counter.js

export function setupCounter(element) {
  let counter = 0;
  const setCounter = (count) => {
    counter = count;
    element.innerHTML = `count is ${counter}`;
  };
  element.addEventListener('click', () => setCounter(counter + 1));
  setCounter(0);
}
4.1.2 在 tests 資料夾下建立 counter.spec.js
// tests/counter.spec.js
import { test, expect } from '@playwright/test';

test('counter should initialize with count 0', async ({ page }) => {
  await page.goto('/');
  const counter = page.getByRole('button');
  await expect(counter).toHaveText('count is 0');
});

test('counter should increment when clicked', async ({ page }) => {
  await page.goto('/');
  const counter = page.getByRole('button');
  await expect(counter).toHaveText('count is 0');

  // Click the counter
  await counter.click();
  await expect(counter).toHaveText('count is 1');

  // Click again to verify multiple increments
  await counter.click();
  await expect(counter).toHaveText('count is 2');
});
4.1.3 修改 playwright.config.js
// playwright.config.js

use: {
  /* Base URL to use in actions like `await page.goto('/')`. */
   baseURL: 'http://localhost:5173'
},

 /* Run your local dev server before starting the tests */
webServer: {
  command: 'npm run dev',
  url: 'http://localhost:5173',
  reuseExistingServer: !process.env.CI,
},
然後在終端機執行 npx playwright test 指令,或是 npx playwright test --ui 開啟瀏覽器介面查看測試流程。
4.2 視覺化測試
添加測試案例
// tests/counter.spec.js

test('counter should match initial visual state', async ({ page }) => {
  await page.goto('/');
  const counter = page.getByRole('button');
  await expect(counter).toHaveText('count is 0');

  await expect(page).toHaveScreenshot('counter-initial.png');
});

test('counter should match visual state after click', async ({ page }) => {
  await page.goto('/');
  const counter = page.getByRole('button');

  await counter.click();
  await expect(counter).toHaveText('count is 1');

  await expect(page).toHaveScreenshot('counter-clicked.png');
});
然後執行 npx playwright test會發現測試都失敗,這是因為還沒有可比對的基準截圖快照,所以可以再執一次指令,或是直接用 npx playwright test --update-snapshots 指令。
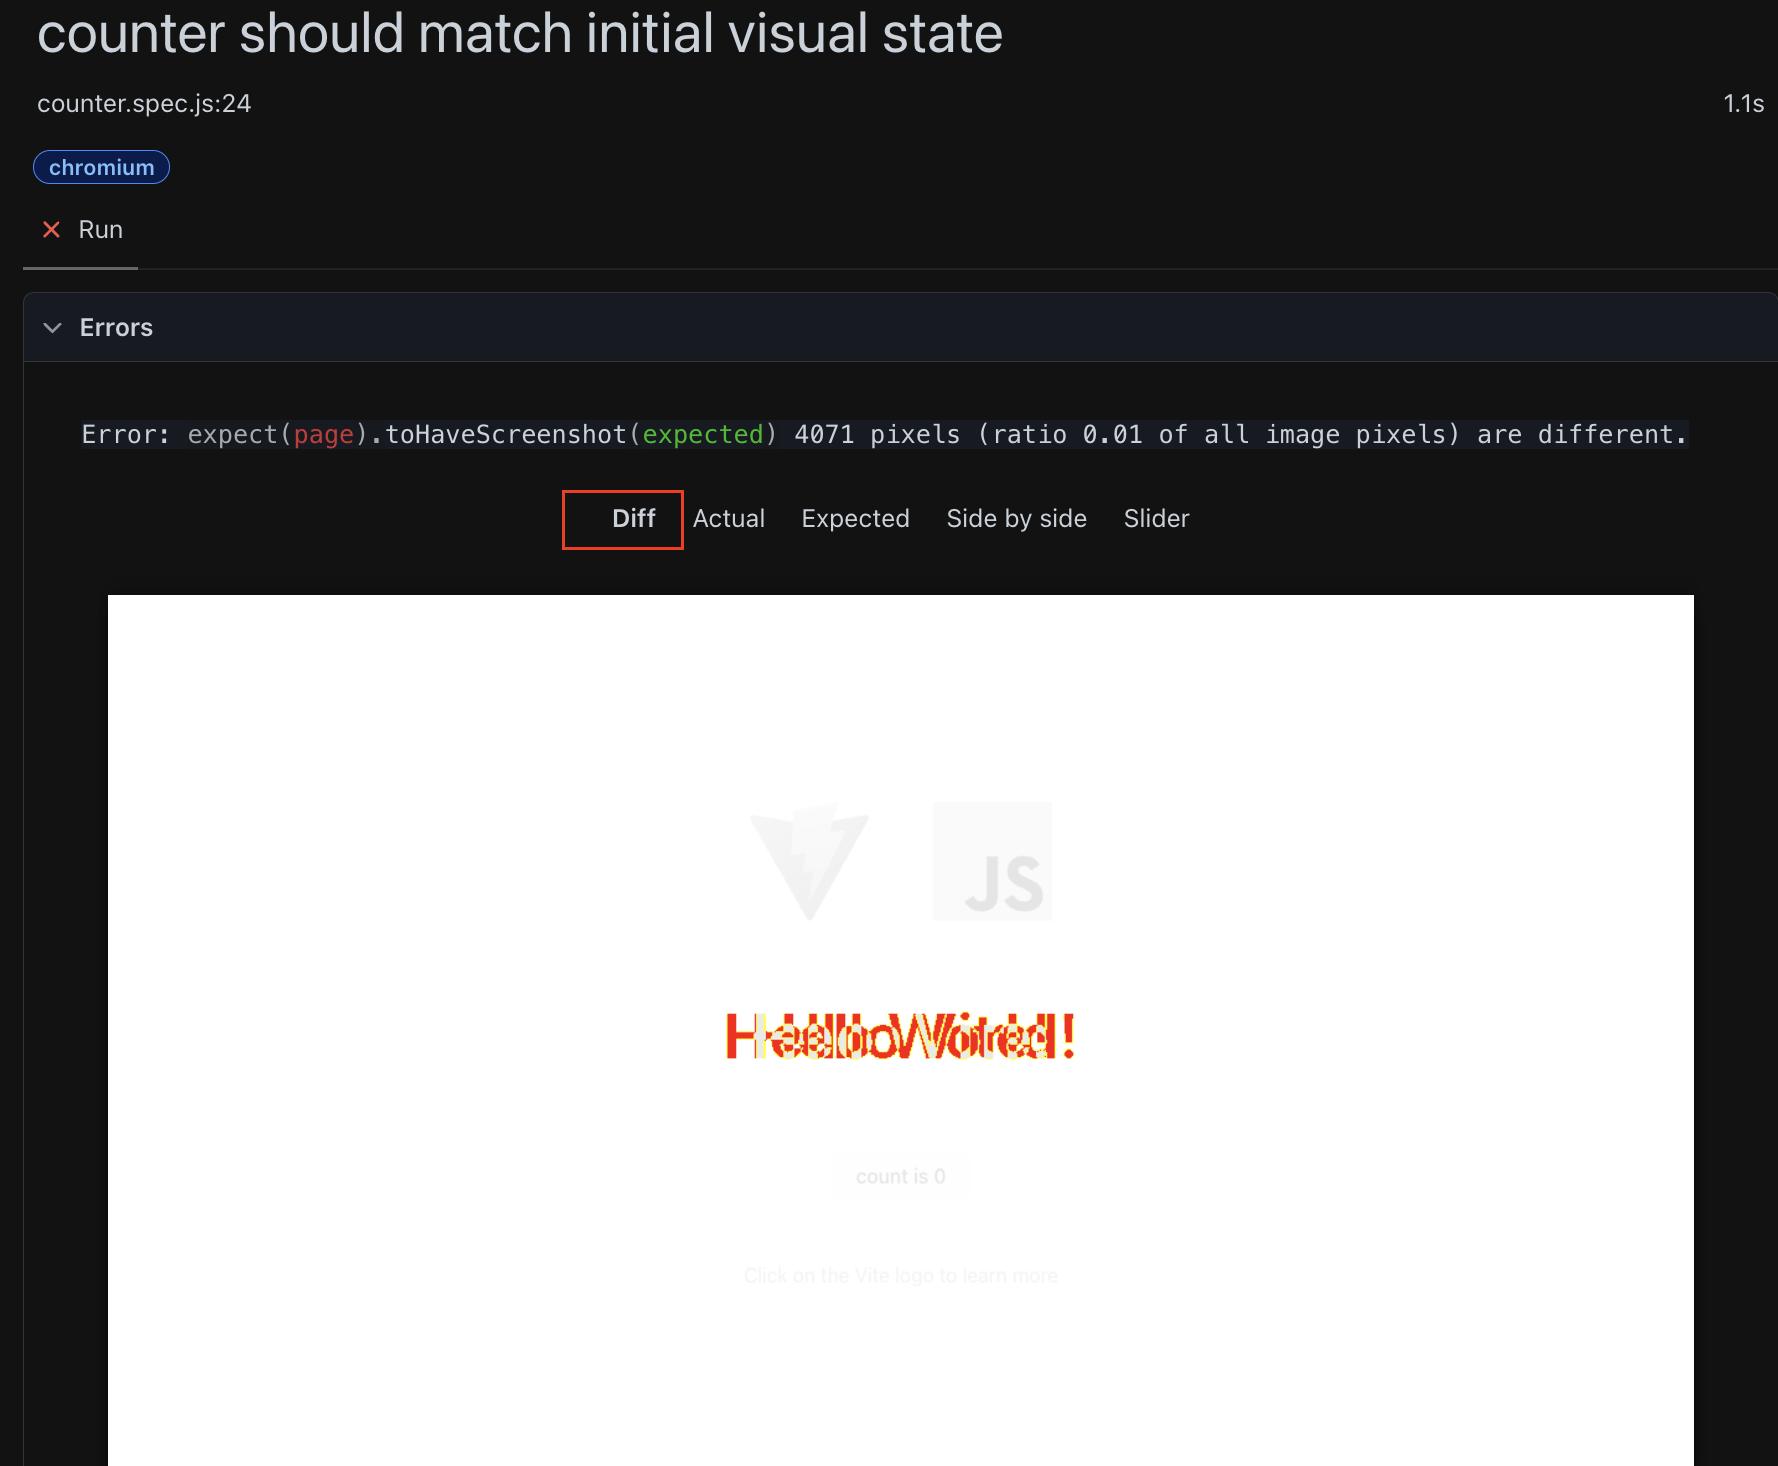
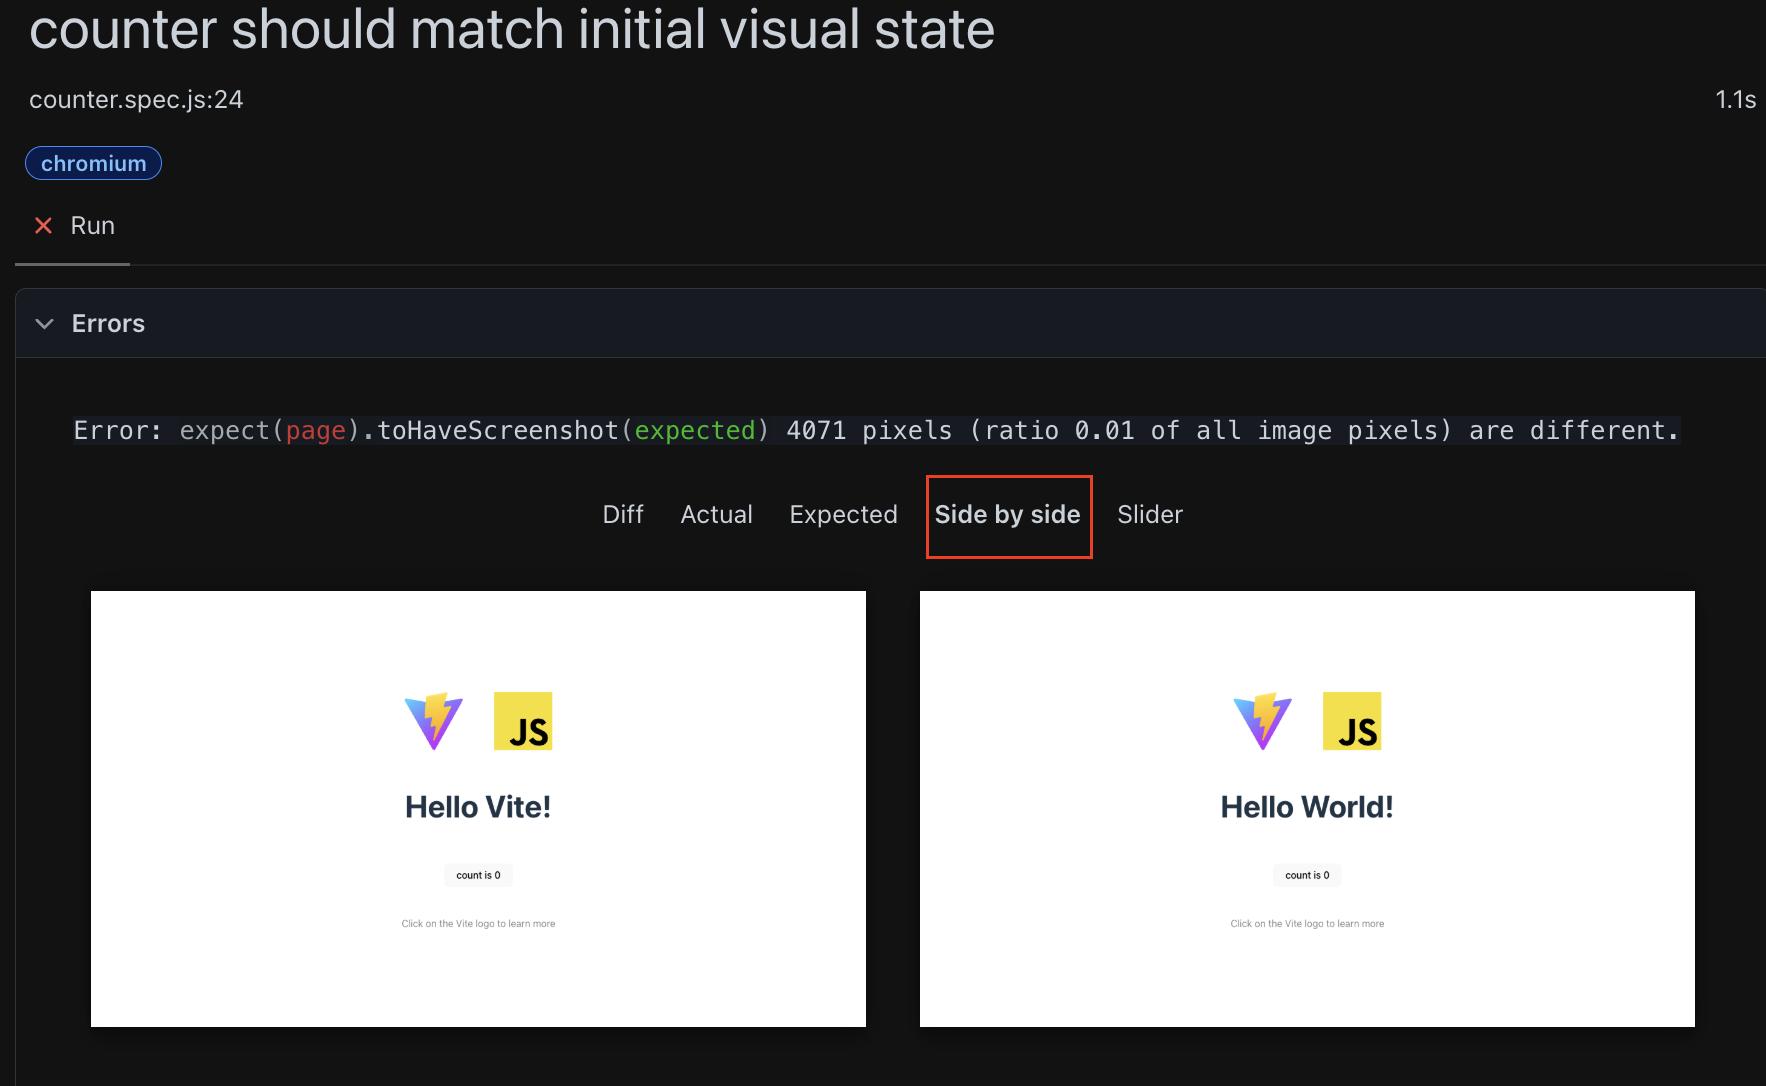
完成首次截圖快照後可以嘗試修改畫面,例如修改標題為 Hello World!,再次執行測試會發生測試失敗並且會開啟 http://localhost:9323 網頁伺服器
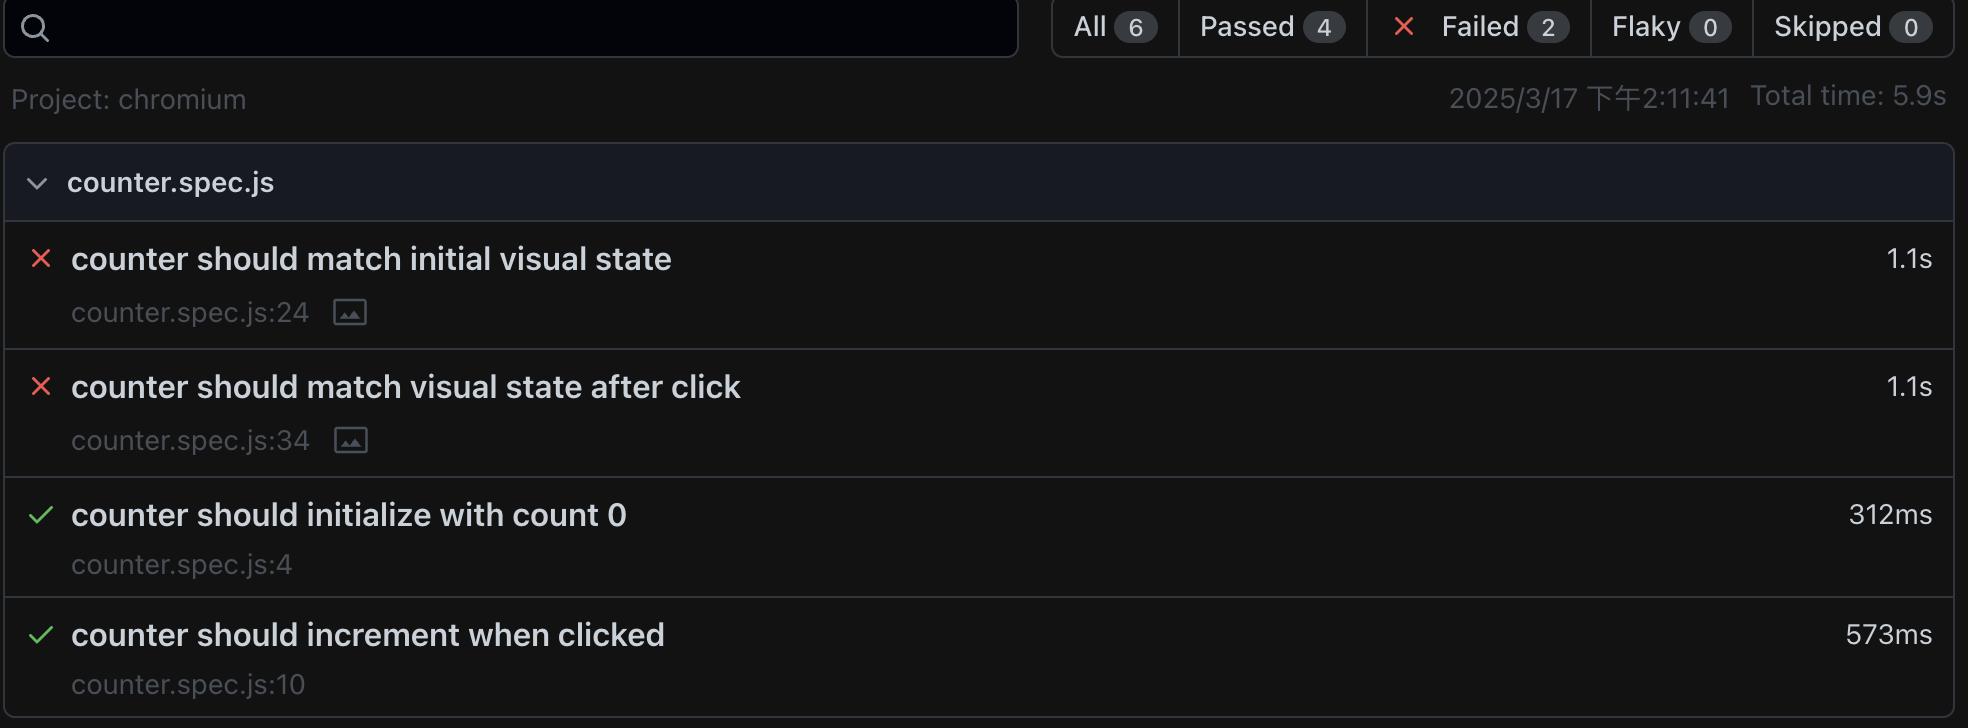
點擊失敗的測試案例進入查看,在 Diff 頁籤會顯示比對結果,不同的地方會以紅色顯示。
Actual 頁籤是目前版本的截圖快照

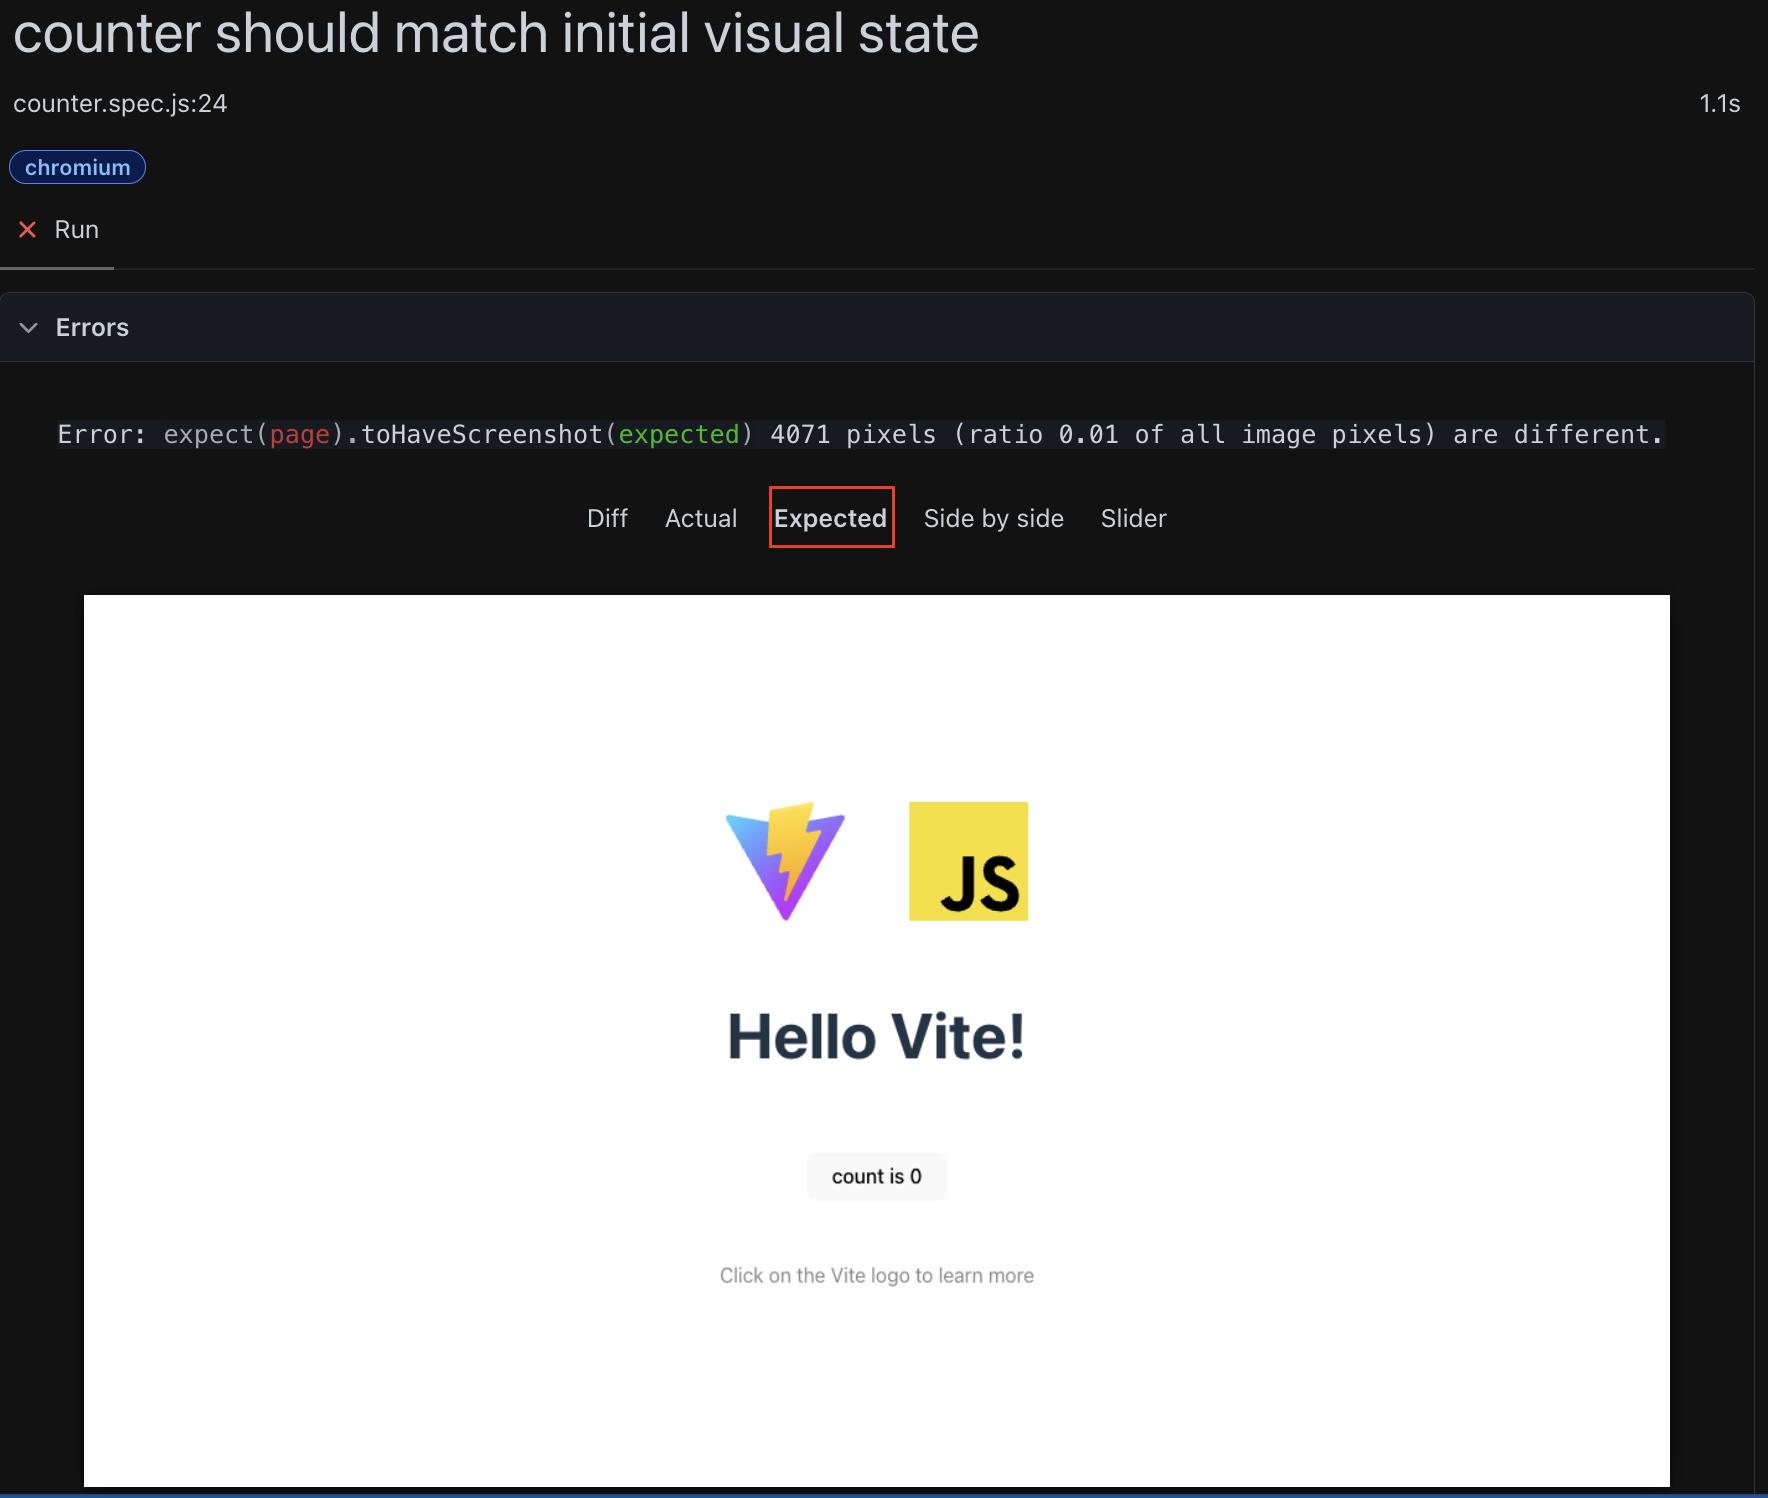
Expected 頁籤是之前本版的截圖快照
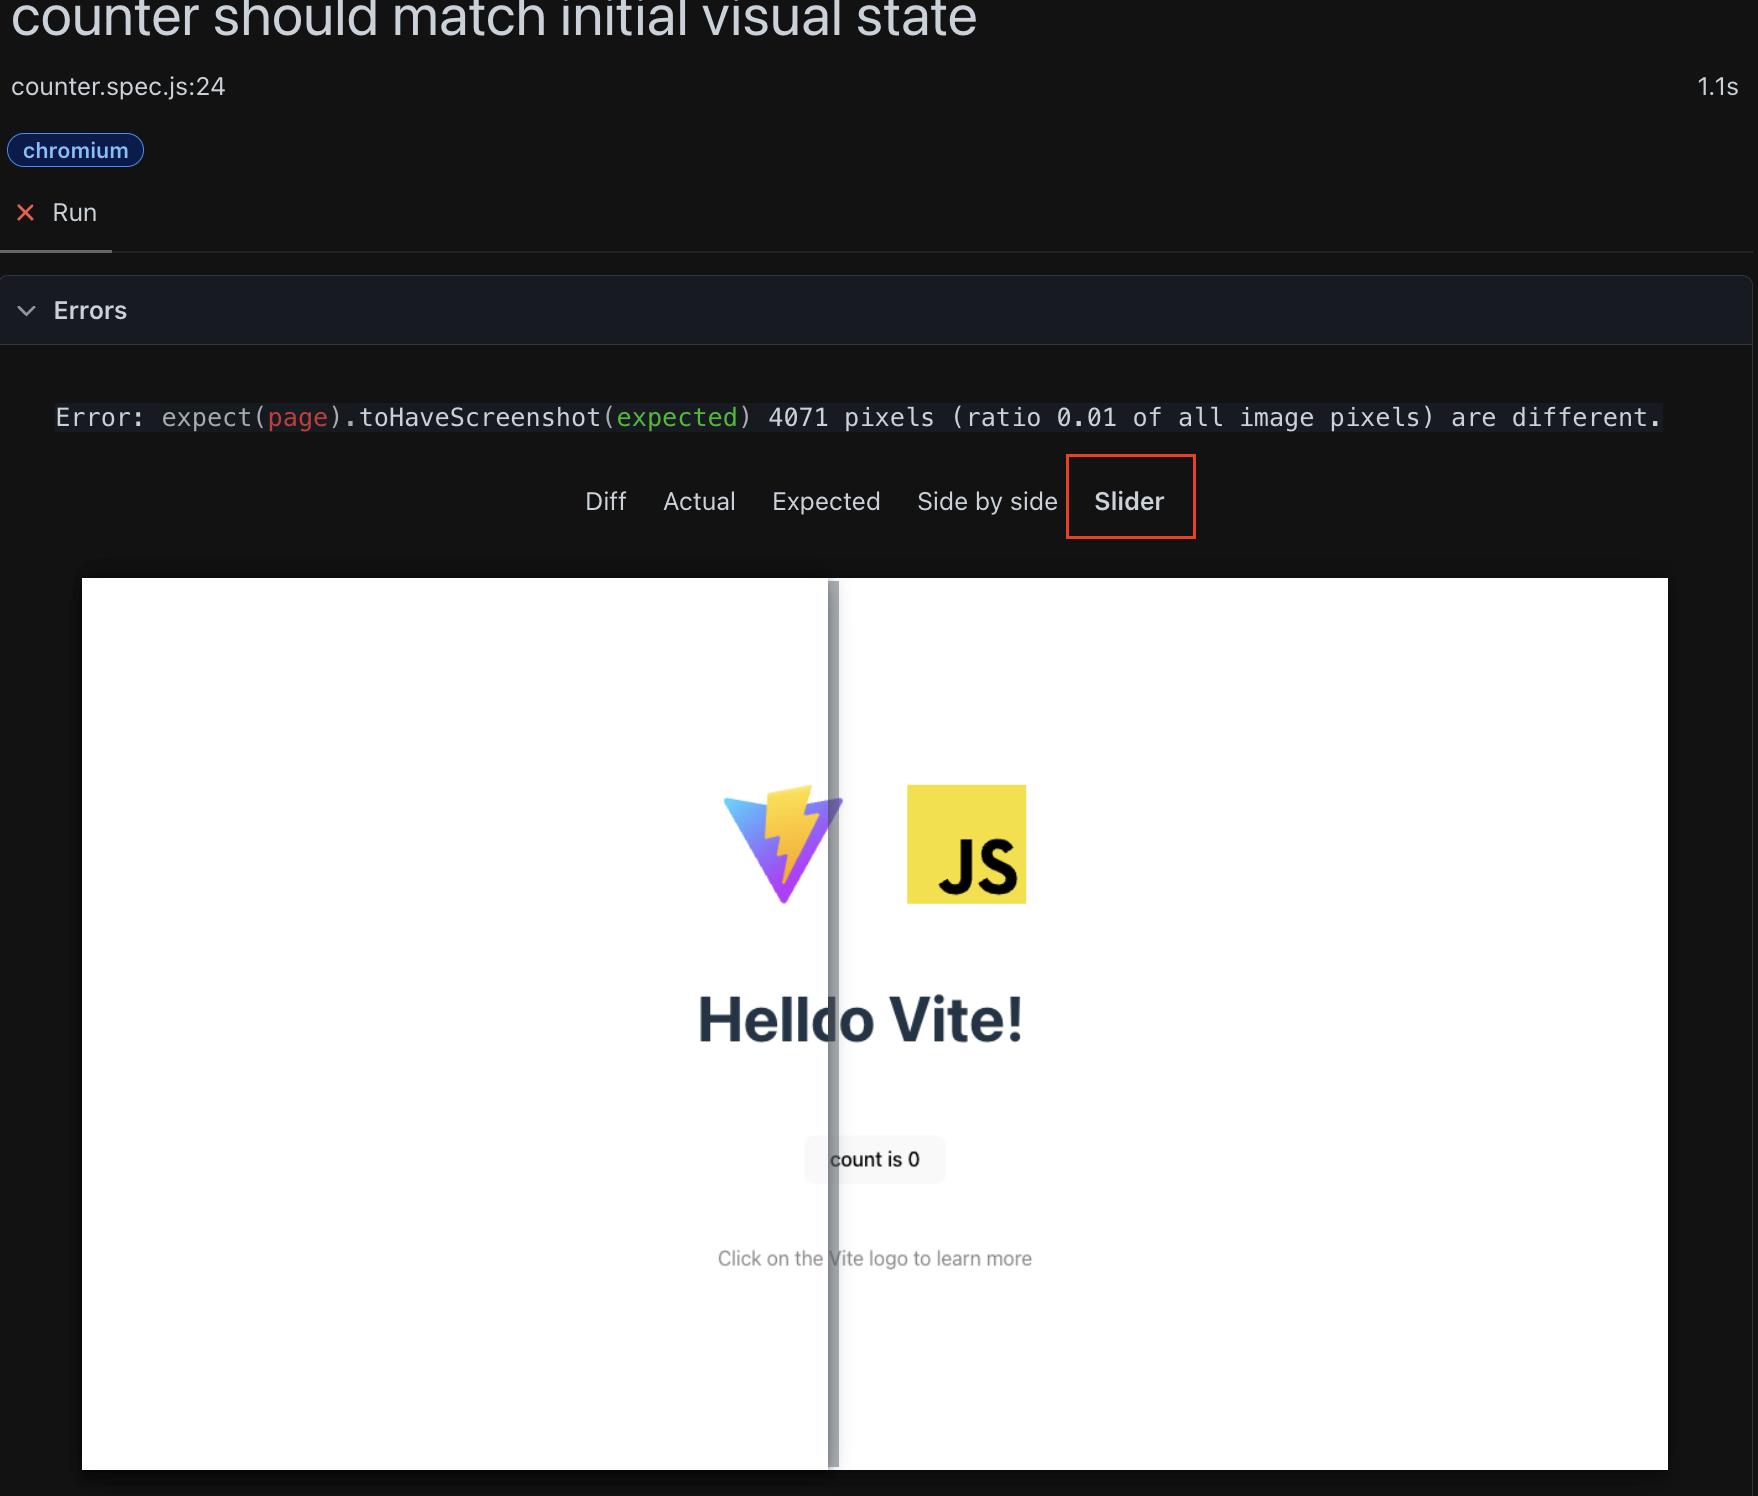
Side by side 頁籤顯示前後完整截圖
Slider 頁籤可左右拖拉顯示前後變化
如果要保持程式修改結果記得要再執行 playwright test --update-snapshots 指令更新截圖快照並加入版本控管。
4.3 CI 持續整合
如果嘗試在 CI 服務上執行測試會發現視覺化測試都會失敗,實際將錯誤的截圖下載下來看,會看到與本地產生的截圖不一樣。
這是因為瀏覽器在不同的主機系統、設定、硬體會有不同的渲染,所以最好要統一測試環境。
4.3.1 修改 playwright.config.js
- 設定 snapshotPathTemplate 參數,指定截圖快照檔案名稱。
- 調整 projects 只保留 chromium 瀏覽器,方便減少稍後建立環境的時間。
export default defineConfig({
  snapshotPathTemplate: '{snapshotDir}/{testFilePath}-snapshots/{arg}-{projectName}{ext}',
  projects: [
    {
      name: 'chromium',
      use: { ...devices['Desktop Chrome'] }
    }
  ]
});
調整前後的截圖檔案名稱 :
- counter-clicked-chromium-darwin.png > counter-clicked-chromium.png
- counter-initial-chromium.png > counter-initial-chromium.png
4.3.2 建立 gitlab-ci.yaml
這裡選擇使用 gitlab 做整合測試,要注意的有:
- node image: 不能用 alpine 精簡版,缺少 playwright 所需的系統依賴。
- playwright@1.51.0: 指定 playwright 版本和 package.json 中 @playwright/test 套件相同, 避免下載的瀏覽器本版不一致導致奇怪問題發生。
- --with-deps: 安裝 Playwright 相關的系統依賴。
- chromium: 只下載 chromium 瀏覽器。
- -only-shell: 因為 CI 環境下只需要 headless 模式運行測試,不需要完整的瀏覽器 UI 可以減少下載時間。
image: node:20.19.0-bookworm

test:
  stage: test
  script:
    - npm ci
    - npx playwright@1.51.0 install --with-deps chromium --only-shell
    - npm run test
  artifacts:
    when: always
    paths:
      - playwright-report/
      - test-results/
    expire_in: 1 week
Gitlab CI 執行結果失敗,如上述所說不同機器環境因素會影響畫面渲染,可以下載 artifacts 查看測試報告與截圖

可以看到比對有差異的部分很多,呈現的字體大小不同。

4.3.2 使用 docker 建立統一的測試環境
為了解決不同環境下產生的截圖快照不一致的問題,目前只想到用 docker 解決。
1. 首先建立 Dockerfile,注意 Node.js、playwright 版本要和 Gitlab CI 設定一致
FROM node:20.19.0-bookworm

WORKDIR /app

RUN npx -y playwright@1.51.0 install --with-deps chromium --only-shell

CMD ["npx", "playwright", "test"]
然後執行以下指令建立 image。
docker build --rm -f 'Dockerfile' -t 'playwright-demo:latest' '.' 2. 修改 playwright.config.js
webServer 判斷是否為 CI 環境 ,不是則不設定(這裡需要關閉的原因是本地用的 docker image 並沒有包含 node_modules,而是容器啟動時直接將專案程式碼掛載到容器裡面,又因為 docker image 裡的系統環境與本地開發環境不同無法共用 node_modules,後續容器啟動 webServer 會出現 Error: Cannot find module @rollup/rollup-linux-arm64-gnu. npm has a bug related to optional dependencies 的錯誤)。
webServer: process.env.CI
    ? {
        command: 'npm run dev',
        url: 'http://localhost:5173',
        reuseExistingServer: !process.env.CI,
      }
    : undefined,
3. package.json 加上 script 使用 docker 容器執行 playwright 測試與更新截圖快照。
// 使用 docker 執行測試
"test:docker": "docker run -it --rm --ipc=host --net=host -v $PWD:/app --workdir=/app playwright-demo:latest",
// 使用 docker 執行更新截圖快照
"test:docker:update-snapshots": "npm run test:docker npx playwright test -- --update-snapshots"- ipc=host:這個參數將容器的 IPC(Inter-Process Communication,進程間通信)命名空間設置為與主機相同。這意味著容器和主機之間可以共享內存和信號等 IPC 資源。
- net=host:這個參數將容器的網絡命名空間設置為與主機相同。這意味著容器將直接使用主機的網絡接口和 IP 地址,而不是使用 Docker 默認的虛擬網絡。
4. 本地執行測試
因為本地已經關閉 webServer 設定,需要先手動執行 npm run dev 然後再執行 npm run test:docker,或是使用 start-server-and-test 套件達成自動開啟關閉 vite dev server。
成功的話發現測試會是失敗的,記得再更新截圖快照並加入版本控管。

5. Gitlab CI 執行測試
測試執行成功!

5. 總結
以上是 playwright 視覺化測試基本介紹與範例,最主要是要分享如何解決在不同測試環境下會影響瀏覽器畫面渲染的問題,造成視覺化測試失敗。
Playwright 還有許多強大的進階功能,包括:網路請求攔截與模擬、多設備模擬測試、智慧等待機制、測試並行執行、完整的偵錯工具(如 Playwright Inspector 和 Trace Viewer)、API 測試能力、前端元件測試,以及完整的 CI/CD 整合支援。這些功能讓 Playwright 成為一個全方位的自動化測試解決方案。在實際專案中,建議根據需求逐步探索這些進階功能,以打造更完善的測試架構。
參考資料