Apple MVC VS. MVVM:將 Apple MVC 重構成 MVVM
前言
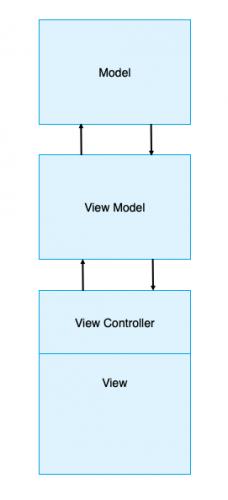
Model-View-ViewModel(MVVM)這一種設計模式,近年來在iOS開發社群中得到不少的關注。它涉及一個稱為ViewModel的概念,在iOS的App中,ViewModel 是 ViewController 的配對物件。

如上圖所示,MVVM模式由三層組成:
• Model:在應用程序運作的數據。
• View:用戶界面上的可視元素。在iOS中,ViewController和View的觀念是密不可分的。
• ViewModel:從View輸入更新Model,並從Model輸出更新View。
MVVM提供了一些優於Model-View-Controller或MVC的優勢,但MVC是iOS官方的實際建議做法:
• 降低複雜性:MVVM透過將許多業務邏輯移出,使得ViewController更加簡單。
• 更具表達性:ViewModel可以更好的表達View的業務邏輯。
• 增加可測試性:ViewModel比ViewController更容易測試,我們不必擔心View的實作就可以測試業務邏輯了(UnitTest)。
在本文章中,我們將透過將一個MVC架構的app重構成MVVM架構的過程,了解他們之間的差異。首先,將所有雨天氣和位置相關的邏輯從ViewController移到ViewModel,然後,為ViewModel編寫UnitTest,以了解如何輕鬆的將測試整合到新的ViewModel中。
Apple MVC不等於MVC(Apple MVC ≠ MVC)
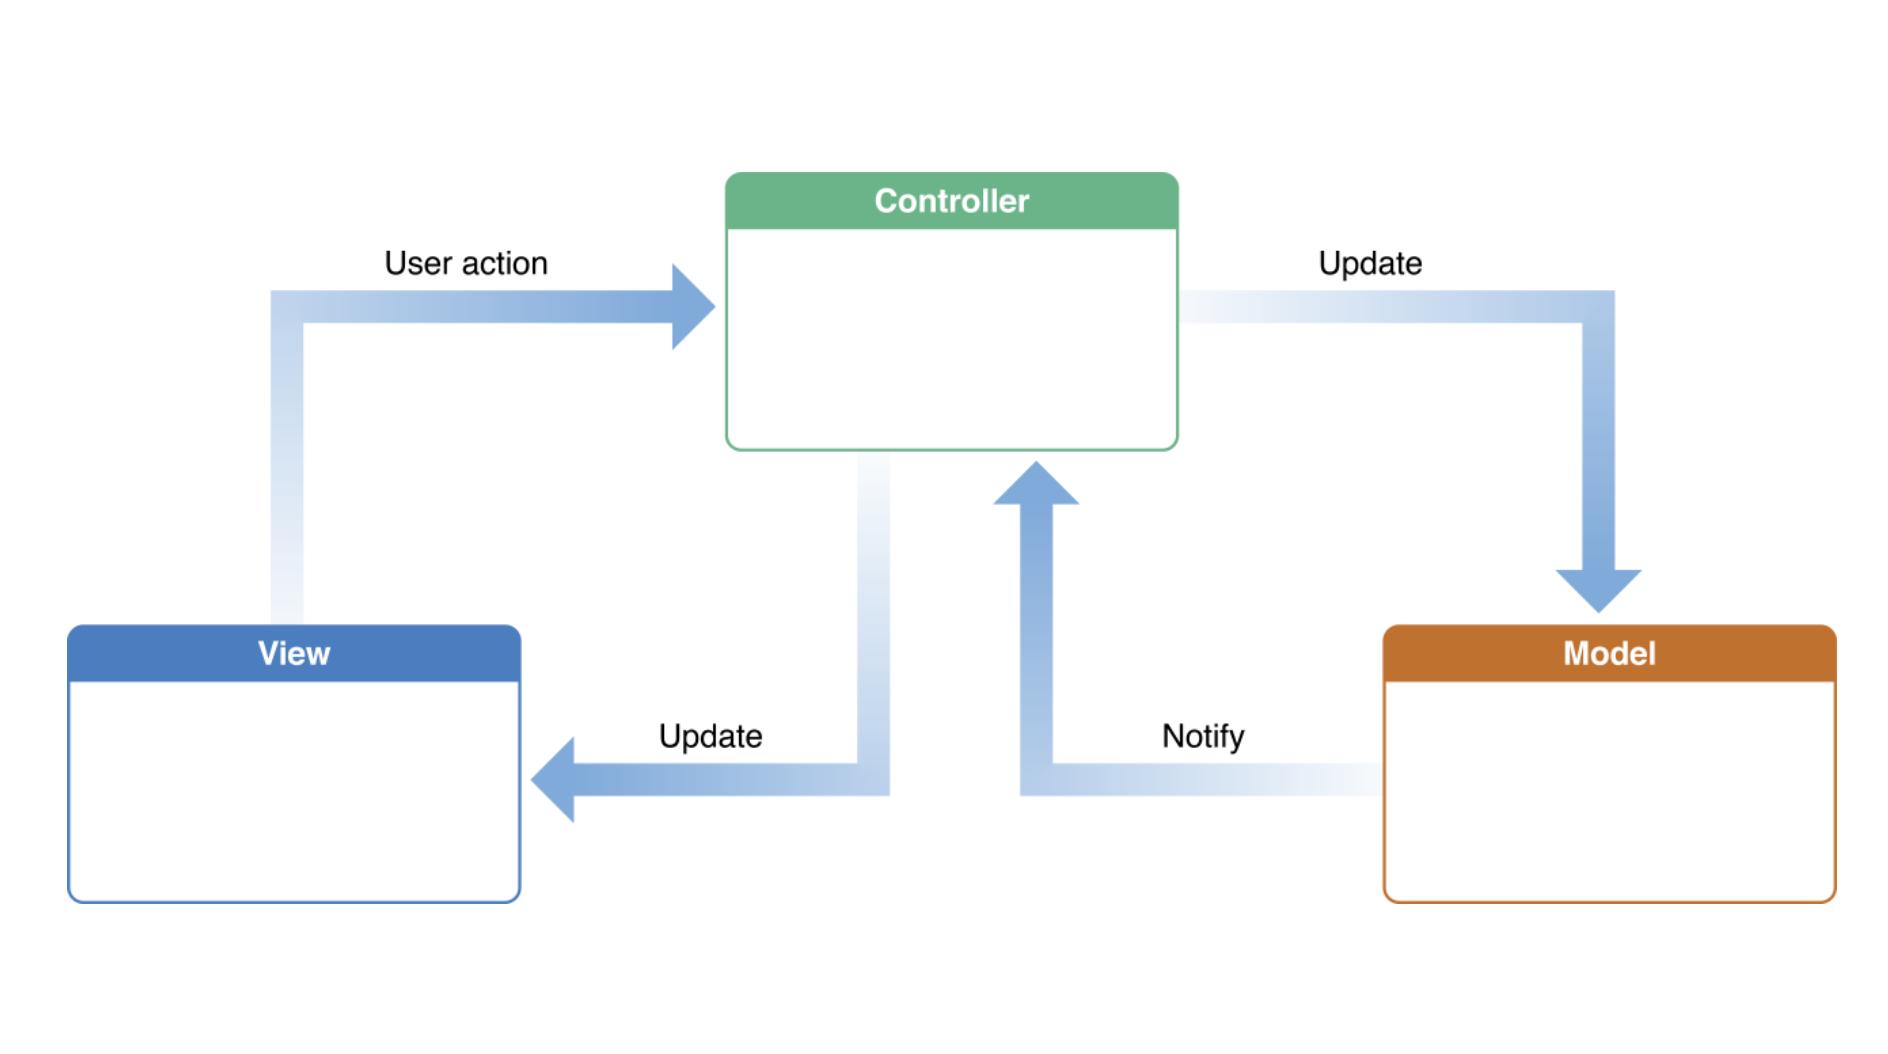
Apple 所提倡的 MVC (Model-View-Controller),是 iOS 開發過程中,所有開發者第一個會遇到的架構。不同於 Apple 的 MVC,在原始的定義的 MVC 之中,Model 代表資料模型(或稱Data Entities),View 代表視圖,Controller 則是負責商業邏輯處理。這三者的互動方式如下圖:

Controller 介於 View 跟 Model 之間,用來做為整合與溝通兩者的橋樑角色。
但是在 iOS 開發中,因為 View 角色特殊的關係,原本的 MVC 變成了 Model - ViewController + View:

ViewController 包含了 View,並且加入了一些 View 的 life cycle 的邏輯。因為 UIViewController 地位特別的關係,View 跟 Controller 的 code 都會出現在 UIViewController 裡,這樣會造成 UIViewController 變得相當肥大,也就是大家常說的 Massive View Controller。並且這樣 UIViewController 其實很不好寫 Unit Test,因為你的 Controller 邏輯跟 View 綁得太緊了(所謂的強耦合)。你如果想要測某個 Controller 的功能,就必須要 mock 某個 view 以及它的 life cycle,這樣是很不符合經濟效益的。
面對 Apple MVC 的問題,網路上其實已經有非常多的討論跟解法,不管是那一種解決辦法,主要的作法,都是把過多的邏輯,從 UIViewController 裡面切割出來,並且設計一個乾淨的架構,讓所有的物件能夠盡量遵循 single responsibility 原則,不要有分工不明的問題。目前常見的替代架構有 MVVM、VIPER 兩種,都是解決 Massive View Controller 的好方法,也都有各自的優缺點。因為 MVVM 比較好上手,也比較能夠拿來解釋切分權責的步驟,所以接下來我們會以 MVVM 為主,介紹 MVVM 以及怎樣拿 MVVM 來解決 Apple MVC 的問題。
開始
接下來,我們會循序引導完成下列顯示的App畫面的設計和程式碼的編寫。我們會展示一個從weatherbit取得最新資訊,並提供目前天氣摘要的App。
在開始之前,我們必需先到weatherbit網站註冊,並取得一個API Key,然後準備置入我們的App中。
我們不會從建App專案開始,你可以從這個位置取得source code。開啟專案後,從專案巡覽視窗找到WeatherbitService.swift。然後將新申請到的API Key,替換掉apiKey的值。

現在將App執行看看,它應該會顯示Neihu District(內湖區)的天氣和今天的日期。
我們會利用 MVVM 重構這個 App,但是我們已先用 MVC 來建置這個 App 的原型,然後將其重構為 MVVM 設計模式(Design Pattern),有利於大家清楚離解 Apple MVC 和 MVVM 之間的差異。
MVVM的角色和職責介紹
在進行重構之前,必須了解MVVM設計模式中的ViewModel和ViewController之間的交互作用。
ViewController僅負責更新View,並將View的輸入傳遞給ViewModel。因此,我們要將ViewController中的業務邏輯部分移除掉,改到ViewModel裡。
相反的,ViewModel需負責以下的工作:
• Model的輸入:取得View上的輸入資料,並更新Model。
• Model的輸出:將Model的輸出傳遞給ViewController。
• 資料格式化:格式化Model資料以供ViewController顯示。
認識現有的App專案結構
熟悉目前以Apple MVC設計的App專案。
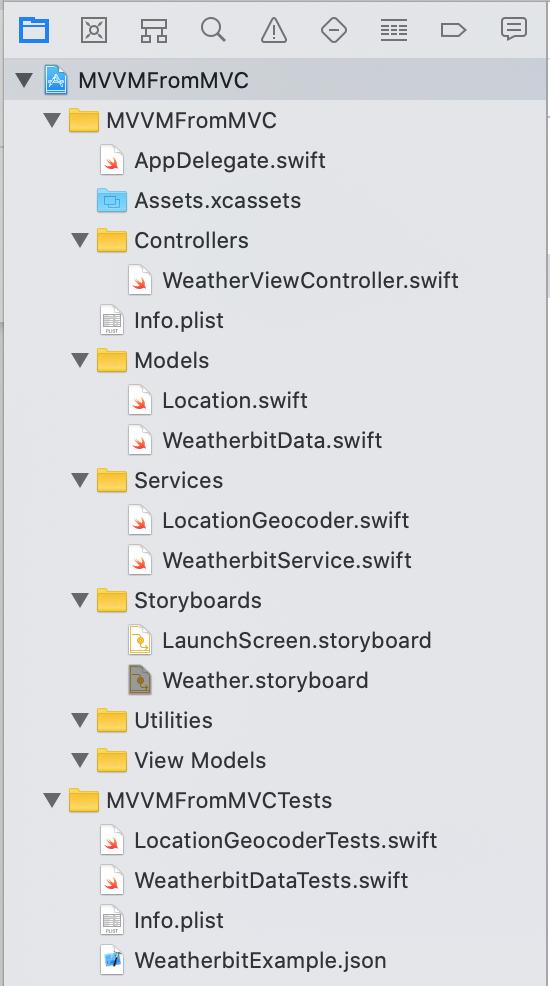
首先,開啟專案巡覽視窗,如下圖所示:

在「Controllers」之下,可以找到WeatherViewController.swift,這是要重構的ViewController,將其中關於Model和Service類型的使用移除掉。
在「Models」下,可以找到兩個不同的Model物件:Location和WeatherbitData。
WeatherbitData是表示Weatherbit API回傳的資料結構;而Location則是iOS的CLLocation回傳的GPS資料的簡化結構。
「Services」下,包含WeatherbitService.swift和LocationGeocoder.swift。顧名思義,WeatherbitService是負責從Weatherbit API取得天氣資料。而LocationGeocoder則負責將地址字串轉換成一個Location。
「Storyboards」中包含LaunchScreen和Weather兩個storyboard。
「Utilities」和「View Models」目前都是空的。我們將在重構成MVVM設計模式時用到它們。
WeatherViewController
重構時,將關注在WeatherViewController。我們先來看看它的private屬性:
  // 1
  private let geocoder = LocationGeocoder()
  // 2
  private let defaultAddress = "Neihu District"
  // 3
  private let dateFormatter: DateFormatter = {
    let dateFormatter = DateFormatter()
    dateFormatter.dateFormat = "EEEE, MMM d"
    return dateFormatter
  }()
  // 4
  private let tempFormatter: NumberFormatter = {
    let tempFormatter = NumberFormatter()
    tempFormatter.numberStyle = .none
    return tempFormatter
  }()
1. geocoder它會接受地址字串的輸入,並轉換成要發送給weatherbit API的緯度和經度。
2. defaultAddress設定預設地址。
3. dateFormatter格式化要顯示的日期格式。
4. tempFormatter用來將氣溫格式化為整數值。
現在來看看viewDidLoad():
  override func viewDidLoad() {
    geocoder.geocode(addressString: defaultAddress) { [weak self] locations in
      guard
        let self = self,
        let location = locations.first
        else {
          return
        }
      self.cityLabel.text = location.name
      self.fetchWeatherForLocation(location)
    }
}viewDidLoad()調用geocoder來轉換defaultAddress為Location。傳回的locations.name指定給cityLable.text來顯示。接著,再將Location為參數傳遞給fetchWeatherForLocation(_:)。
WeatherViewController的最後一部份是fetchWeatherForLocation(_:)的實作方法。
  func fetchWeatherForLocation(_ location: Location) {
    // 1
    WeatherbitService.weatherDataForLocation(
      latitude: location.latitude,
      longitude: location.longitude) { [weak self] (weatherData, error) in
      // 2
      guard
        let self = self,
        let weatherData = weatherData
        else {
          return
        }
      self.dateLabel.text =
        self.dateFormatter.string(from: weatherData.date)
      self.currentIcon.image = UIImage(named: weatherData.iconName)
      let temp = self.tempFormatter.string(
        from: weatherData.currentTemp as NSNumber) ?? ""
      self.currentSummaryLabel.text =
        "\(weatherData.description) - \(temp)℃"
      self.forecastSummary.text = "\nSummary: \(weatherData.description)"
    }
  }
這個方法只做兩件事:
1. 呼叫weatherbit API,並將位置的經緯度傳遞給它。
2. 使用weatherbit API傳回的天氣資料更新View。
現在我們已經對目前的App結構有比較深入的了解,可以著手開始重構了。
使用Box來綁定資料
在MVVM中,我們需要一個將ViewModel輸出綁定View的方法。因此,我們必須實作一個工具,這個工具提供一個簡單的機制來將View綁定到ViewModel的輸出值。事實上,有幾種方法可以進行這樣的綁定:
• Key-Value Observing 或 KVO:監聽Key path屬性值,並在該屬性更新時得到及時通知的機制。
• Functional Reactive Programming 或 FRP:將事件和數據當成"流"來處理的方法。Apple公司新的Combine框架就是FRP方法。RxSwift和ReactiveSwift是FRP的兩個主要流行框架。
• Delegation:使用委派方法在值更動時傳遞通知。
• Boxing:使用屬性觀察器通知觀察器值已經更改。
在這篇文章中,我們使用Boxing。對於相對簡單的App,Boxing的自定義實現已經足夠。
在「Utilities」下,新增一個Siwft文件,命名為Box。然後,編寫下面的程式碼到文件中:
final class Box<T> {
  // 1
  typealias Listener = (T) -> Void
  var listener: Listener?
  // 2
  var value: T {
    didSet {
      listener?(value)
    }
  }
  // 3
  init(_ value: T) {
    self.value = value
  }
  // 4
  func bind(listener: Listener?) {
    self.listener = listener
    listener?(value)
  }
}
這是上面程式碼的作用:
1. 每個Box都會有一個Listener,當值被更改了就會通知Box。
2. Box具有泛型值,當didSet觀察到任何的更改,就會通知Listener。
3. 初始化Box的初始值。
4. 當一個Listener在Box上調用bind(listener:)時,它會成為Listener,並且立即得到Box的當前值的通知。
新增WeatherViewModel
現在,我們已經建立了一個View和ViewModel之間進行資料綁定的機制。接著可以開始建構實際的ViewModel了,在MVVM中,ViewController不會調用任何服務或處理任何Model type,這個責任完全屬於ViewModel的。
透過將geocoder和Weatherbit服務相關程式碼從WeatherViewController的移入,開始重構WeatherViewModel。接下來,我們要將View綁定到WeatherViewController中的ViewModel屬性。
首先,在「View Models」下,新增一個名為WeatherViewModel的Switf文件,然後,加入以下程式碼:
// 1
import UIKit.UIImage
// 2
public class WeatherViewModel {
}
程式碼說明如下:
1. 引入UIKit.UIImage。我們不需要UIKit中的其他類型,所以只引入UIKit.UIImage。通常,我們不會在ViewModel裡引入UIKit。
2. 然後,將WeatherViewModel的class修飾符改為public。將其公開,以便可以進行測試。
現在,開啟WeatherViewController,新增以下的屬性:
private let viewModel = WeatherViewModel()這是在初始化ViewController裡的ViewModel。
接下來,我們將移動WeatherViewController的LocationGeocoder邏輯到WeatherViewModel。
1. 先將WeatherViewController中的defaultAddress剪下,並貼到WeatherViewModel中。然後,為這個屬性增加一個static修飾符號。
2. 接著再從WeatherViewController中剪下geocoder,並貼到WeatherViewModel中。
在WeatherViewModel中,新增一個屬性:
let locationName = Box("Loading...")上面的程式碼會讓App啟動時顯示“Loading...”,直到取得位置為止。
接下來,將下面的程式碼加入到WeatherViewModel中:
  func changeLocation(to newLocation: String) {
    locationName.value = "Loading..."
    geocoder.geocode(addressString: newLocation) { [weak self] locations in
      guard let self = self else { return }
      if let location = locations.first {
        self.locationName.value = location.name
        self.fetchWeatherForLocation(location)
        return
      }
    }
}在gecoder取得位置前,這段程式碼會將locationName.value設定為“Loading...”。當gecoder完成查詢,就會更新地點名稱並取得該位置的天氣訊息。
替換WeatherViewController.viewDidLoad()為以下程式碼:
  override func viewDidLoad() {
    viewModel.locationName.bind { [weak self] locationName in
      self?.cityLabel.text = locationName
    }
}這段程式碼是將cityLabel.text綁定到viewModel.locationName。
接下來,將WeatherViewController.swift內部的fetchWeatherForLocation(_:)刪除。
由於我們還需要一種取得某個位置的天氣資料的方法,所以,可以在WeatherViewModel.swift中重構fetchWeatherForLocation(_:),並增加一些新的內容:
  private func fetchWeatherForLocation(_ location: Location) {
    WeatherbitService.weatherDataForLocation(
    latitude: location.latitude,
    longitude: location.longitude) { [weak self] (weatherData, error) in
      guard
        let self = self,
        let weatherData = weatherData
        else {
          return
        }
    }
  }
return目前不執行任何動作,但是我們會在之後完成這個方法。
最後,在WeatherViewModel新增init():
init(){
  changeLocation(to:Self .defaultAddress)
}
這個View Model先將位置設為預設的defaultAddress。
我們已經完成了不少的重構,將service和geocoder相關的內容,從ViewContoller移到ViewModel了。可以看到ViewController顯著的縮小,同時也變得更加簡潔。
可以試試看將defaultAddress的地址做個修改,然後執行看看。

接下來,我們來解決這些問題。
在MVVM中格式化資料
在MVVM中,ViewController只負責View的顯示。ViewModel則是要負責格式化service和model類型中的資料來呈現在View中。
接下來的重構中,我們要將資料格式從WeatherViewController移到WeatherViewModel中。在這個階段,我們將會新增其他的資料綁定,以便當位置資料改變時,同時更新天氣的資料。
在WeatherViewModel中,在location之後,增加下面的程式碼:
let date = Box(" ")它一開始是一個空白字串值,在天氣資料從Weatherbit API接收到時會更新。
現在,WeatherViewModel.fetchWeatherForLocation(_:)在API取得資料的closure結束之前,增加以下的程式碼:
self.date.value = self.dateFormatter.string(from: weatherData.date)在每次天氣資料接到時,上面這段程式碼都會同步更新date。
最後,將以下程式碼加入到WeatherViewController.viewDidLoad()的末尾:
viewModel.date.bind { [weak self] date in
  self?.dateLabel.text = date
}
重新建置執行看看。

接下來,我們一步一步地來將其餘的天氣服務相關的顯示文字和資料數據綁定。首先,從WeatherViewController中,將tempFormatter剪下,貼到WeatherViewModel裡。接著,將WeatherViewModel裡剩餘可以綁定的屬性增加以下程式碼:
let icon: Box<UIImage?> = Box(nil)
let summary = Box(" ")
let forecastSummary = Box(" ")
接下來,將下面的程式碼加到WeatherViewController.viewDidLoad()的末尾:
viewModel.icon.bind { [weak self] image in
  self?.currentIcon.image = image
}

viewModel.summary.bind { [weak self] summary in
  self?.currentSummaryLabel.text = summary
}

viewModel.forecastSummary.bind { [weak self] forecast in
  self?.forecastSummary.text = forecast
}
在這裡,我們已經為天氣icon、摘要和預報摘要建立了綁定,只要box的值發生變化,就會自動通知ViewController一起更新。
現在,我們實際來更改這些Box物件內的值吧!在WeatherViewModel.swift中,把下面的程式碼加到fetchWeatherForLocation(_:)的結尾位置:
self.icon.value = UIImage(named: weatherData.iconName)
let temp = self.tempFormatter
  .string(from: weatherData.currentTemp as NSNumber) ?? ""
self.summary.value = "\(weatherData.description) - \(temp)℉"
self.forecastSummary.value = "\nSummary: \(weatherData.description)"
這些程式碼將會格式化不同的天氣資料項目,供View來顯示。
最後,將下面的程式碼加到changeLocation(to:)API fetch的closure末尾:
self.locationName.value = "Not found"
self.date.value = ""
self.icon.value = nil
self.summary.value = ""
self.forecastSummary.value = ""
如果geocoder調用後沒有回傳任何位置資料,這段程式碼可以確保不顯示天氣資料。
重新執行一次試試。
現在,所有的天氣訊息都會根據defaultAddress做更新。我們只要使用目前所在位置,然後確認資料的正確。下一步,我們要來看看MVVM如何擴充App的功能。
在MVVM中增加功能
目前為止,我們的App可以顯示程式碼中的預設位置的天氣,但是,如果我想知道其他地方的天氣呢?我們可以使用MVVM新增按鈕來顯示其他位置的天氣資料。
我們可以在App畫面的左上角發現➤符號,目前是一個沒有作用的按鈕,接下來,我們要將它連結到一個提示輸入的alert,讓使用者輸入新的位置,然後獲取新位置的天氣資料。
開啟WeatherViewController.swif,然後,在viewDidLoad()之後,class WeatherViewController結尾大括號之前,加入下列按鈕事件的程式碼:
  @IBAction func promptForLocation(_ sender: Any) {
    // 1
    let alert = UIAlertController(
      title: "Choose location",
      message: nil,
      preferredStyle: .alert)
    alert.addTextField()
    // 2
    let submitAction = UIAlertAction(
      title: "Submit",
      style: .default) { [unowned alert, weak self] _ in
        guard let newLocation = alert.textFields?.first?.text else { return }
        self?.viewModel.changeLocation(to: newLocation)
    }
    alert.addAction(submitAction)
    // 3
    present(alert, animated: true)
  }
這個方法的主要作用:
1. 產生一個UIAlertController,並將title帶入字串“Choose location”。
2. 為Submit新增一個做動作按鈕,這個動作會將新的位置字串傳遞給viewModel.changeLocation(to:)。
3. 顯示alert。
打開Weather.storyboard,然後,將➤按鈕的Touch Up Inside事件和前面的@IBAction func promptForLocation(_:)連結:

接著再次重新建置執行看看。點擊➤按鈕後,會出現提示輸入的alert,在輸入新的位置後,按下Submit,便可看到畫面呈現新的位置的天氣資訊了。

讓我們回頭看一下,我們在ViewController裡面新增的動作事件所需的程式碼並不多吧。
接下來,我們來看看如何利用MVVM來建立UnitTest。
在MVVM中進行UnitTest
MVVM比MVC更好的一個優勢在於它建立自動化測試變得更加容易。
要使用MVC測試ViewController,必須使用UIKit來建立一個ViewController的實體。然後,我們必須搜索View的層次結構才得以觸發操作並驗證結果。
在MVVM中,我們可以編寫更多常規測試。我們或許仍需要等待一些非同步事件,但是大多數事情都很容易觸發和驗證。
MVVM使測試view model簡單得多,我們會建立一個測試,讓WeatherViewModel更改位置,然後確認locationName的綁定會更新到預期位置。
首先,從專案導覽視窗切換測試導覽視窗,選擇「New Unit Test Class」。

在出現的新建文件對話視窗中,如下圖輸入「WheatherViewModelTests」,建立一個新的Unit Test Case Class。

因為我們要對專案進行Unit Test,所以,需要導入整個專案才能進行測試。請在import XCTest下面加入下面程式碼:
@testable import WeatherMVVM
然後,清除class需告內的所有預設程式碼。
接著,在WeatherViewModelTests中加入下面的方法:
    func testChangeLocationUpdatesLocationName() {
      // 1
      let expectation = self.expectation(
        description: "Find location using geocoder")
      // 2
      let viewModel = WeatherViewModel()
      // 3
      viewModel.locationName.bind {
        if $0.caseInsensitiveCompare("Richmond, VA") == .orderedSame {
          expectation.fulfill()
        }
      }
      // 4
      DispatchQueue.main.asyncAfter(deadline: .now() + 2) {
        viewModel.changeLocation(to: "Richmond, VA")
      }
      // 5
      waitForExpectations(timeout: 8, handler: nil)
    }
測試細節說明如下,:
1. locationName以非同步的方式綁定。使用expectation來等待非同步事件。
2. 建立viewModel要測試的實體。
3. 綁定到locationName且只有滿足期望值與期望結果匹配的情況。忽略任何位置名稱值,例如“ Loading…”或預設位置。只有是預期結果才能滿足測試預期。
4. 透過更改位置開始測試。必須要等待幾秒鐘,然後再進行更改,以便使所有未完成的geocoder活動先完成,這一點很重要。App啟動時,它會觸發geocoder查找。
建立ViewModel的測試實例時,它還會觸發geocoder查找。等待幾秒鐘,可以使那些其他查詢完成,然後再觸發測試查詢。
Apple的文件明確警告我們,CLLocation如果請求率過高,可能會引發錯誤。
5. 等待最多八秒鐘,以實現期望。只有在預期結果在逾時之前到達時,測試才會成功。
點擊旁邊的菱形testChangeLocationUpdatesLocationName()執行測試。測試通過時,菱形將變為綠色打勾標記。測試失敗時,則會是紅色打叉的標記。

我們可以按照上面的示範,建立其他的測試值,來確認WeatherViewModel的正確性。或是可以建立mock的測試資料文件,不依賴weatherbit API的回傳資料。
Review MVVM重構
我們已完成了對MVC架構的App的重構。當我們回顧這些更改時,可以發現重構成MVVM帶來的一些優勢:
• 降低複雜度:WeatherViewController變得更簡潔了。
• 專用:WeatherViewController不再依賴任何model類型,只專注於view的內容呈現。
• 分隔:WeatherViewController僅和WeatherViewModel進行交互溝通,如changeLocation(to:)或是以Box綁定的方式輸出資料。
• 更具表達性:WeatherViewModel將業務邏輯和視圖層邏輯分開了。
• 可維護性:增加新功能非常簡單,而對WeatherViewController的修改卻很少。
• 提升測試性:WeatherViewModel比較容易測試。
但是,MVVM會對開發者帶來的額外負擔,這是我們需要權衡的:
• 增加額外的類型:MVVM在App的結構中必須增加額外的ViewModel類型。
• 增加了綁定的機制:需要用某種綁定的機制,來降低view controller的雜亂。我們這裡用的是Box類型。
• 需建立樣板:需要額外建立樣板來實現MVVM。畢竟,Apple官方設計就是推MVC,所以,要改變這樣的事實,當然要額外建立某些東西來達成。
• 記憶體管理:將ViewModel引入結合時,必須意識到記憶體管理和保留期限的問題。
參考資料
Model-View-ViewModel with swift - SwiftyJimmy
MVVM - Writing a Testable Presentation Layer with MVVM - Brent Edwards


