利用Spring Security實作JWT驗證
What is JWT?
有鑑於同樣在昕力大學已有文章已詳細介紹過JWT,本篇就省略該部分的介紹,請各位可以直接過去看看(JSON Web Token)。
Why we need JWT?
近期接觸前後端分離的網頁架構,因為在開發上是透過API的方式來串聯前後端的資料傳遞。但是由於是前後分離的開發模式,因此資料的傳遞以及API的權限問題就免不了是直接大喇喇地攤在網路上,因此我們就遇到了誰能夠使用這個API的安全性問題。
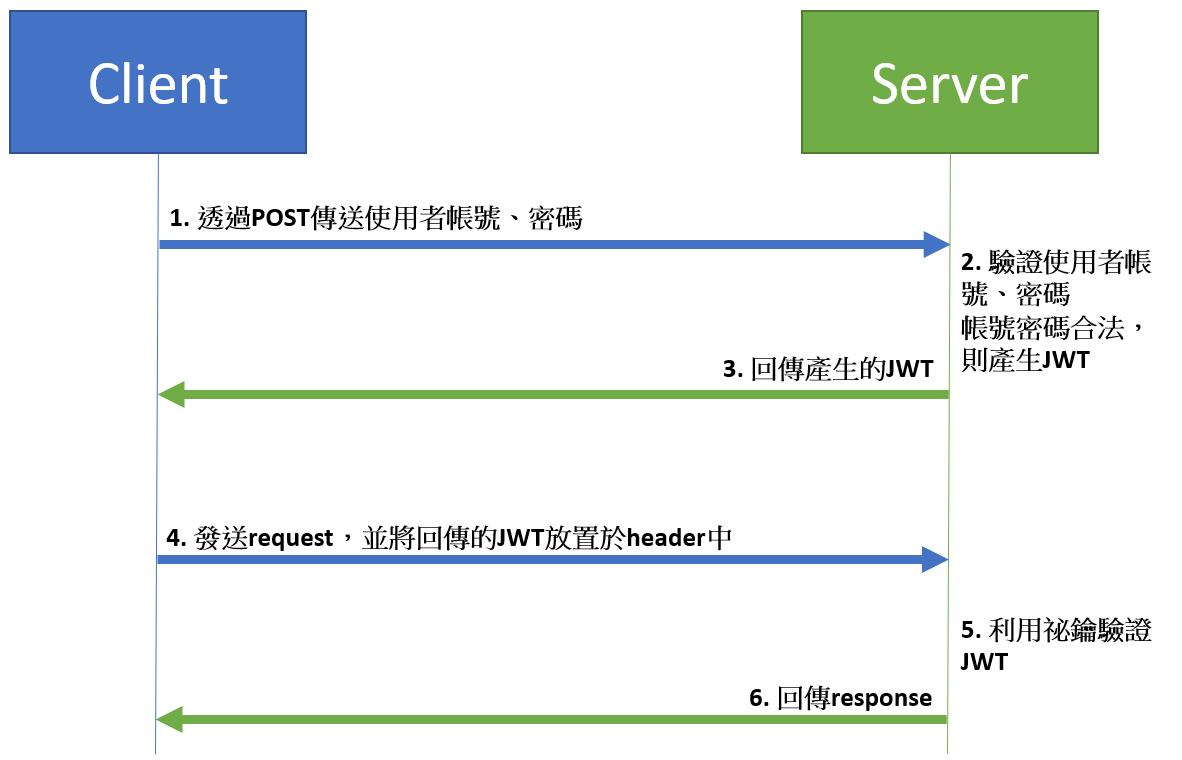
因此我們必須對所有的請求進行加密,而對請求加密的方法有很多種,而近期最流行的方法就是透過JWT進行加密。透過在每次請求時,將Token放進request head中,server會在處理請求前先驗證Token的合法性而決定是否處理請求。
實際處理流程如下圖

Spring Security and JWT Configuration
• Gradle相依性配置如下
dependencies {
	implementation 'org.springframework.boot:spring-boot-starter-data-jpa'
	implementation 'org.springframework.boot:spring-boot-starter-web'
	implementation 'org.springframework.boot:spring-boot-starter-security'
	implementation 'io.jsonwebtoken:jjwt-api:0.10.7',
			'io.jsonwebtoken:jjwt-impl:0.10.7',
            'io.jsonwebtoken:jjwt-jackson:0.10.7'
}
JWT的工具類
簡單介紹JWT是什麼以及為何需要使用JWT之後,我們就開始進入我們的正題。配置基於Spring Secrutiy的JWT,在JWT的工具類主要分兩個部分:
1. 產生JWT
前端透過POST與後端開放的/login API傳遞使用者的登入帳號及密碼。如果前端傳遞的使用者帳號密碼正確的話,伺服器會產生一組JWT並回傳給前端。
2. 驗證JWT
前端嘗試向後端發送request時,後端會判斷此request的API是否需要驗證,如果需要則會判斷request header內的JWT是否合法。
首先就來建立一個JwtUtil
import java.io.IOException;
import java.security.Key;
import java.util.Date;
import java.util.List;

import javax.servlet.http.HttpServletRequest;
import javax.servlet.http.HttpServletResponse;

import org.springframework.security.authentication.UsernamePasswordAuthenticationToken;
import org.springframework.security.core.Authentication;
import org.springframework.security.core.GrantedAuthority;
import org.springframework.security.core.authority.AuthorityUtils;

import com.thinkpower.teampractice.pojo.JSONResult;

import io.jsonwebtoken.Claims;
import io.jsonwebtoken.JwtException;
import io.jsonwebtoken.Jwts;
import io.jsonwebtoken.impl.crypto.MacProvider;


public class JwtUtil {
	static final long EXPIRATIONTIME = 432_000_000;     // 5天
    static final String TOKEN_PREFIX = "Bearer";        // Token前缀
    static final String HEADER_STRING = "Authorization";// 存放Token的Header Key
    static final Key key = MacProvider.generateKey();	//給定一組密鑰,用來解密以及加密使用


    // JWT產生方法
    public static void addAuthentication(HttpServletResponse response, Authentication user) {

    	authorize.deleteCharAt(authorize.lastIndexOf(","));
    	// 生成JWT
    	String jws = Jwts.builder()
    			// 在Payload放入自定義的聲明方法如下
    			//.claim("XXXXX",XXXXX)
    			// 在Payload放入sub保留聲明
    			.setSubject(user.getName())
    			// 在Payload放入exp保留聲明
    			.setExpiration(new Date(System.currentTimeMillis() + EXPIRATIONTIME))

    			.signWith(key).compact();
        // 把JWT傳回response
        try {
            response.setContentType("application/json");
            response.setStatus(HttpServletResponse.SC_OK);
            response.getOutputStream().println(JSONResult.fillResultString(0, user.getName(), jws));
        } catch (IOException e) {
            e.printStackTrace();
        }
    }

  // JWT驗證方法
    public static Authentication getAuthentication(HttpServletRequest request) {

        // 從request的header拿回token
        String token = request.getHeader(HEADER_STRING);

        if (token != null) {
            // 解析 Token
        	try {
        		Claims claims = Jwts.parser()
                        // 驗證
                        .setSigningKey(key)
                        // 去掉 Bearer
                        .parseClaimsJws(token.replace(TOKEN_PREFIX, ""))
                        .getBody();

                // 拿用户名
                String user = claims.getSubject();

                // 得到權限
                List<GrantedAuthority> authorities =
                		AuthorityUtils.commaSeparatedStringToAuthorityList((String) claims.get("authorize"));
                // 返回Token
                return user != null ?
						new UsernamePasswordAuthenticationToken(user, null, authorities) :
                        null;
        	} catch (JwtException ex) {
        		System.out.println(ex);
        	}

        }
        return null;
    }
以上類別就兩個static方法,分別負責產生JWT及驗證JWT。
接著創建一個WebSecurityConfig進行設定,這邊繼承WebSecurityConfigureAdapter並自行設定規則即可,僅針對JWT的地方在註解特別說明。
public class WebSecurityConfig extends WebSecurityConfigurerAdapter {

	@Autowired
	private CustomAuthenticationProvider customAuthenticationProvider;

	// 設置HTTP請求驗證
	@Override
	protected void configure(HttpSecurity http) throws Exception {
		// 因為是JWT,無須csrf驗證
		http.csrf().disable()
				// 對請求進行驗證
				.authorizeRequests()
				// 所有/login的请求放行
				.antMatchers("/login").permitAll()
			// ... 中間配置省略
				.and()
				// 添加過濾器,針對/login的請求,交給LoginFilter處理
				.addFilterBefore(new LoginFilter("/login", authenticationManager()),
						UsernamePasswordAuthenticationFilter.class)
				// 添加過濾器,針對其他請求進行JWT的驗證
				.addFilterBefore(new JWTAuthenticationFilter(), UsernamePasswordAuthenticationFilter.class);
	}

	@Override
	protected void configure(AuthenticationManagerBuilder auth) throws Exception {
		// 使用自定義的驗證
		auth.authenticationProvider(customAuthenticationProvider);
	}
}
在configure(AuthenticationManagerBuilder auth)內,我們使用我們自定義的provider,為了讓各位可以簡單上手,我也提供最簡單的provider給各位,有想深入了解其運作內容的可以在自行深入研究。
CustomAuthenticationProvider
import org.springframework.beans.factory.annotation.Autowired;
import org.springframework.security.authentication.AuthenticationProvider;
import org.springframework.security.authentication.BadCredentialsException;
import org.springframework.security.authentication.UsernamePasswordAuthenticationToken;
import org.springframework.security.core.Authentication;
import org.springframework.security.core.AuthenticationException;
import org.springframework.security.core.userdetails.UserDetails;
import org.springframework.stereotype.Service;

import com.thinkpower.teampractice.config.security.UserLoginService;
@Service
public class CustomAuthenticationProvider implements AuthenticationProvider {

	@Autowired
	private UserLoginService userLoginService;

	@Override
	public Authentication authenticate(Authentication authentication) throws AuthenticationException {
		// 獲得使用者帳號及密碼
		String account = authentication.getName();
		String password = authentication.getCredentials().toString();
		UserDetails user = userLoginService.loadUserByUsername(account);
		// 帳號密碼驗證邏輯
		if (account.equals(user.getUsername()) && password.equals(user.getPassword())) {

			// 生成Authentication令牌
			Authentication auth = new UsernamePasswordAuthenticationToken(account, password, user.getAuthorities());
			return auth;
		} else {
			throw new BadCredentialsException("Password error");
		}
	}


	@Override
	public boolean supports(Class<?> authentication) {
		return authentication.equals(UsernamePasswordAuthenticationToken.class);
	}
}
其中UserLoginService是透過帳號去與資料庫獲得此帳號登入所需的資訊。
接著我們針對兩個過濾器進行講解
LoginFilter
import java.io.IOException;

import javax.servlet.FilterChain;
import javax.servlet.ServletException;
import javax.servlet.http.HttpServletRequest;
import javax.servlet.http.HttpServletResponse;

import org.json.JSONObject;
import org.springframework.security.authentication.AuthenticationManager;
import org.springframework.security.authentication.UsernamePasswordAuthenticationToken;
import org.springframework.security.core.Authentication;
import org.springframework.security.core.AuthenticationException;
import org.springframework.security.web.authentication.AbstractAuthenticationProcessingFilter;
import org.springframework.security.web.util.matcher.AntPathRequestMatcher;

import com.thinkpower.teampractice.pojo.JSONResult;
import com.thinkpower.teampractice.service.TokenAuthenticationService;


public class LoginFilter extends AbstractAuthenticationProcessingFilter{

	public JWTLoginFilter(String url, AuthenticationManager authManager) {
        super(new AntPathRequestMatcher(url));
        setAuthenticationManager(authManager);
    }
    @Override
    public Authentication attemptAuthentication(
            HttpServletRequest req, HttpServletResponse res)
            throws AuthenticationException, IOException, ServletException {

    	String username = req.getParameter("username");
        String password = req.getParameter("password");

        if (username == null) {
            username = "";
        }

        if (password == null) {
            password = "";
        }

        username = username.trim();
        // 觸發AuthenticationManager
        return getAuthenticationManager().authenticate(
                new UsernamePasswordAuthenticationToken(
                		username,password
                )
        );
    }

    @Override
    protected void successfulAuthentication(
            HttpServletRequest req,
            HttpServletResponse res, FilterChain chain,
            Authentication auth) throws IOException, ServletException {
    	// 登入成功,將token透過JwtUtil放到res中
        JwtUtil.addAuthentication(res, auth);
    }


    @Override
    protected void unsuccessfulAuthentication(HttpServletRequest request, HttpServletResponse response, AuthenticationException failed) throws IOException, ServletException {

        response.setContentType("application/json");
        response.setStatus(HttpServletResponse.SC_UNAUTHORIZED);
        response.getOutputStream().println(JSONResult.fillResultString(401, "Loing error!!!", JSONObject.NULL));
    }
}
此LoginFilter繼承AbstractAuthenticationProcessingFilter負責/login的請求進行驗證,此方法包含一個abstract的attemptAuthentication的方法,而我們在子類重寫這個驗證方法。最後呼叫 AuthenticationManager 的 authenticate 方法進行驗證,如果驗證成功則會呼叫successfulAuthentication()這個方法內的JwtUtil去取得產生的token。
JWTAuthenticationFilter
import java.io.IOException;

import javax.servlet.FilterChain;
import javax.servlet.ServletException;
import javax.servlet.ServletRequest;
import javax.servlet.ServletResponse;
import javax.servlet.http.HttpServletRequest;

import org.springframework.security.core.Authentication;
import org.springframework.security.core.context.SecurityContextHolder;
import org.springframework.web.filter.GenericFilterBean;

import com.thinkpower.teampractice.service.TokenAuthenticationService;

public class JWTAuthenticationFilter extends GenericFilterBean{

	@Override
    public void doFilter(ServletRequest request,
                         ServletResponse response,
                         FilterChain filterChain)
            throws IOException, ServletException {

		//驗證token,獲得授權
        Authentication authentication = JwtUtil
                .getAuthentication((HttpServletRequest)request);

        SecurityContextHolder.getContext()
                .setAuthentication(authentication);
        filterChain.doFilter(request,response);
    }

}
此Filter就是負責除了/login以外其他受到Spring Security保護的url,也就是需要攜帶JWT來進行驗證後才可以使用的API,而解析過程已放在JwtUtil之中。
透過以上類別的設定即為最簡便的Spring security with JWT


