Spring MVC 5 + Spring Security 5 + Hibernate 5 整合實作(輕輕鬆鬆入門篇)
一、前言
Spring MVC、Spring Security與Hibernate 是很常見的Framework,雖然在網路可以找到整合這三個Framework的教學,但有些教學過於精簡或是複雜導致部份開發經驗不足的讀者沒有成功實作出來,而這次筆者將以step by step 方式引導經驗不足的讀者整合時做出來。
二、Framework框架簡略介紹
因為有些初學者可能沒有聽過Spring MVC、Spring Security與Hibernate框架,所以筆者就簡單說明一下它們的主要作用,讓各位讀者有初步的認識,不會深及原理與運作。
1.Spring MVC框架:提供建構 Web 應用程式的 MVC架構,MVC架構可分為控制器(Controller)、視圖(View)與模型(Model)三個部分,開發人員可以依據自身的專長負責其中一個部分。
a.控制器(Controller):負責轉發request請求,導向View。
b.視圖(View):畫面介面設計。
c.模型(Model):設計商業邏輯演算法。
2.Spring Security框架:提供Spring MVC的安全管理機制,限制管理使用者存取的控制器(Controller)權限。
3.Hibernate框架:提供關聯式資料庫中的表格與表格之間的關係,轉換對應成Java中物件與物件關係的自動對應轉換方案。讓開發人員透過操作Java物件來新增、修改與刪除資料。
三、建立資料表
a.以MySQL 5.7 版本為示範資料庫。
b.需要建立兩個資料表,第一個資料表是紀錄有關使用者資料,第二個資料表是紀錄有關使用者權限資料。
c. 使用者資料Schema建立Script:
CREATE TABLE `min`.`user` (
  `user_seq` INT NOT NULL AUTO_INCREMENT,
  `user_name` VARCHAR(45) NOT NULL,
  `password` VARCHAR(45) NOT NULL,
  PRIMARY KEY (`user_seq`));
d. 使用者權限Schema建立Script:
CREATE TABLE `min`.`role` (
  `role_seq` INT NOT NULL AUTO_INCREMENT,
  `user_seq` INT NOT NULL,
  `role_name` VARCHAR(45) NOT NULL,
  PRIMARY KEY (`role_seq`));
e.建立使用者資料Script:
INSERT INTO min.`user`
(
  user_name,
  password
)
VALUES
(
  'thinkpower',
  '12345'
);
f.建立使用者權限資料Script:
INSERT INTO min.role
(
  user_seq,
  role_name
)
VALUES
(
  (SELECT user_seq
   FROM min.`user`
   WHERE min.`user`.user_name = 'thinkpower'),
  'ROLE_ADMIN'
)
四、建立Maven專案
a.使用Eclipse建立Maven專案。
b.使用最新版本的Spring MVC、Spring Security與Hibernate, pom.xml的設定如下。
<project xmlns="http://maven.apache.org/POM/4.0.0"
	xmlns:xsi="http://www.w3.org/2001/XMLSchema-instance"
	xsi:schemaLocation="http://maven.apache.org/POM/4.0.0 http://maven.apache.org/maven-v4_0_0.xsd">
	<modelVersion>4.0.0</modelVersion>
	<groupId>tw.com.min</groupId>
	<artifactId>spring</artifactId>
	<packaging>war</packaging>
	<version>0.0.1-SNAPSHOT</version>
	<name>spring Maven Webapp</name>
	<url>http://maven.apache.org</url>
	<dependencies>

		<!-- https://mvnrepository.com/artifact/org.springframework/spring-webmvc -->
		<dependency>
			<groupId>org.springframework</groupId>
			<artifactId>spring-webmvc</artifactId>
			<version>5.1.6.RELEASE</version>
		</dependency>

		<!-- https://mvnrepository.com/artifact/org.springframework.security/spring-security-web -->
		<dependency>
			<groupId>org.springframework.security</groupId>
			<artifactId>spring-security-web</artifactId>
			<version>5.1.5.RELEASE</version>
		</dependency>

		<!-- https://mvnrepository.com/artifact/org.springframework.security/spring-security-config -->
		<dependency>
			<groupId>org.springframework.security</groupId>
			<artifactId>spring-security-config</artifactId>
			<version>5.1.5.RELEASE</version>
		</dependency>

		<!-- https://mvnrepository.com/artifact/org.springframework/spring-orm -->
		<dependency>
			<groupId>org.springframework</groupId>
			<artifactId>spring-orm</artifactId>
			<version>5.1.6.RELEASE</version>
		</dependency>

		<!-- https://mvnrepository.com/artifact/org.hibernate/hibernate-core -->
		<dependency>
			<groupId>org.hibernate</groupId>
			<artifactId>hibernate-core</artifactId>
			<version>5.4.2.Final</version>
		</dependency>

		<!-- https://mvnrepository.com/artifact/org.hibernate/hibernate-c3p0 -->
		<dependency>
			<groupId>org.hibernate</groupId>
			<artifactId>hibernate-c3p0</artifactId>
			<version>5.4.2.Final</version>
		</dependency>

		<!-- https://mvnrepository.com/artifact/javax.servlet/javax.servlet-api -->
		<dependency>
			<groupId>javax.servlet</groupId>
			<artifactId>javax.servlet-api</artifactId>
			<version>4.0.1</version>
			<scope>provided</scope>
		</dependency>

		<!-- https://mvnrepository.com/artifact/javax.servlet.jsp.jstl/javax.servlet.jsp.jstl-api -->
		<dependency>
			<groupId>javax.servlet.jsp.jstl</groupId>
			<artifactId>javax.servlet.jsp.jstl-api</artifactId>
			<version>1.2.2</version>
		</dependency>

		<!-- https://mvnrepository.com/artifact/mysql/mysql-connector-java -->
		<dependency>
			<groupId>mysql</groupId>
			<artifactId>mysql-connector-java</artifactId>
			<version>5.1.47</version>
		</dependency>


	</dependencies>
	<build>
		<finalName>spring</finalName>
		<plugins>
			<plugin>
				<artifactId>maven-compiler-plugin</artifactId>
				<configuration>
					<source>1.8</source>
					<target>1.8</target>
				</configuration>
			</plugin>
		</plugins>
	</build>
</project>
五、設定web.xml
a.為了使用Servlet 3.1,所以web.xml設定如下。
<?xml version="1.0" encoding="UTF-8"?>

<web-app version="3.1" xmlns="http://java.sun.com/xml/ns/javaee"
	xmlns:xsi="http://www.w3.org/2001/XMLSchema-instance"
	xsi:schemaLocation="http://java.sun.com/xml/ns/javaee http://java.sun.com/xml/ns/javaee/web-app_3_1.xsd">
	<display-name>Archetype Created Web Application</display-name>
</web-app>
b.因為是使用Servlet 3.1,所以tomcat版本需要使用8.5.x以上。
六、設定Hibernate的資料庫連線資訊
在src/main/resources目錄下,建立一個名稱為db.properties檔案,內容如下。
# MySQL資料庫連線資訊
mysql.driver=com.mysql.jdbc.Driver
mysql.jdbcUrl=jdbc:mysql://localhost:3306/min?useUnicode=true&characterEncoding=UTF-8&useSSL=falsemysql.username=root
mysql.password=root
#C3P0 連接池(Connection Pool)設定
connectionPool.min_size=10
connectionPool.max_size=20
connectionPool.timeout=600
七、建立資料庫設定物件
主要會讀取db.properties檔案內的設定Hibernate有關資料庫設定,透過LocalSessionFactoryBean來建立Hibernate SessionFactory。
package config;

import java.util.Properties;

import org.springframework.beans.factory.annotation.Autowired;
import org.springframework.context.annotation.Bean;
import org.springframework.context.annotation.ComponentScan;
import org.springframework.context.annotation.ComponentScans;
import org.springframework.context.annotation.Configuration;
import org.springframework.context.annotation.PropertySource;
import org.springframework.core.env.Environment;
import org.springframework.orm.hibernate5.HibernateTransactionManager;
import org.springframework.orm.hibernate5.LocalSessionFactoryBean;
import org.springframework.transaction.annotation.EnableTransactionManagement;

import entity.Role;
import entity.User;

import static org.hibernate.cfg.Environment.*;

@Configuration
@PropertySource("classpath:db.properties")
@EnableTransactionManagement
@ComponentScans(value = { @ComponentScan("dao"), @ComponentScan("service") })
public class DBConfig {

	@Autowired
	private Environment env;

	@Bean
	public LocalSessionFactoryBean getSessionFactory() {
		LocalSessionFactoryBean factoryBean = new LocalSessionFactoryBean();

		Properties props = new Properties();

		props.put(DRIVER, env.getProperty("mysql.driver"));
		props.put(URL, env.getProperty("mysql.jdbcUrl"));
		props.put(USER, env.getProperty("mysql.username"));
		props.put(PASS, env.getProperty("mysql.password"));

		props.put(C3P0_MIN_SIZE, env.getProperty("connectionPool.min_size"));
		props.put(C3P0_MAX_SIZE, env.getProperty("connectionPool.max_size"));
		props.put(C3P0_TIMEOUT, env.getProperty("connectionPool.timeout"));

		factoryBean.setHibernateProperties(props);
		//factoryBean.setAnnotatedClasses(User.class, Role.class);
		factoryBean.setPackagesToScan("entity");
		return factoryBean;
	}

	@Bean
	public HibernateTransactionManager getTransactionManager() {
		HibernateTransactionManager transactionManager = new HibernateTransactionManager();
		transactionManager.setSessionFactory(getSessionFactory().getObject());
		return transactionManager;
	}
}
八、建立Entity資料庫物件
a.建立使用者Entity如下。
package entity;

import javax.persistence.Column;
import javax.persistence.Entity;
import javax.persistence.Id;
import javax.persistence.Table;

@Entity
@Table(name = "user")
public class User {

	@Id
	@Column(name = "user_seq")
	private Integer userSeq;

	@Column(name = "user_name")
	private String userName;

	@Column(name = "password")
	private String password;

	public Integer getUserSeq() {
		return userSeq;
	}

	public void setUserSeq(Integer userSeq) {
		this.userSeq = userSeq;
	}

	public String getUserName() {
		return userName;
	}

	public void setUserName(String userName) {
		this.userName = userName;
	}

	public String getPassword() {
		return password;
	}

	public void setPassword(String password) {
		this.password = password;
	}

}
b.建立權限Entity如下。
package entity;

import javax.persistence.Column;
import javax.persistence.Entity;
import javax.persistence.Id;
import javax.persistence.Table;

@Entity
@Table(name = "role")
public class Role {

	@Id
	@Column(name = "role_seq")
	private Integer roleSeq;

	@Column(name = "user_seq")
	private Integer userSeq;

	@Column(name = "role_name")
	private String roleName;

	public Integer getRoleSeq() {
		return roleSeq;
	}

	public void setRoleSeq(Integer roleSeq) {
		this.roleSeq = roleSeq;
	}

	public Integer getUserSeq() {
		return userSeq;
	}

	public void setUserSeq(Integer userSeq) {
		this.userSeq = userSeq;
	}

	public String getRoleName() {
		return roleName;
	}

	public void setRoleName(String roleName) {
		this.roleName = roleName;
	}

}
九、建立DAO資料庫存取物件
可以透過此物件對資料庫進行存取作業。
a.建立使用者DAO介面。
package dao;

import entity.User;

public interface UserDao {
	public User findByUsername(String username, String password);
}
b.實作使用者DAO物件。
package dao;

import java.util.Iterator;

import javax.persistence.Query;

import org.hibernate.Session;
import org.hibernate.SessionFactory;
import org.springframework.beans.factory.annotation.Autowired;
import org.springframework.stereotype.Repository;
import org.springframework.transaction.annotation.Transactional;

import entity.User;

@Repository
public class UserDaoImp implements UserDao {

	@Autowired
	private SessionFactory sessionFactory;

	 @Transactional(readOnly = true)
	public User findByUsername(String username, String password) {
		Session session = sessionFactory.getCurrentSession();
		Query query = session.createNativeQuery("SELECT * FROM user WHERE user_name = :user_name AND password = :password ", User.class);
		query.setParameter("user_name", username);
		query.setParameter("password", password);
		Iterator iterator = query.getResultList().iterator();
		User user = null;
		while (iterator.hasNext()) {
			user = (User) iterator.next();
		}
		return user;
	}

}
b.建立權限DAO介面。
package dao;

import java.util.List;

import entity.Role;

public interface RoleDao {
	public List<Role> findByUserSeq(int userSeq);
}
b.實作權限DAO物件。
package dao;

import java.util.List;

import javax.persistence.Query;

import org.hibernate.Session;
import org.hibernate.SessionFactory;
import org.springframework.beans.factory.annotation.Autowired;
import org.springframework.stereotype.Repository;
import org.springframework.transaction.annotation.Transactional;

import entity.Role;
import entity.User;

@Repository
public class RoleDaoImp implements RoleDao {

	@Autowired
	private SessionFactory sessionFactory;

	 @Transactional(readOnly = true)
	public List<Role> findByUserSeq(int userSeq) {
		Session session = sessionFactory.getCurrentSession();
		Query query = session.createNativeQuery("SELECT * FROM role WHERE user_seq = :user_seq  ", Role.class);
		query.setParameter("user_seq", userSeq);
		return (List<Role>)query.getResultList();
	}

}
十、建立Authentication Service物件
主要Spring Security用來驗證帳號是否正確,並賦予帳號相對應的權限。
package service;

import java.util.List;

import org.springframework.beans.factory.annotation.Autowired;
import org.springframework.security.authentication.AuthenticationProvider;
import org.springframework.security.authentication.UsernamePasswordAuthenticationToken;
import org.springframework.security.core.Authentication;
import org.springframework.security.core.AuthenticationException;
import org.springframework.security.core.GrantedAuthority;
import org.springframework.security.core.authority.AuthorityUtils;
import org.springframework.stereotype.Service;

import dao.RoleDao;
import dao.UserDao;
import entity.Role;
import entity.User;

@Service
public class AuthenticationService implements AuthenticationProvider {

	@Autowired
	private UserDao userDao;

	@Autowired
	private RoleDao roleDao;

	@Override
	public Authentication authenticate(Authentication authentication) throws AuthenticationException {
		String name = authentication.getName();
		String password = authentication.getCredentials().toString();
		User user = userDao.findByUsername(name, password);
		if (user != null) {

			List<Role> roleList = roleDao.findByUserSeq(user.getUserSeq());
			if (!roleList.isEmpty()) {
				String[] roleArr = new String[roleList.size()];
				for (int i = 0; i < roleList.size(); i++) {
					roleArr[i] = roleList.get(0).getRoleName();
				}
				List<GrantedAuthority> grantedAuthority = AuthorityUtils.createAuthorityList(roleArr);
				return new UsernamePasswordAuthenticationToken(name, password, grantedAuthority);
			}
		}
		return null;
	}

	public boolean supports(Class<?> authentication) {
		return authentication.equals(UsernamePasswordAuthenticationToken.class);
	}

}
十一、Spring Security設定
a.主要設定網址的存取權限與驗證方式。
package config;

import org.springframework.beans.factory.annotation.Autowired;
import org.springframework.security.config.annotation.authentication.builders.AuthenticationManagerBuilder;
import org.springframework.security.config.annotation.web.builders.HttpSecurity;
import org.springframework.security.config.annotation.web.configuration.EnableWebSecurity;
import org.springframework.security.config.annotation.web.configuration.WebSecurityConfigurerAdapter;

import service.AuthenticationService;

@EnableWebSecurity
public class SecurityConfig extends WebSecurityConfigurerAdapter {

	@Autowired
	private AuthenticationService authenticationService;

	@Override
	protected void configure(AuthenticationManagerBuilder auth) throws Exception {
		auth.authenticationProvider(authenticationService);
	}

	@Override
	protected void configure(HttpSecurity http) throws Exception {
		http.authorizeRequests().anyRequest().hasAnyRole("ADMIN")
		.and().authorizeRequests().antMatchers("/login**").permitAll()
		.and().formLogin().loginPage("/login").loginProcessingUrl("/loginAction").permitAll()
		.and().logout().logoutSuccessUrl("/login").permitAll();
	}
}
b.建立一個物件並繼承AbstractSecurityWebApplicationInitializer註冊springSecurityFilterChain filter。
package config;

import org.springframework.security.web.context.AbstractSecurityWebApplicationInitializer;

public class SecurityInitializer extends AbstractSecurityWebApplicationInitializer {
}
十二、Spring MVC設定
設定JSP為view resolver,並使用addViewControllers()建立一個預設的login頁面。
package config;

import org.springframework.context.annotation.ComponentScan;
import org.springframework.context.annotation.Configuration;
import org.springframework.web.servlet.config.annotation.EnableWebMvc;
import org.springframework.web.servlet.config.annotation.ViewControllerRegistry;
import org.springframework.web.servlet.config.annotation.ViewResolverRegistry;
import org.springframework.web.servlet.config.annotation.WebMvcConfigurer;

@Configuration
@EnableWebMvc
@ComponentScan(basePackages = { "controller" })
public class WebConfig implements WebMvcConfigurer {
	@Override
	public void configureViewResolvers(ViewResolverRegistry registry) {
		registry.jsp().prefix("/WEB-INF/views/").suffix(".jsp");
	}

	@Override
	public void addViewControllers(ViewControllerRegistry registry) {
		registry.addViewController("/login").setViewName("login");
	}
}
十三、建立Controller
導向index首頁。
package controller;

import java.security.Principal;

import org.springframework.stereotype.Controller;
import org.springframework.ui.Model;
import org.springframework.web.bind.annotation.GetMapping;

@Controller
public class IndexContoller {

	@GetMapping("/")
	public String index(Model model, Principal principal) {
		model.addAttribute("message", "登入者姓名 " + principal.getName());
		return "index";
	}
}
十四、應用程式初始化設定
主要在初始化時候,會載入資料庫(DBConfig.java)、Spring Security(SecurityConfig.java)與Spring Web MVC(WebConfig.java)的設定。
package config;

import org.springframework.web.servlet.support.AbstractAnnotationConfigDispatcherServletInitializer;

public class SpringInitializer extends AbstractAnnotationConfigDispatcherServletInitializer {

	@Override
	protected Class<?>[] getRootConfigClasses() {
		return new Class[] { DBConfig.class, SecurityConfig.class };
	}

	@Override
	protected Class<?>[] getServletConfigClasses() {
		return new Class[] { WebConfig.class };
	}

	@Override
	protected String[] getServletMappings() {
		return new String[] { "/" };
	}
}
十五、建立JSP網頁
a.在src\main\webapp\WEB-INF\views目錄下,建立名稱為login.jsp的網頁
<%@ page language="java" contentType="text/html; charset=UTF-8"
    pageEncoding="UTF-8"%>
<%@taglib uri="http://www.springframework.org/tags" prefix="spring"%>
<!DOCTYPE html>
<html>
<head>
<meta http-equiv="Content-Type" content="text/html; charset=UTF-8">
<title>min</title>
</head>
<body>

	<h1>Spring MVC 5 + Spring Security 5 + Hibernate 5 輕輕鬆鬆入門</h1>
	<h4>登入頁面</h4>

	<form action='<spring:url value="/loginAction"/>' method="post">
    <table>
      <tr>
        <td>Username</td>
        <td><input type="text" name="username"></td>
      </tr>
      <tr>
        <td>Password</td>
        <td><input type="password" name="password"></td>
      </tr>
      <tr>
        <td>
        <button type="submit">Login${1+1}</button>
        <input type="hidden" name="${_csrf.parameterName}" value="${_csrf.token}"/>
        </td>
      </tr>
    </table>
  </form>
  <br/>
</body>
</html>
b.在src\main\webapp\WEB-INF\views目錄下,建立名稱為index.jsp的網頁
<%@ page language="java" contentType="text/html; charset=UTF-8"
    pageEncoding="UTF-8"%>
<%@taglib uri="http://www.springframework.org/tags" prefix="spring"%>
<!DOCTYPE html>
<html>
<head>
<meta http-equiv="Content-Type" content="text/html; charset=UTF-8">
<title>min</title>
</head>
<body>
	<h1>Spring MVC 5 + Spring Security 5 + Hibernate 5 輕輕鬆鬆入門s</h1>
	<h2>${message}</h2>

	<form action='<spring:url value="/logout"/>' method="post">
		<input value="Logout" type="submit">
		<input type="hidden" name="${_csrf.parameterName}" value="${_csrf.token}"/>
	</form>
</body>
</html>
十六、執行畫面
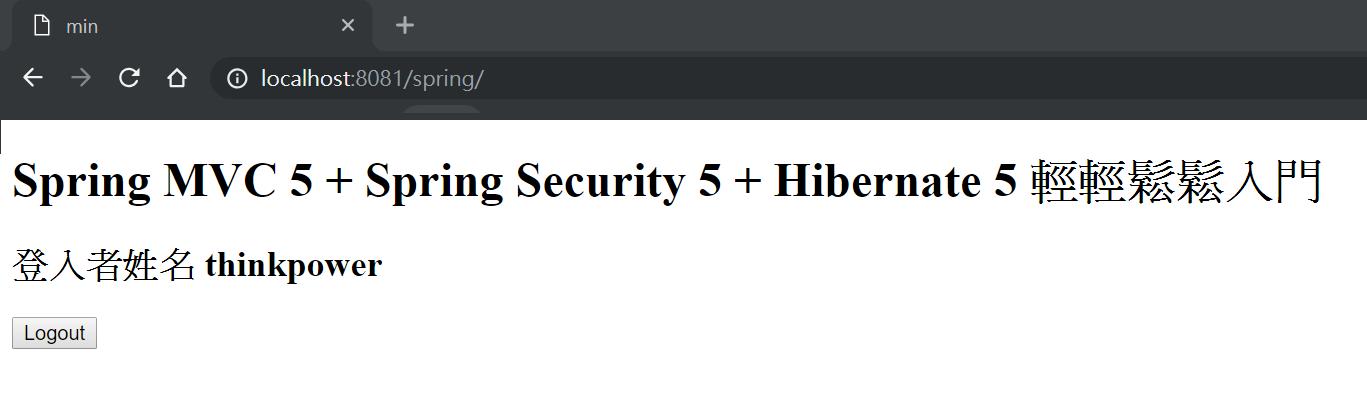
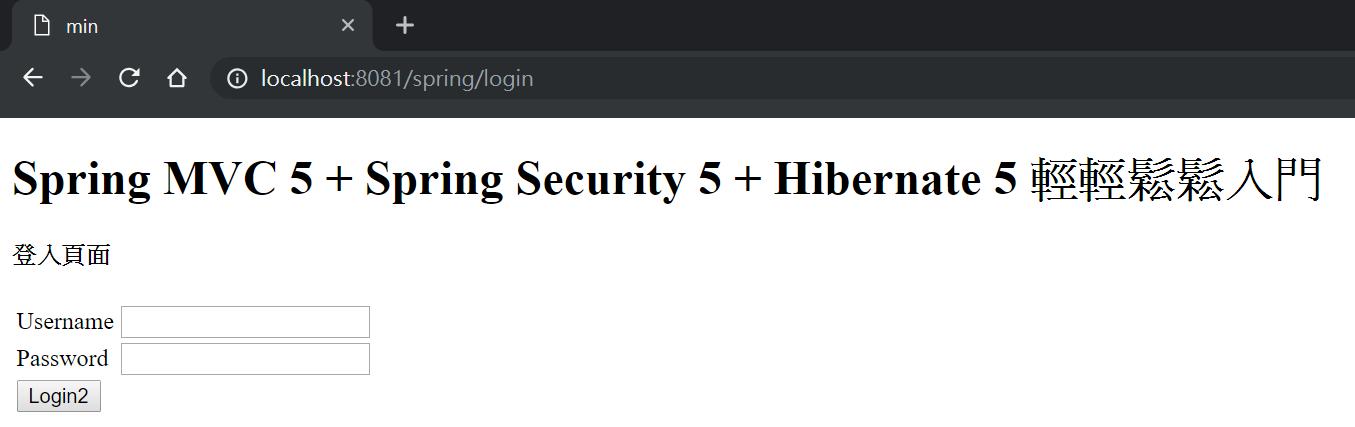
a.登入http://localhost:8080/spring/ 。
b.因為沒有經過帳號認證,所以會被Spring Security導向login.jsp畫面如下圖。在username欄位輸入thinkpower,password欄位輸入12345進行登入。
c.成功登入會如下圖。